Accountant Preferences
There are a host of preferences that you can configure for the Accountant module in Zoho Books.
- Click Settings on the top right corner of the page.
- Click Accountant under Preferences.
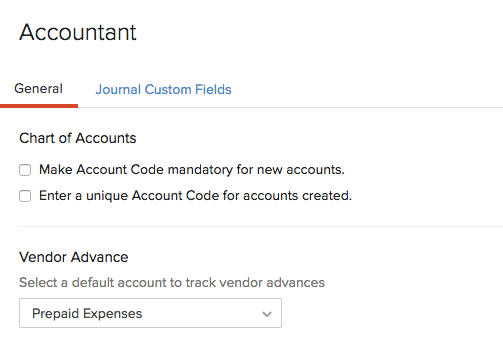
Chart of Accounts
An account code is a code assigned to an account under the Chart of Accounts. It can be used to quickly retrieve accounts in an organisation while creating transactions. You can use the same or different account codes for all the accounts (under Chart of Accounts) in Zoho Books.
Make account code mandatory
Whenever you create a new account in the Chart of Accounts, you can choose to make the account code of that account a mandatory field.
Unique account code for accounts
When you create a new account in the Chart of Accounts, you can make sure that the account code is unique and is not used for any other account.
Vendor Advance
Select a default account which tracks your vendor advances.
Revenue Accounts Mapping
With Revenue Accounts Mapping, you can easily track and record revenue under different accounts in your Zoho Books organisation. When you select an item in a transaction’s creation page, the appropriate account is automatically chosen, and the revenue for that item is recorded in that account. For example, when selling an item with a 19% tax rate, the account revenue 19% VAT will be auto-selected.
Note: This feature is only applicable to Invoices, Recurring Invoices and Credit Notes.
Enable Revenue Accounts Mapping
To enable Revenue Accounts Mapping:
- Go to Settings in the top right corner.
- Select Accountant under Preferences.
- Navigate to the General tab.
- Enable the Map revenue accounts to track based on VAT rates, regions, and product types option under Revenue Accounts Mapping.
Once the feature is enabled, selecting an item in a transaction will automatically select the corresponding account for tracking the revenue and if it doesn’t, you can map the accounts manually.
Configure Accounts
If the default mapping doesn’t match your accounting or business requirements, you can configure the accounts to be automatically populated in your transactions. To do this:
- Go to Settings in the top-right corner.
- Select Accountant under Preferences.
- Navigate to the General tab.
- Click Configure Accounts under Revenue Accounts Mapping.
- Select the accounts.
- Click Save.
You will be displayed with the accounts and their descriptions.
- Click the account that you want to change, and select another account from the dropdown.
- Click Save.
Note: The accounts you configure here will be automatically populated based on the selected VAT treatment, VAT, Product type, and the application of the domestic reverse charge at the line-item level of your transactions. When you edit any of these, the account will be updated accordingly.
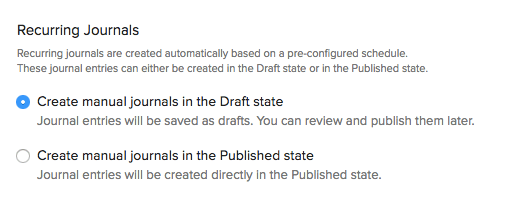
Recurring Journals
If you have not enabled recurring journals, you can do it from the General section under preferences.
After you enable it, you can choose how recurring journals are saved. Recurring journals are created automatically based on a pre-configured schedule. These journal entries can either be created two states:
Draft
Journal entries will be saved as drafts. You can review and publish them later.
Published
Journal entries will be created directly in the Published state.
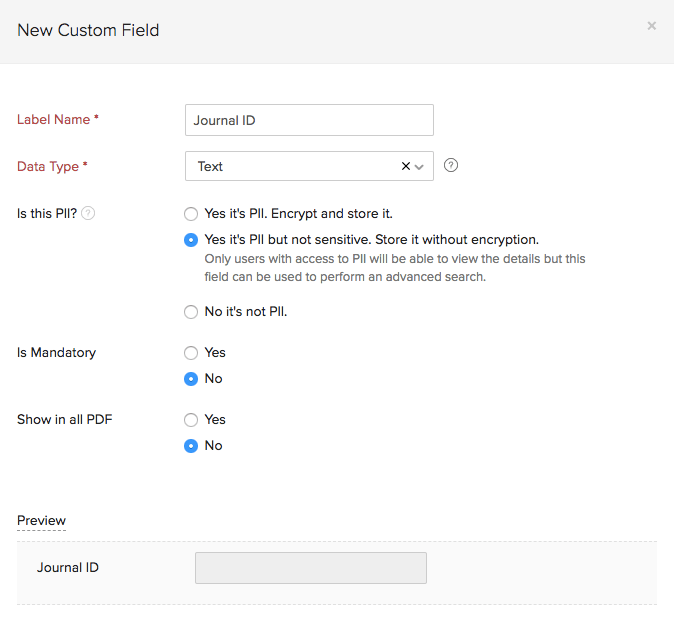
Journal Custom Fields
You can add multiple custom fields for your journal entries in Zoho Books.
- Click Settings on the top right corner of the page.
- Click Accountant under Preferences.
- Click the Journal Custom Fields tab on the top of the page.
- Click + New Custom Field on the top right corner of the page.

- Fill in the following details.
| Fields | Description |
|---|---|
| Label name | Enter a name for your custom field. |
| Data Type | Select the appropriate data type for your custom field. |
| Is this PII? | If the field contains Personally Identifiable Information (PII) such as personal data, then select the appropriate method to store it. |
| Is Mandatory | Select this option if the custom field is mandatory while recording payments. |
| Show in all PDF | Select this option if you want the field to be displayed in your transaction PDFs. |
- Click Save.
 Yes
No
Yes
No

Thank you for your feedback!