Blueprints
Blueprints are the online representation of a business process. In Zoho Books, you can use Blueprints to design a process flow using states and transitions. They guide your team through the workflow, validate essential information, and automate the business processes managed via Custom Modules. Let’s understand this better with the help of a scenario.
Scenario: Zylker uses Zoho Books. To keep track of the items requested by employees, Bailey, Zylker’s Chief Procurement Manager, uses the Custom Modules feature to create a Purchase Requests module. To set up an approval process for the requests raised by users, she uses the Blueprints feature in Custom Modules and designs a process flow for approval using States and Transitions. Now, whenever a user creates a purchase request, the Blueprints section is displayed on the request’s Details page, and users with access to execute the transitions (transition owners) can approve or reject the requests by clicking the respective transitions.
Note: This feature is only available in certain plans of Zoho Books. Visit our pricing page to see if it is available in your plan.
Terms to Remember
Before you begin creating a blueprint, read the following terms and their definitions as they are key to understanding how the feature works.
- State: Each option added to the dropdown field created for the blueprint is called a State. Each state represents the various statuses a record may go through after entering a blueprint. For example, in the Purchase Requests module scenario mentioned earlier, the various approval stages (Submit for Approval, Approve, and Reject) are the states of the blueprint used in this help document.
- Transition: A Transition is the link between two states within a process. It defines the conditions required for a record to move from one state to another. Transitions guide users by prompting them to complete specific tasks, such as entering mandatory fields, attaching documents, or adding notes, ensuring that all necessary actions are taken before progressing to the next stage.
- Transition Owners: Transition Owners are the users who can view and execute a specific transition between stages in a blueprint.
- Service Level Agreement (SLA): A Service Level Agreement (SLA) is the duration for which a blueprint can remain in a particular state. Using an SLA, you can configure immediate actions to be performed if the blueprint is still in its current state after the specified period. You can also configure actions to be taken before and after an SLA.
Create a Blueprint
Creating a blueprint involves the following processes:
- Enter Basic Information
- Design the Blueprint’s Process Flow
- Configure SLA for a State
- Create a Transition
Enter Basic Information
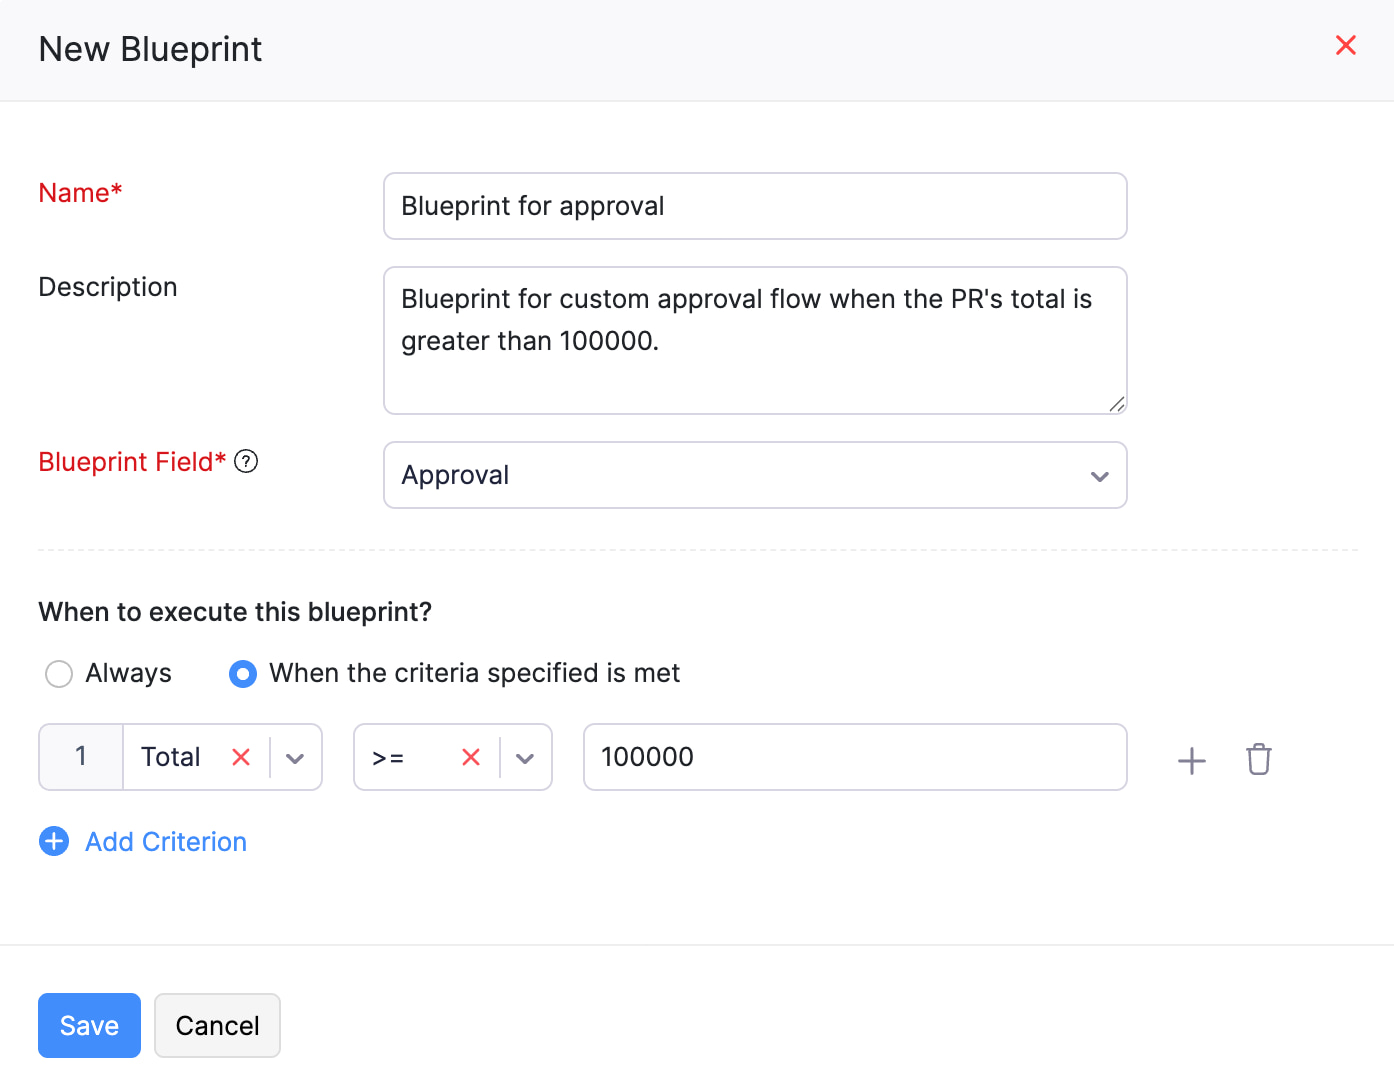
Here’s how you can create a blueprint:
- Go to Settings in the top right corner of the page.
- Select the required custom module under Custom Modules.
- Go to the Blueprints tab.
- Click + New Blueprint in the top right corner of the page.
- Enter the blueprint’s Name and provide a Description if required.
- Select a Blueprint Field.
Note: You can only select fields of the dropdown data type from Blueprint Field. This is because, when a record enters a blueprint, only options from the dropdown field can be used to trigger the required transition.
- Choose whether the blueprint should be executed based on criteria in When to execute the blueprint? Select When the specified criteria are met if the blueprint should be executed based on criteria, and enter the criteria. Select Always if not.
- Click Save. You’ll be redirected to another page where you need to design the blueprint’s process flow using states and transitions.
Design the Blueprint’s Process Flow
Once you’ve created a blueprint, you can use the dropdown options to create a flowchart that represents your business process. Here’s how:
- Drag and drop the required states from the Available States pane on the left side of the screen to the center.
- Hover over a state, click a connector (the circles around a state), and drag it to a connector on another state to connect the two states.
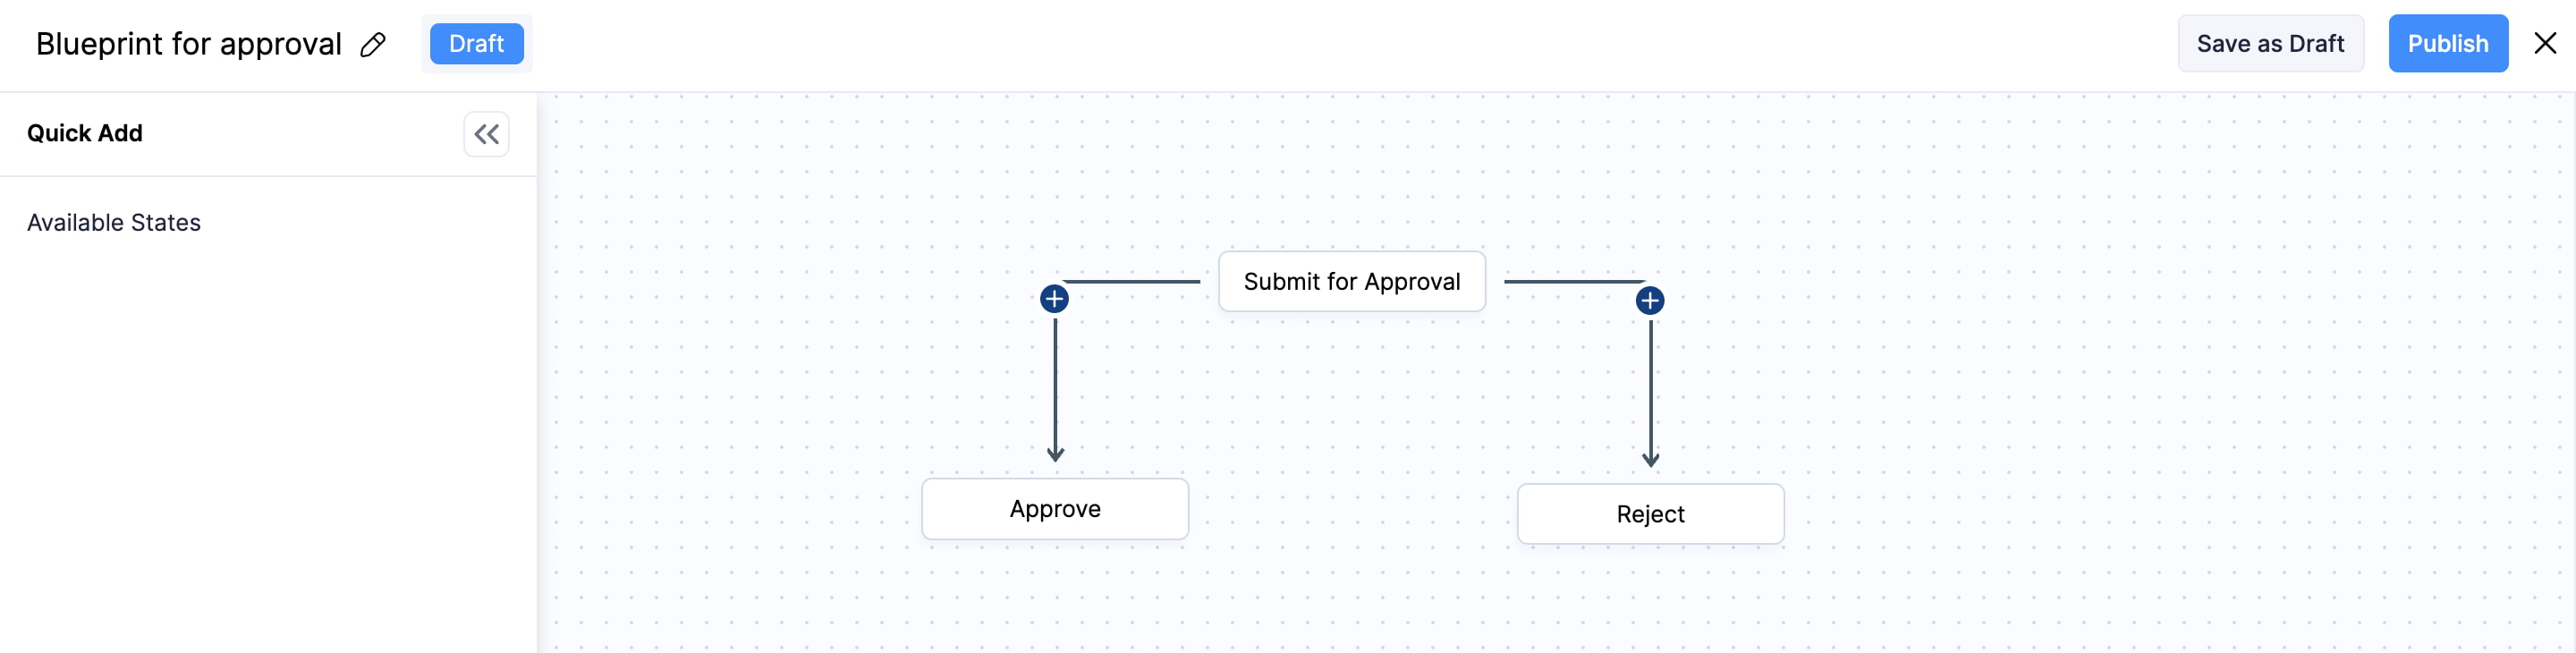
Pro Tip: When connecting states, ensure that it does not create a loop (a closed connection).
- Next, you can configure a SLA for each state and create a transition between two states.
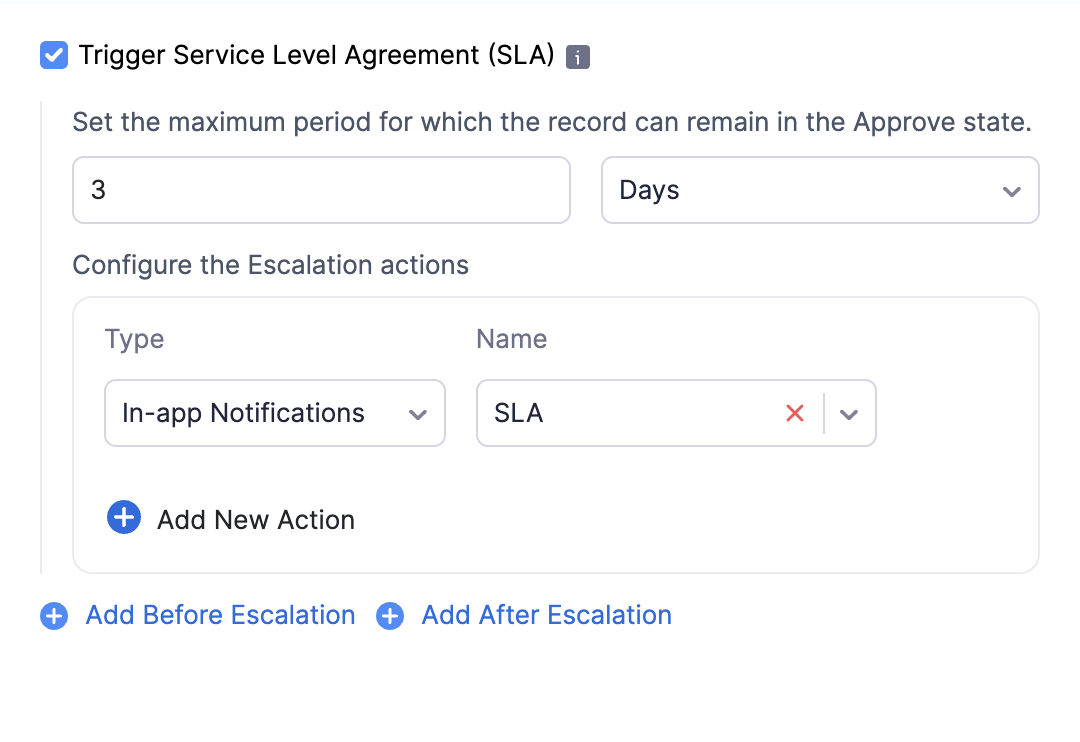
Configure SLA for a State
To trigger a Service Level Agreement (SLA) for a state:
- Select the state for which you want to add an SLA.
- Click Edit in the pane that appears.
- Check Trigger Service Level Agreement (SLA).
- Enter the maximum period for which the record can remain in the selected state and select the frequency (hours, minutes, or days).
- Select the Action Type and Action Name.
- Click + Add New Action to add more actions.
- If you want to perform any actions before or after the SLA is triggered, click + Add Before Escalation and + Add After Escalation, respectively. Then, select the Action Type and Action Name.
- Click Save after you’ve configured the SLA.
Create a Transition
- Click the + icon between two connected states. A pane will appear on the right side.
- Enter the Transition Name and provide a Description if required.
- Select the Transition Type.
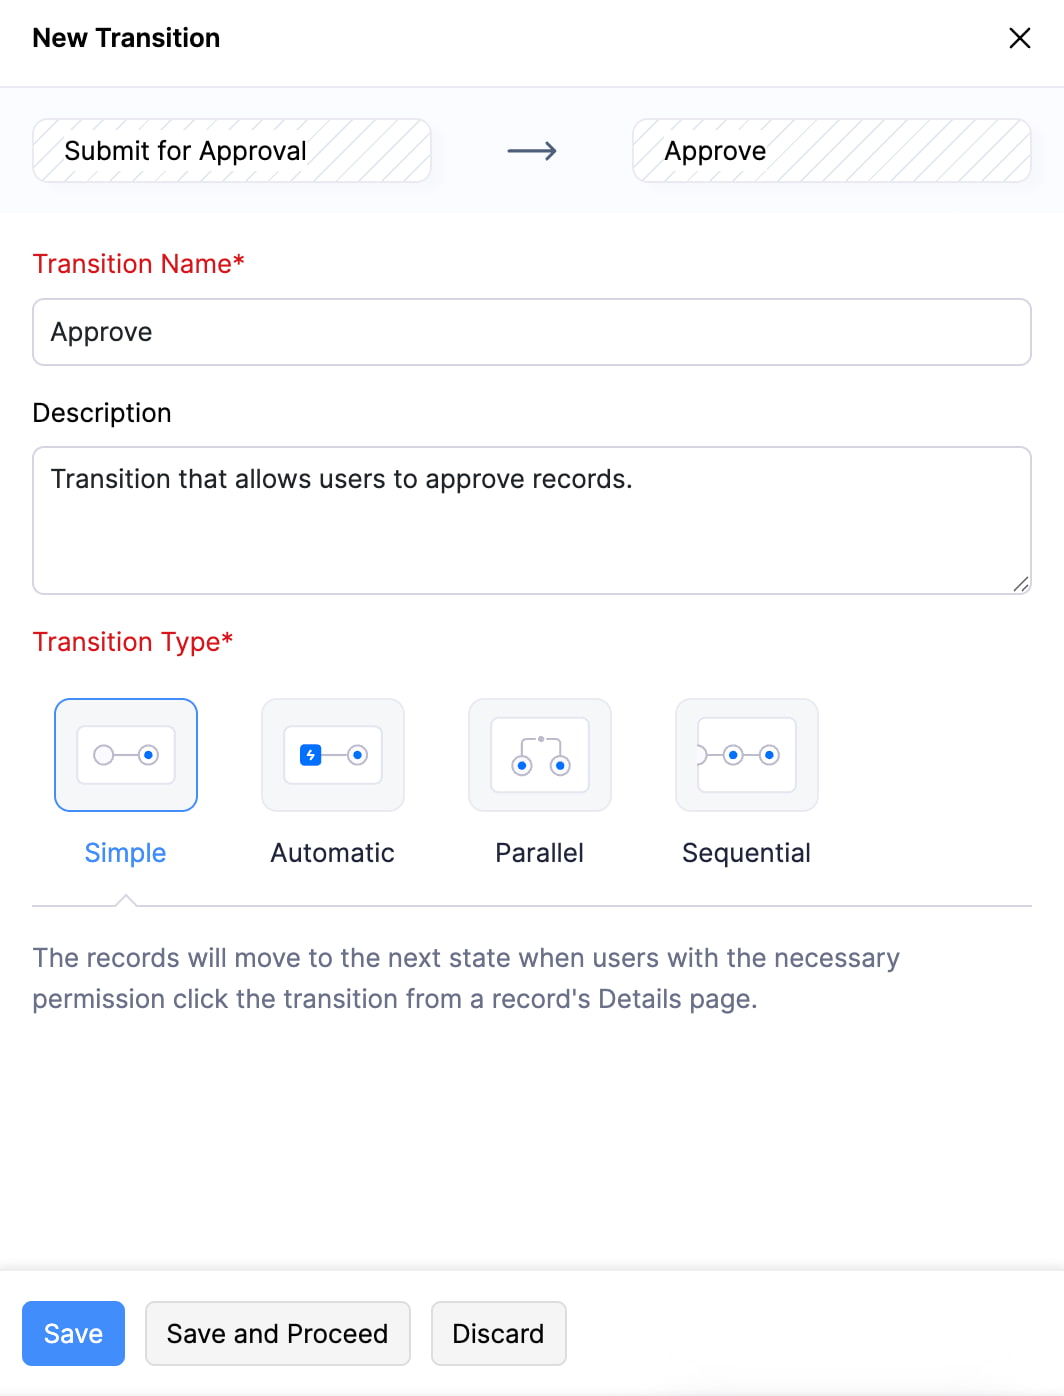
- Click Save and Proceed to enter the other details. Or, click Save if you want to enter them later. You can enter the details by clicking the transition and clicking Edit.
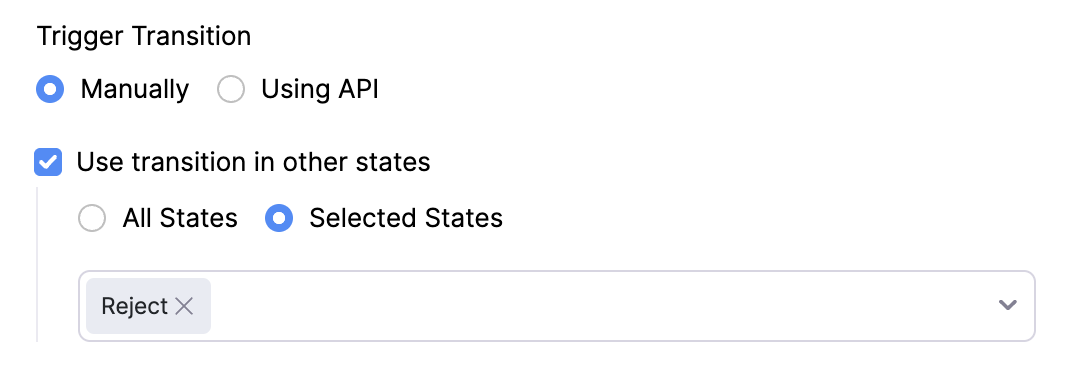
- Choose how you want to trigger the transition in Trigger Transition.
- Select Manually if the transition has to be triggered by clicking the transition button from a record’s Details page.
- Check Use transition in other states, if you want to use the same transition in other states. Select All States if the transition has to be used in all states. Or, click Selected States and select the required states if the transition has to be used only in selected states.
- Select Using API if the transition has to be triggered via API. The OAuth URL will be displayed after you save the transition.
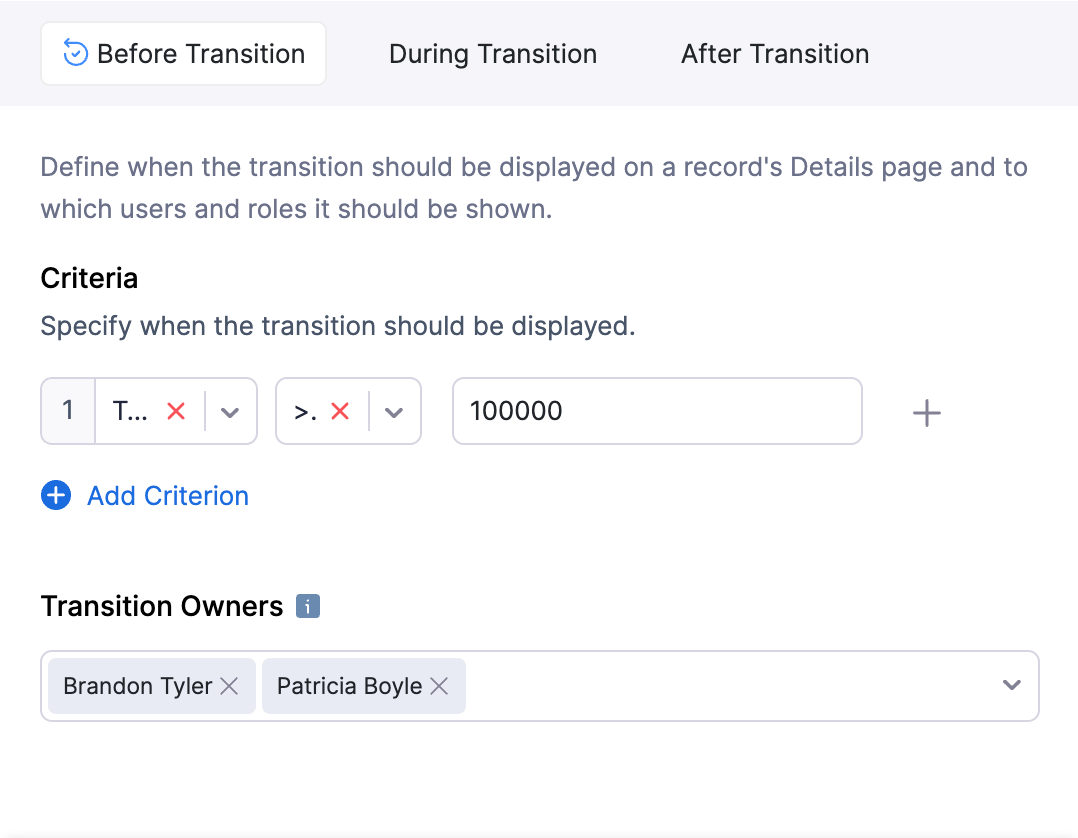
Before Transition
Define when the transition should be displayed on a record’s Details page and to which users and roles it should be shown.
- If the transition should be displayed based on certain conditions, specify the Criteria. Click + Add Criterion to add more criteria.
- Select the Transition Owners. They are the users who can view the transition on a record’s Details page.
Note: The transition will be completed if any one of the transition owners clicks the transition button.
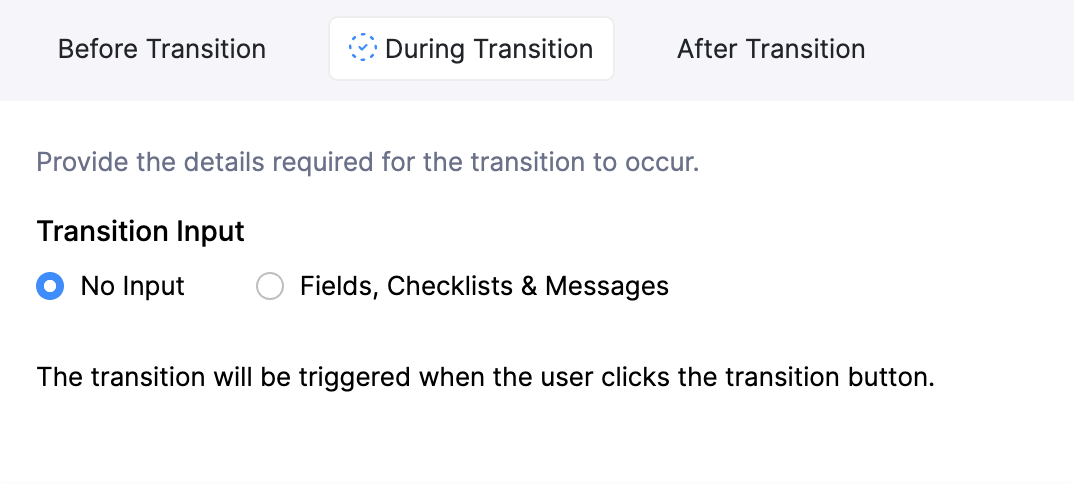
During Transition
Provide the details required for the transition to occur.
- Select the transition input. These are the mandatory information or actions required to execute a transition between two states.
| Transition Input | Description |
|---|---|
| No Input | The blueprint can move to the next state without any mandatory fields to be filled or additional information to be provided. |
| Fields, Checklists & Messages | - Fields: Add the fields in which the transition owners must fill in data. Click + Add Field to add more fields. - Checklists: Create a checklist to help transition owners keep track of the tasks they need to complete. Click + Add Checklist to add more tasks to the checklist. - Messages: Add a message to inform transition owners what they must do. Click + Add Message to add more messages. |
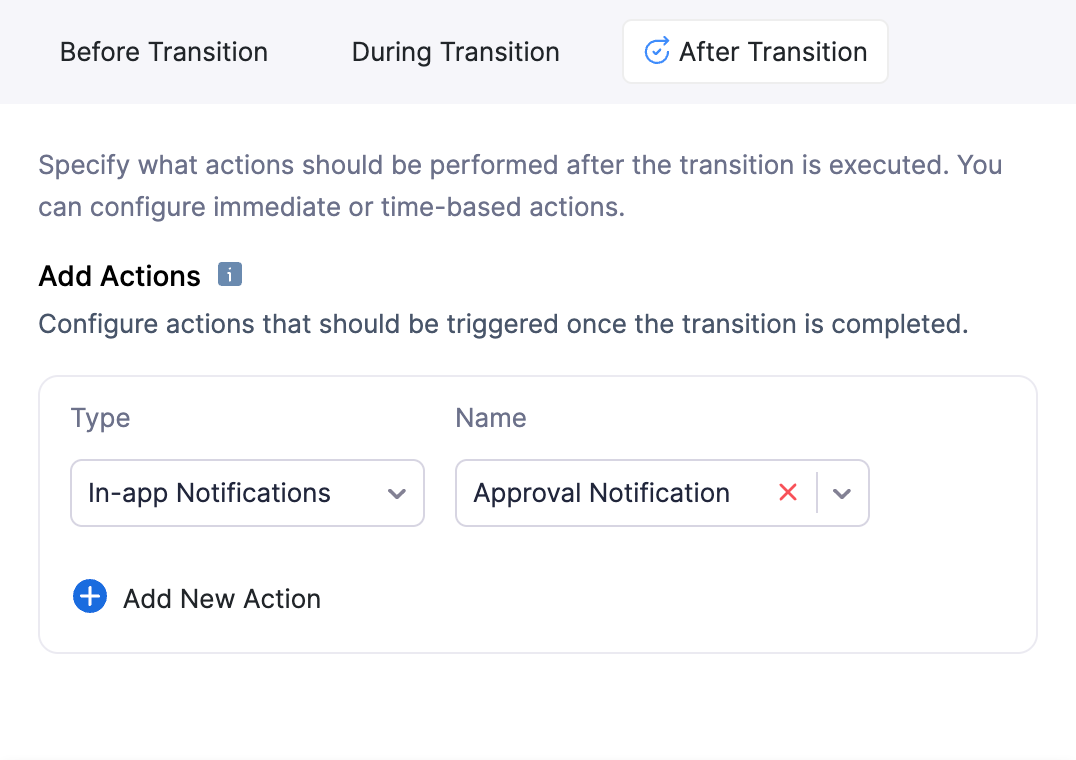
After Transition
Specify what actions should be performed after the transition is executed. You can configure immediate or time-based actions.
- Select the Action Type and the Action Name.
- Click + Add New Action to add more actions.
-
Click Save after you’ve provided all the details for a transition. With this, you’ve added all the details required for the blueprint.
-
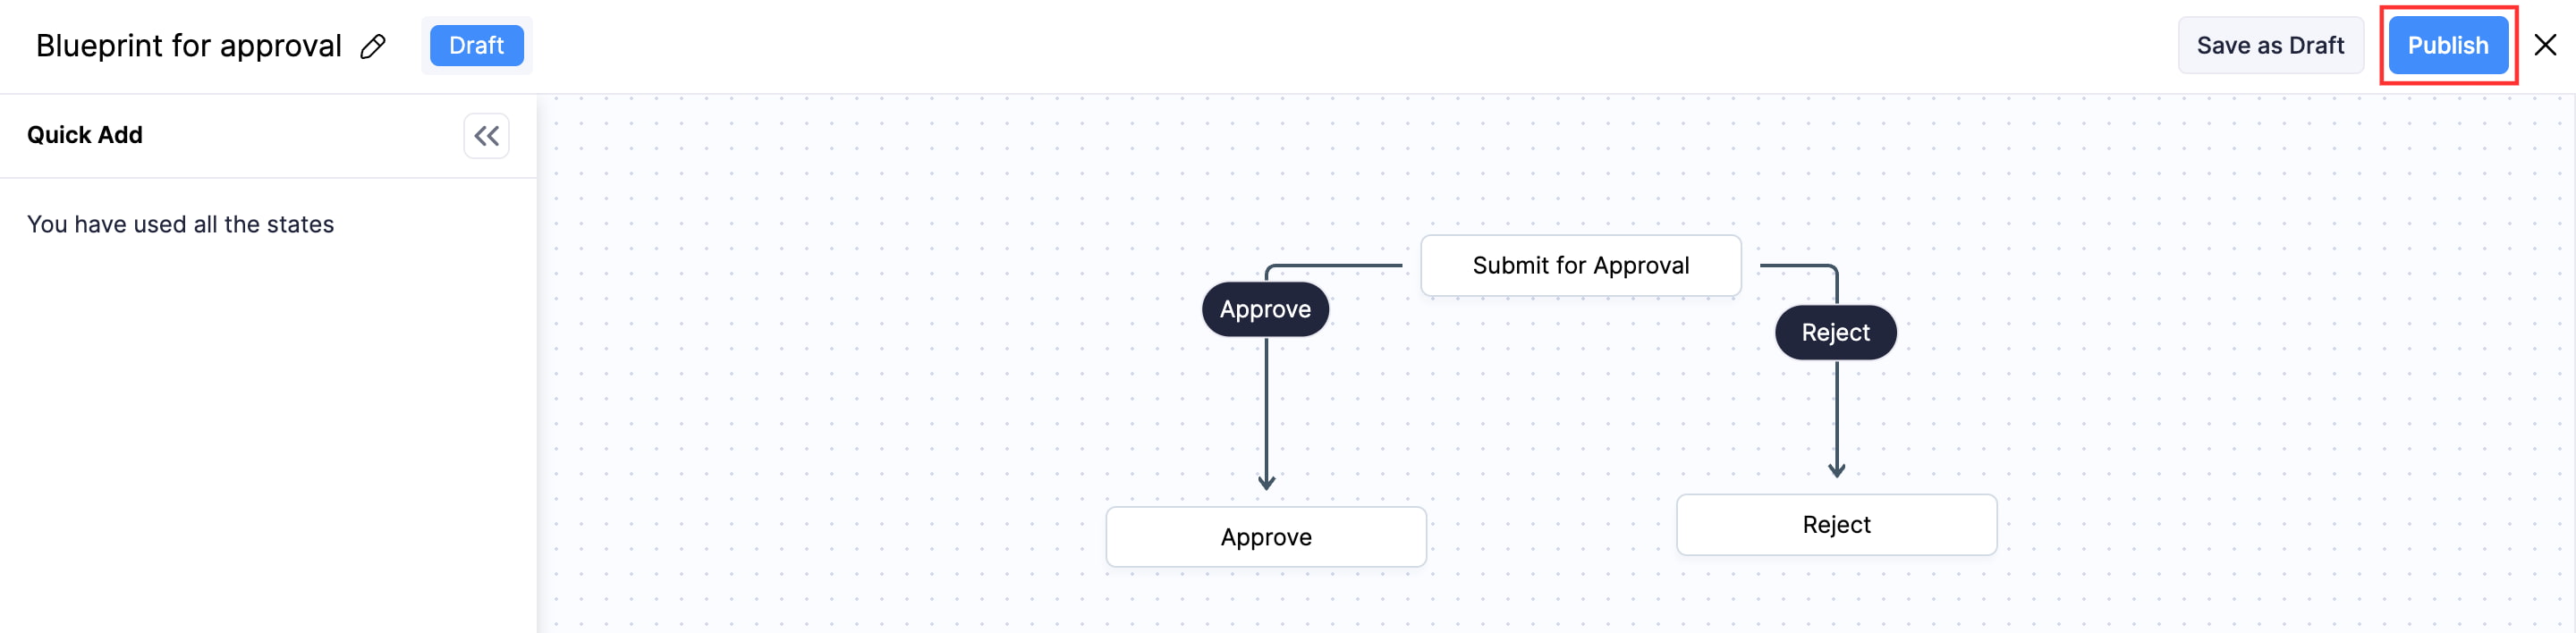
Click Publish to use the blueprint immediately, or click Save as Draft if you want to publish it later.
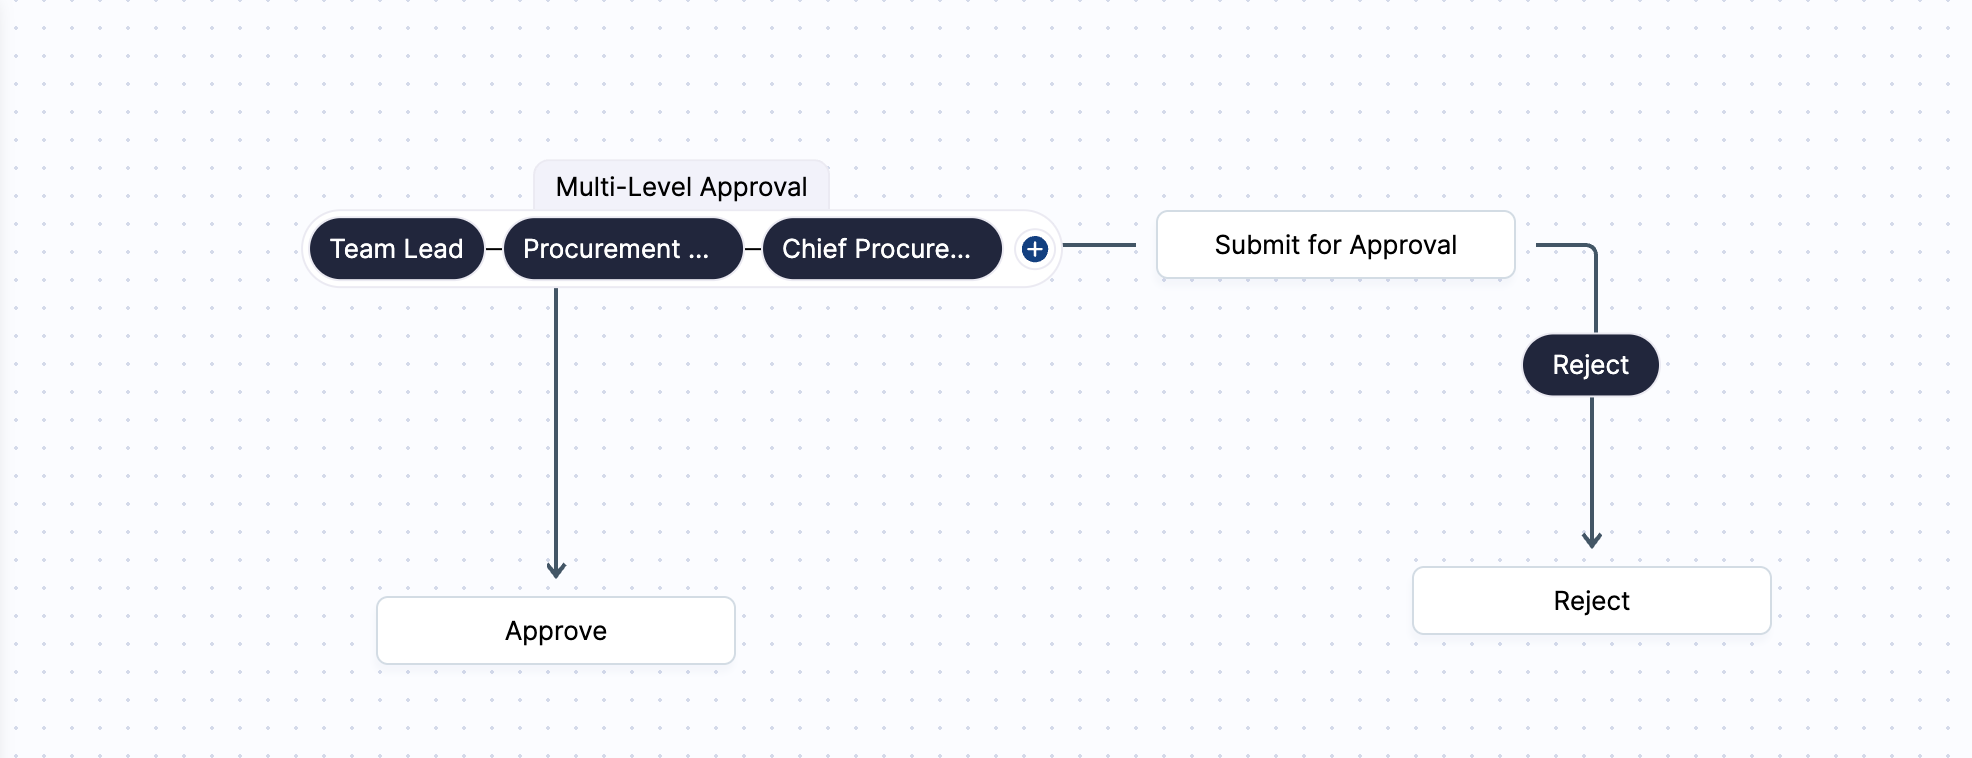
Create a Sequential Transition
A Sequential Transition consists of multiple sub-transitions that must be executed one after the other in the order they were created. Let’s understand this better with the help of a scenario.
Scenario: Zylker uses the Custom Modules feature in Zoho Books to create a module called Purchase Requests, which tracks items requested by its employees for office use. Once a user creates a purchase request, it must be approved by the user’s lead, followed by the Procurement Manager, and finally the Chief Procurement Officer (CPO). To establish this approval flow, Bailey, the CPO of Zylker, creates a blueprint for the approval process. She sets up a Sequential Transition for the Submit for Approval and Approve states and creates a sub-transition for each approver, ensuring that the purchase request is approved only when all approvers have approved the request.
The above scenario is similar to the Multi-Level Approval feature in Zoho Books, where a transaction is approved only when all approvers in the approval hierarchy approve it.
To create a sequential transition:
- Complete the steps mentioned in the Design the Blueprint’s Process Flow section and up to steps 2 in Create a Transition.
- Choose Sequential as the Transition Type.
- Click Save and Proceed to enter details in the Before Transition and After Transition sections, or click Save if you want to enter them later. You can enter them by clicking the transition and clicking Edit.
- Once you’ve created the sequential transition, click the + icon next to it to create sub-transitions. You can create up to five sub-transitions for each transition.
- Enter the Transition Name and Description if required for each sub-transition.
- Click Save and Proceed to enter details in the Before Transition and During Transition sections, or click Save if you want to enter them later. You can enter them by clicking the transition and clicking Edit.
Once you’ve created the required sub-transitions, the blueprint’s process flow with the sequential transition should look similar to the image below.
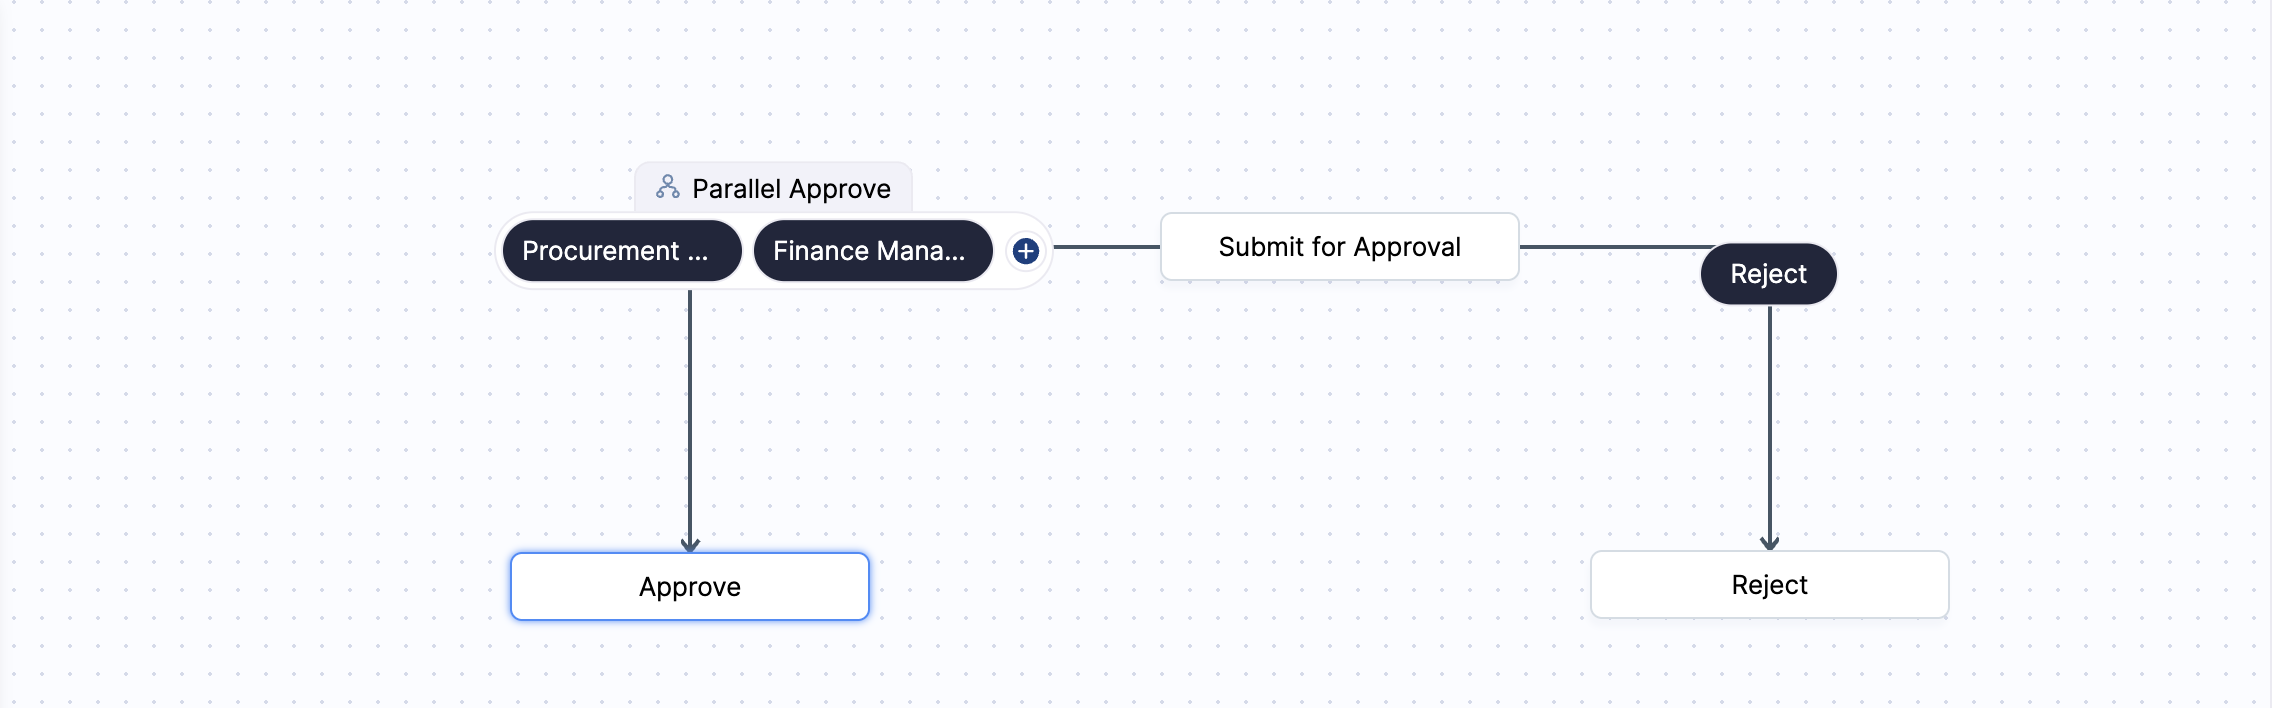
Create a Parallel Transition
A Parallel Transition consists of multiple sub-transitions that are executed simultaneously. Let’s understand this better with the help of a scenario.
Scenario: Zylker uses the Custom Modules feature in Zoho Books to create a module called Purchase Requests, which tracks items requested by its employees for office use. Once a user creates a purchase request, it must be approved by both the Procurement Manager and the Finance Manager. To establish this approval flow, Brandon, the Procurement Manager of Zylker, creates a blueprint for the approval process. He sets up a Parallel Transition for the Submit for Approval and Approve states and creates a sub-transition for both the managers, ensuring that the purchase request is simultaneously sent to both managers and is approved only when both have approved the request.
To create a parallel transition:
- Complete the steps mentioned in the Design the Blueprint’s Process Flow section and up to steps 2 in Create a Transition.
- Choose Parallel as the Transition Type.
- Click Save and Proceed to enter details in the Before Transition and After Transition sections, or click Save if you want to enter them later. You can enter them by clicking the transition and clicking Edit.
- Once you’ve created the parallel transition, click the + icon next to it to create sub-transitions. You can create up to five sub-transitions for each transition.
- Enter the Transition Name and Description if required for each sub-transition.
- Click Save and Proceed to enter details in the Before Transition and During Transition sections, or click Save if you want to enter them later. You can enter them by clicking the transition and clicking Edit.
Once you’ve created the required sub-transitions, the blueprint’s process flow with the parallel transition should look similar to the image below.
Publish a Blueprint
A blueprint must be published to allow records to enter it. If you’ve saved a blueprint as draft, here’s how you can publish it:
- Go to Settings in the top right corner of the page.
- Select the required custom module under Custom Modules.
- Go to the Blueprints tab.
- Click the blueprint you want to publish.
- Click Publish in the top right corner of the page.
Execute Blueprint
Prerequisite:
- Only published blueprints can be executed. Learn how to publish a blueprint.
- The transition button will be shown on a record’s Details page only when the user who created the record chooses the option that starts the process flow of the blueprint in the dropdown field selected as the Blueprint Field. For example, in the Purchase Requests module scenario, the transition buttons will be shown to transition owners only if the user creating the record selects the Submit for Approval option for the Approval field.
Here’s how transition owners can trigger a transition:
- Go to Custom Modules on the left sidebar and select the custom module for which you’ve created a blueprint.
- Select the record for which you want to execute the blueprint.
- Click the preferred transition to enable the record to enter the blueprint.
If the blueprint owner added any configurations in the During Transition section, transition owners need to do the following based on the configurations.
| Transition Input | Description |
|---|---|
| Fields, Checklists & Messages |
Note: The transition will not complete until the transition owners perform the actions specified by the blueprint owner for these inputs. - Fields: Fill in information in the fields displayed. - Checklists: Strike the options displayed to check them off. - Messages: Read the message shared by the blueprint owner. |
With this, the transition will be completed and the blueprint will move to the next state. Complete all the transitions to enable the record to exit the blueprint and complete your business process.
Other Actions for Blueprint
These are the other actions you can perform on a blueprint:
Edit a Blueprint
Here’s how you can edit a blueprint:
- Go to Settings in the top right corner of the page.
- Select the required custom module under Custom Modules.
- Go to the Blueprints tab.
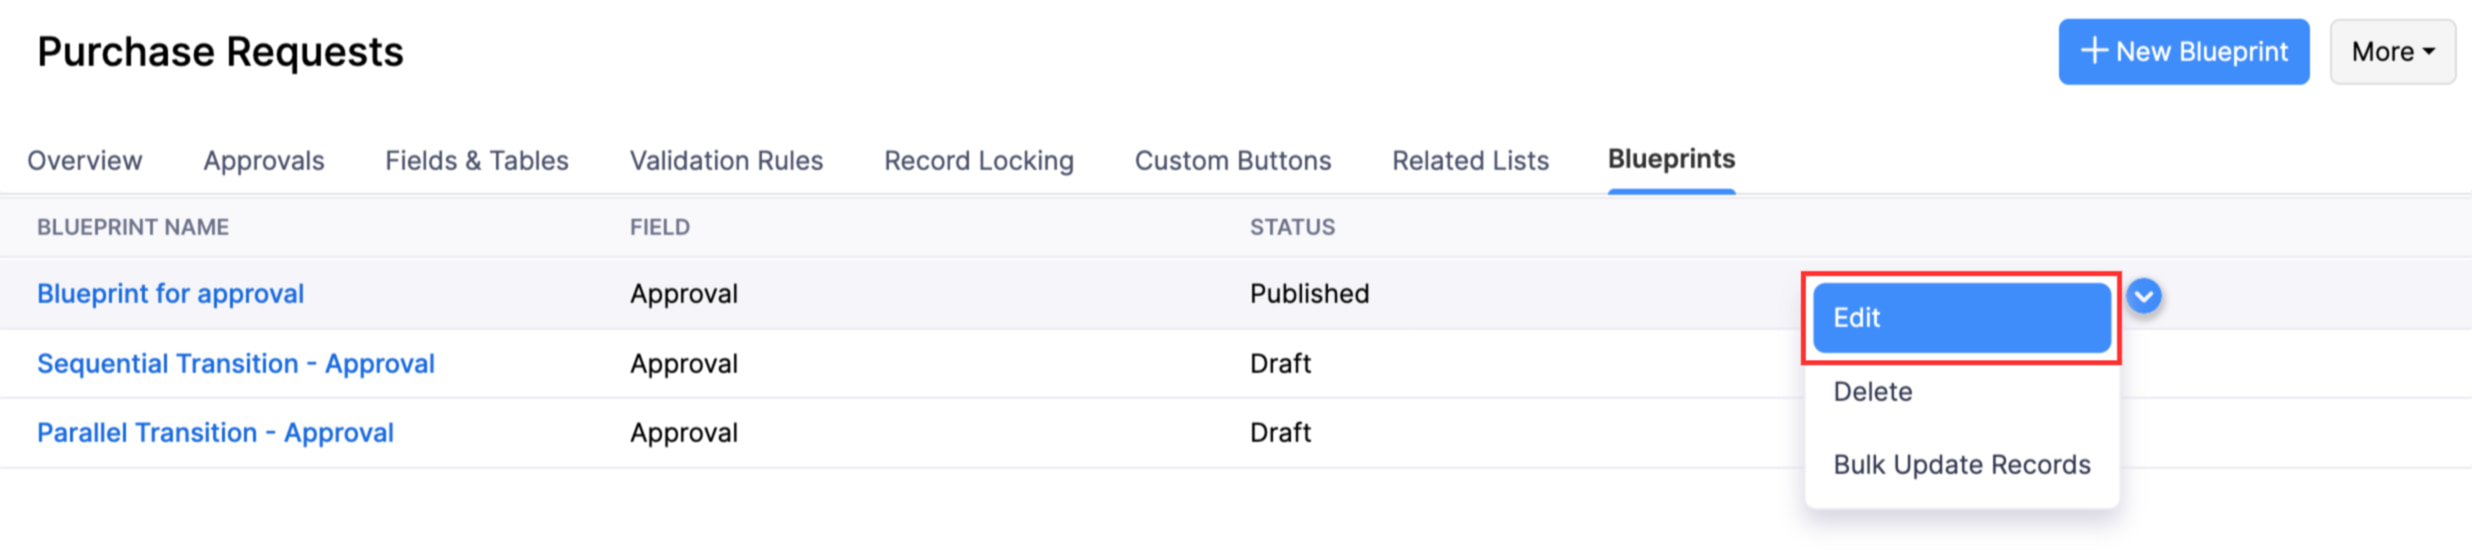
- Hover over the blueprint you want to edit.
- Click the dropdown towards the right and select Edit.
- To make changes to the basic information, click the Edit icon next to the blueprint name in the top left corner.
- Make the necessary changes and click Save as Draft or Publish as per your preference.
Note: You cannot update or delete a transition if a blueprint has been published. Create a Draft and then proceed with the required action.
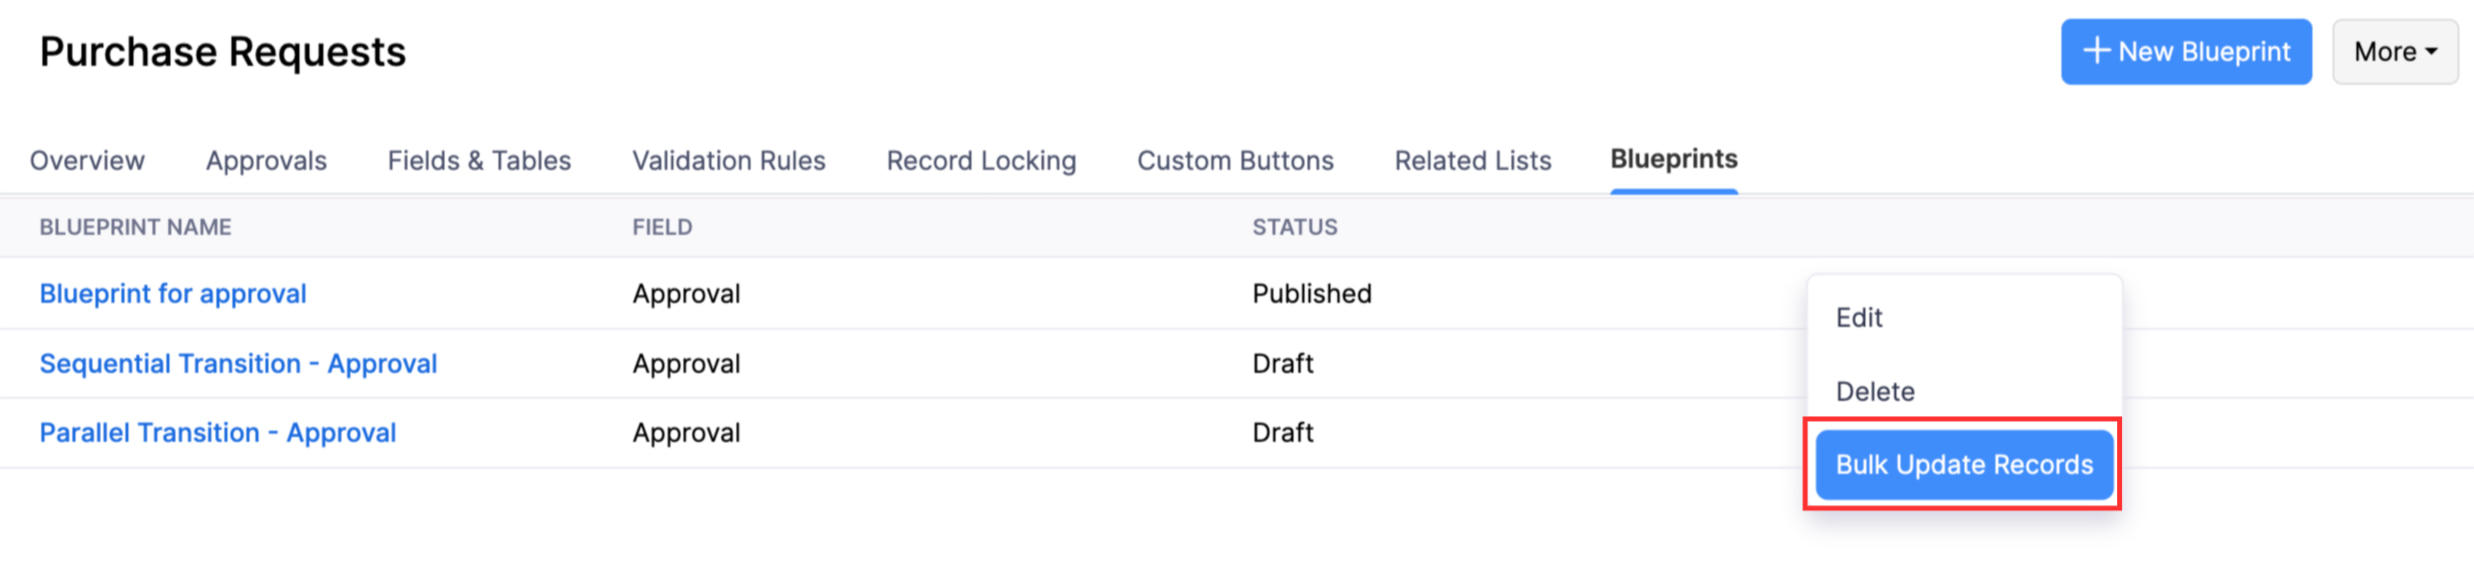
Bulk Update Records
You can bulk update records to include or exlcude them in a blueprint. Before bulk updating records, ensure that they meet the blueprint’s criteria.
Here’s how you can bulk update records for blueprints:
- Go to Settings in the top right corner of the page.
- Select the required custom module under Custom Modules.
- Go to the Blueprints tab.
- Hover over the blueprint for which you want to bulk update records.
- Click the dropdown towards the right and select Bulk Update Records.
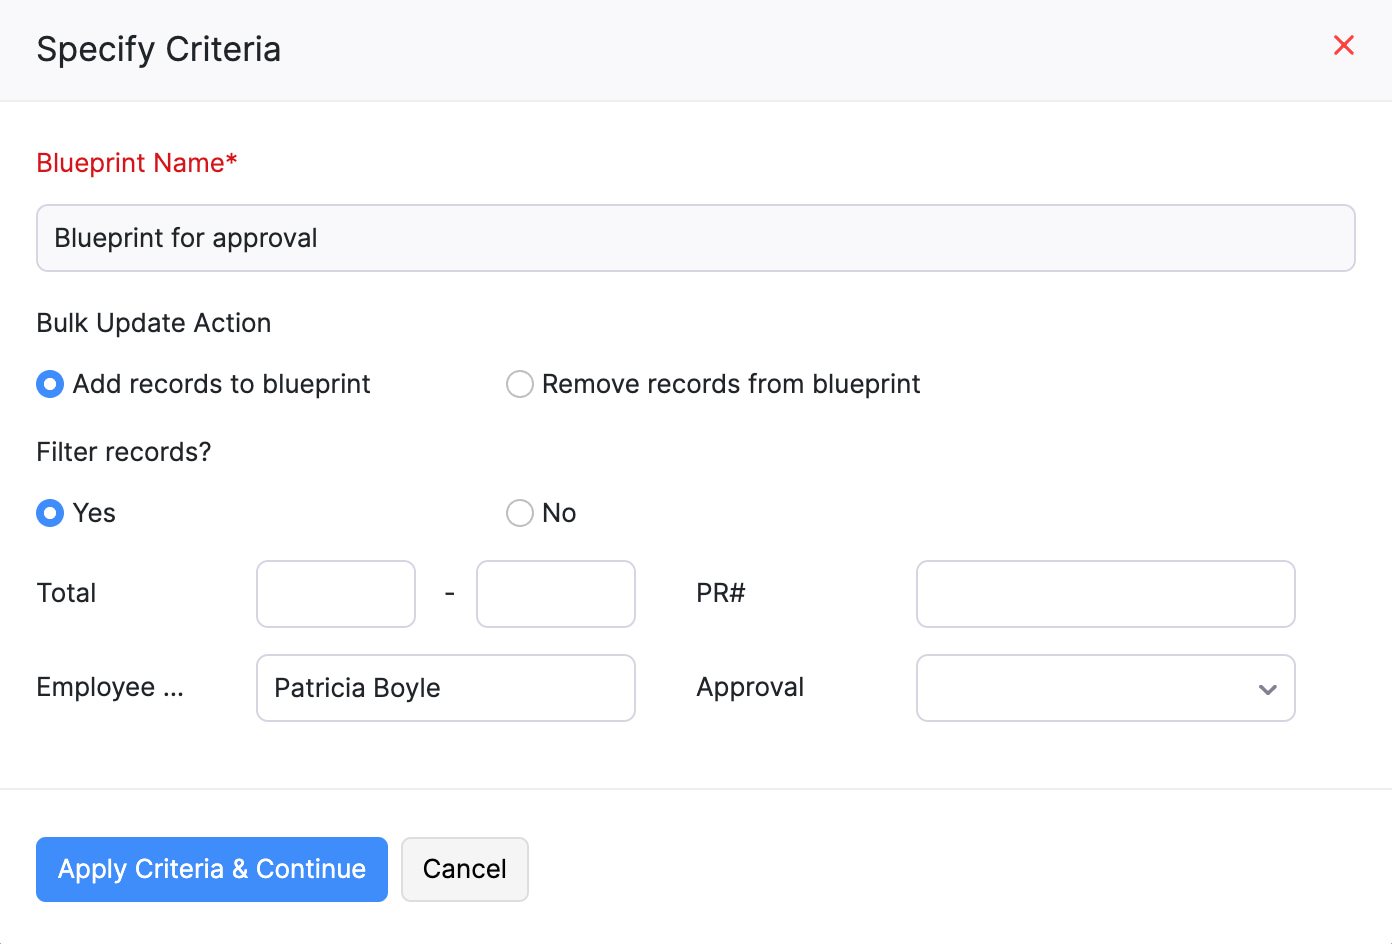
- In the Specify Criteria pop-up:
- Select the Bulk Update Action. You can choose to Add records to blueprint or Remove records from blueprint.
- Choose if you want to Filter records. If you click Yes, enter values in the custom module’s fields based on which the records should be filtered. Click No if you don’t want to filter records.
- Click Apply Criteria & Continue. You’ll be redirected to another page.
- Select the records to be updated by clicking the checkbox towards the left of each record.
- If you want to update the bulk update criteria, click Edit Criteria in the top right corner.
- Click Update Records.
Delete a Blueprint
To delete a blueprint:
- Go to Settings in the top right corner of the page.
- Select the required custom module under Custom Modules.
- Go to the Blueprints tab.
- Hover over the blueprint you want to delete.
- Click the dropdown towards the right and select Delete.
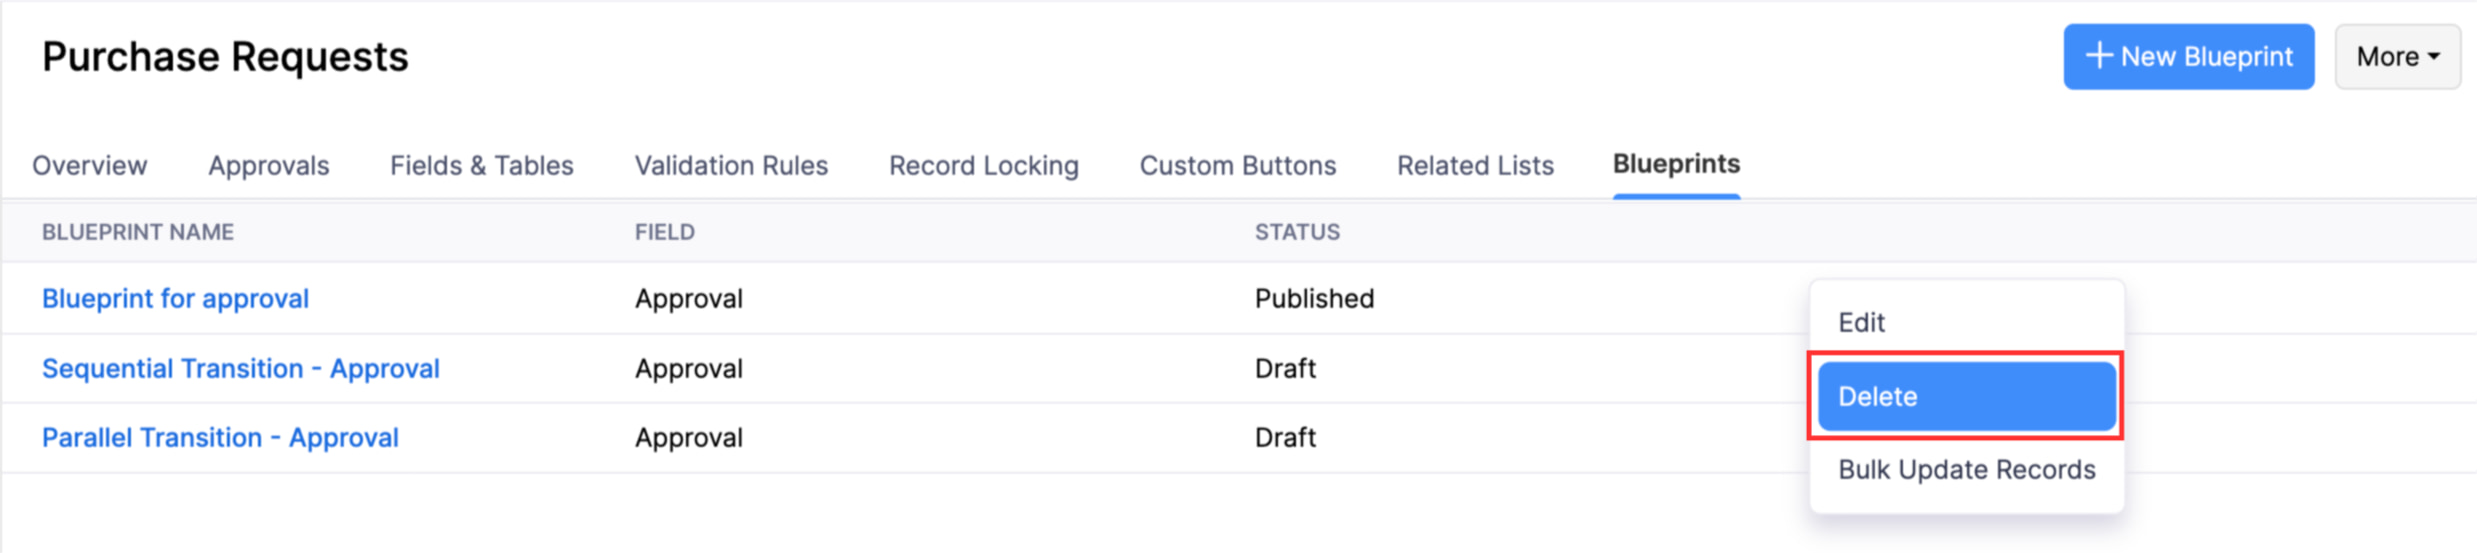
- Click Yes in the pop-up that appears.
Other Actions for Transitions and States
These are the other actions you can perform on a blueprint’s transition:
Edit a Transition or State
Here’s how you can edit a transition or state:
- Go to Settings in the top right corner of the page.
- Select the required custom module under Custom Modules.
- Go to the Blueprints tab.
- Hover over the required blueprint, click the dropdown towards the right, and select Edit.
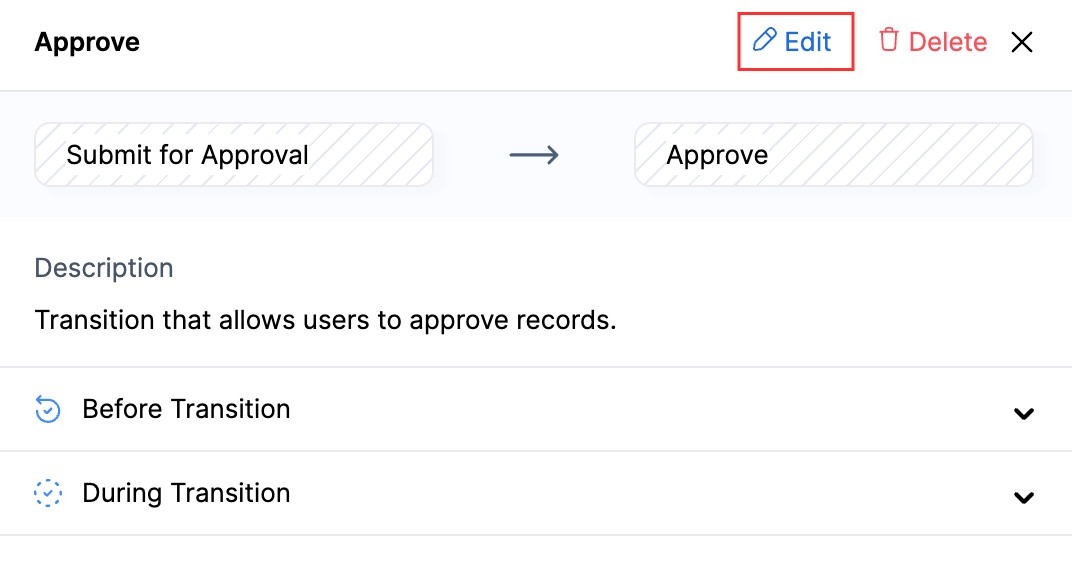
- To edit a transition, click the transition you want to edit and click Edit in the pane that appears.
- To edit a state, click the state you want to edit and click Edit in the pane that appears.
- Transitions and States cannot be edited if the blueprint has been published. Create a draft version and edit the transition in the draft version of the blueprint.
- Make the necessary changes and click Save.
- Click Publish to publish the draft version. The changes in the draft will overwrite the existing published version of the blueprint, or click Save as Draft if you want to publish it later.
Note: If you create a draft of a published blueprint, you must publish the draft for the changes to take effect. Once published, the existing version will be replaced by the new draft.
Delete a Transition
Here’s how you can delete a transition:
- Go to Settings in the top right corner of the page.
- Select the required custom module under Custom Modules.
- Go to the Blueprints tab.
- Hover over the required blueprint, click the dropdown towards the right, and select Edit.
- Click the transition you want to delete and click Delete in the pane that appears.
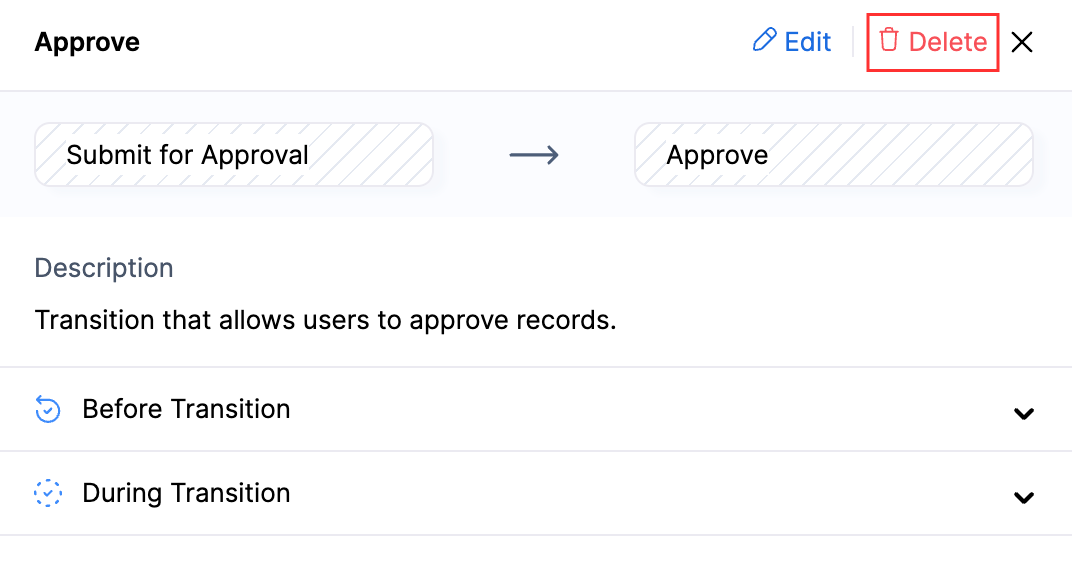
- Click Delete again in the pop-up that appears.
- Transitions and States cannot be edited if the blueprint has been published. Create a draft version and edit the transition in the draft version of the blueprint.
- Click Publish to publish the draft version. The changes in the draft will overwrite the existing published version of the blueprint, or click Save as Draft if you want to publish it later.
Note: If you create a draft of a published blueprint, you must publish the draft for the changes to take effect. Once published, the existing version will be replaced by the new draft.
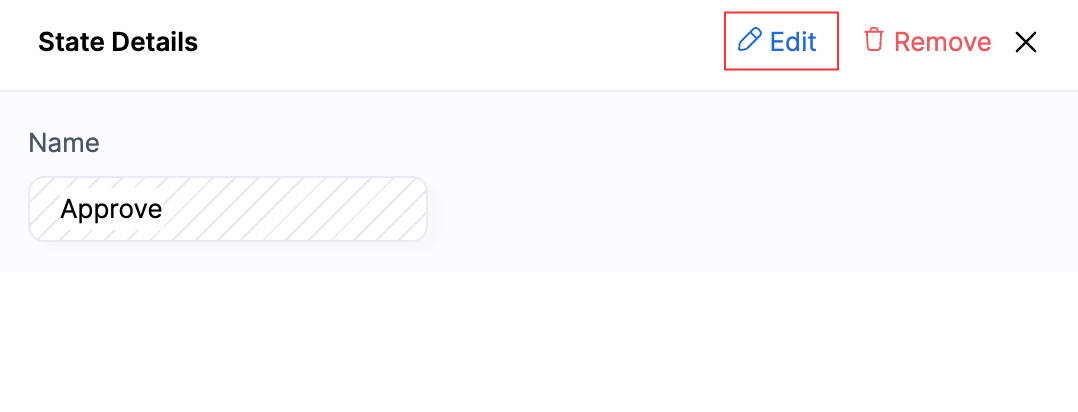
Remove State
If you don’t want to use a state in the process flow of your blueprint, you can remove it. The state will then be added to the Quick Add section on the left side of the page.
To remove a state from the process flow:
- Go to Settings in the top right corner of the page.
- Select the required custom module under Custom Modules.
- Go to the Blueprints tab.
- Hover over the required blueprint, click the dropdown towards the right, and select Edit.
- Click the state you want to remove and click Remove in the pane that appears.
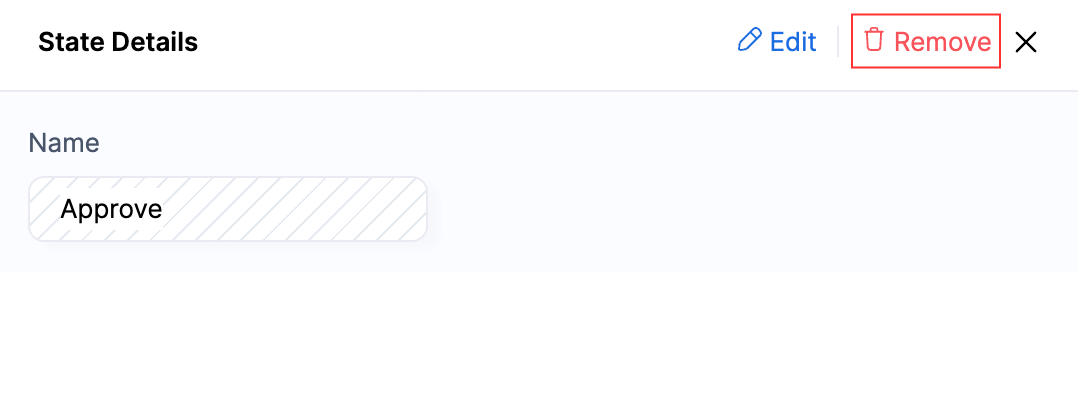
- Click Remove again in the pop-up that appears.
- States cannot be edited if the blueprint has been published. Create a draft version and edit the transition in the draft version of the blueprint. Click Publish to publish the draft version. The changes in the draft will overwrite the existing published version of the blueprint, or click Save as Draft if you want to publish it later.
Note: If you create a draft of a published blueprint, you must publish the draft for the changes to take effect. Once published, the existing version will be replaced by the new draft.
 Yes
No
Yes
No

Thank you for your feedback!