Inventory
Payment Gateway Integration
Zoho Inventory is integrated with major online payment gateways to help you receive payments for your invoices online. This ensures faster and hassle-free receipt of payments and further automates your cash flow.
IN THIS PAGE…
Prerequisites
To integrate with payment gateways, you need the following requirements,
- An active account with the payment gateways that you wish to integrate with.(unless the gateway allows you to create a new account during the integration process like Stripe for example)
- An active account in Zoho inventory.
Why integrate with a payment gateway?
- On integrating with a payment gateway, when you send an invoice to your customer, the customer will also receive a payment link using which, they will be able to make instant payments.
- This integration automates your payment collection process by providing secure and fast payment gateways to collect the payments made by your customers.
- When a payment has been successfully made by your customer, the status of your invoice gets updated accordingly and a payment receipt is generated. If you had set up an automation for sending thank you notes on payment, then your customer also gets wind of your gratitude as soon as they make payments.
- This integration saves you the trouble of manual payment entries, human data entry errors, need of collecting payments through less secure means and long chains of follow ups within your organization.
Authorize.Net
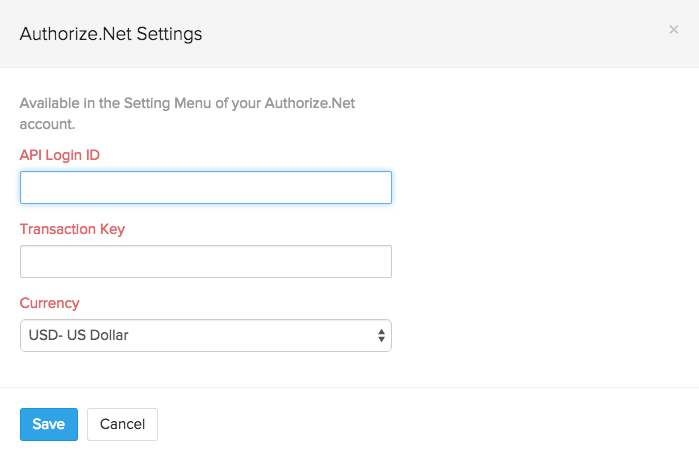
To configure Authorize.Net:
- Navigate to the Integrations module.
- Select the Payments tab.
- Click on the Setup Now button below the Authorize.Net logo.
- Enter the following information and click Save.
- API LoginID: Enter the API Login ID given to you by Authorize.Net.
- Transaction Key: Enter the Transaction Key given to you by Authorize.Net.
- Currency: Enter the currency of receipt. Currently Authorise.net supports transactions only in US Dollars (USD), Canadian Dollars (CAD), Euro (EUR), Pound Sterling (GBP).
- Bank Account: Enter the Bank Account where money received should reflect.
- More information on API Login ID and Transaction Key can be found by clicking here.
Payflow Pro
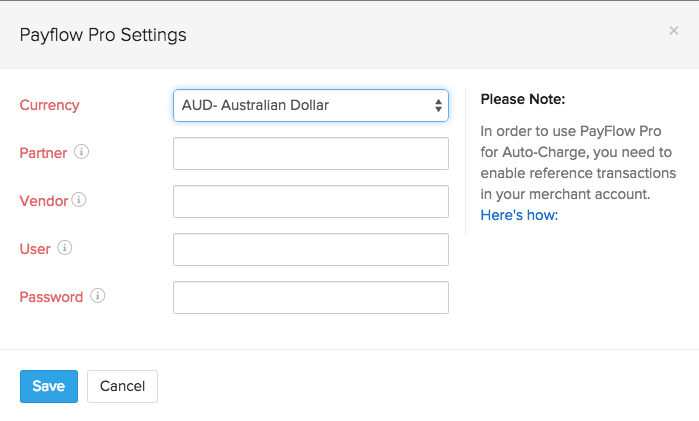
To set up Payflow Pro:
- Navigate to the Integrations module.
- Select the Payments tab.
- Click on the Setup Now button below the Payflow Pro logo.
- Enter the following information and click Save.
- Currency: The currency you set up in your Payflow Pro account.
- Payflow currently supports transaction in 10 leading currencies.
- Partner: The partner ID as mentioned in your Payflow Pro account.
- Vendor: Your vendor name as mentioned in your Payflow Pro account.
- User: Enter your Payflow Pro username.
- Password: Enter your Payflow Pro password.
- Bank Account: Enter the Bank Account where money received should reflect.
- Currency: The currency you set up in your Payflow Pro account.
Important Note:
When you register for Payflow Pro, you will receive an email with information like your Partner ID and Vendor name. Please keep that email at hand while filling the details for Payflow Pro.
Set up payment options from invoice
When you integrate a payment gateway with your Zoho inventory organization, it will be available as a payment option for your invoices.
Inorder facilitate the ease of adding a payment option to your invoices at any point of time, we have provided you with means to integrate a payment gateway right from an invoice.
To integrate a payment gateway/add a payment option to an invoice:
- Create a new invoice. Learn more about creating invoices here.
- Fill up all the details.
- Navigate to the Payment Option field.
- Click on the option called Click to configure payment gateways to get paid online.
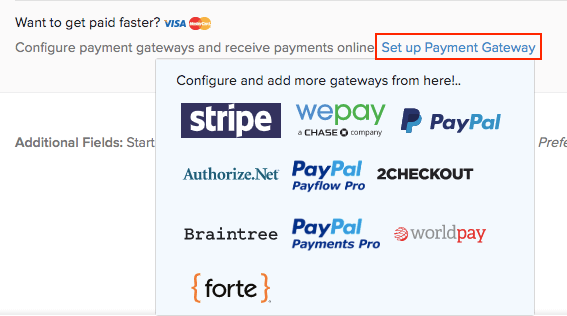
- Doing this will display a drop-down full of available payment gateways.
- Clicking on any payment gateway will direct you to its setup page.
- On completing the required steps, your Zoho Inventory organization will be integrated with the payment gateway of your choice.
- Henceforth, this payment gateway will be available as a payment option for your invoices.