Zoho Voice Extension
Zoho Voice is a cloud-based telephony system designed to help you engage with customers and team members more effectively. With the Zoho Voice Extension for Zoho Mail, you can effortlessly make calls, send messages, listen to voicemails, and manage contacts—all directly from your inbox. This extension enhances collaboration, boosts your productivity, and streamlines communication, making your interactions smoother and more efficient.
Note:
The Zoho Voice extension in Zoho Mail will only be available to users who have subscribed to a paid plan of Zoho Mail, Zoho Workplace, or Zoho One.
Prerequisites
- An active Zoho Voice license.
To place calls in the Zoho Voice extension, you would be required to either purchase a new number or porting existing number.
Note:
To activate your number for placing calls, you will need to provide a valid business document as verification.
- After acquiring your phone number, you can proceed with additional configurations within the Zoho Voice application. This includes options to enable/disable incoming, outgoing calls, as well as SMS/MMS.
Table of Contents
Configure Zoho Voice in Admin Console
The Zoho Voice extension in Zoho Mail is not enabled by default and will only be available once the Organization Admin configures it. After configuration, users can easily access the Zoho Voice extension directly from their accounts. To enable the Zoho Voice extension, follow the steps outlined below in the Admin Console:
- Log into Zoho Mail Admin Console as a Admin.
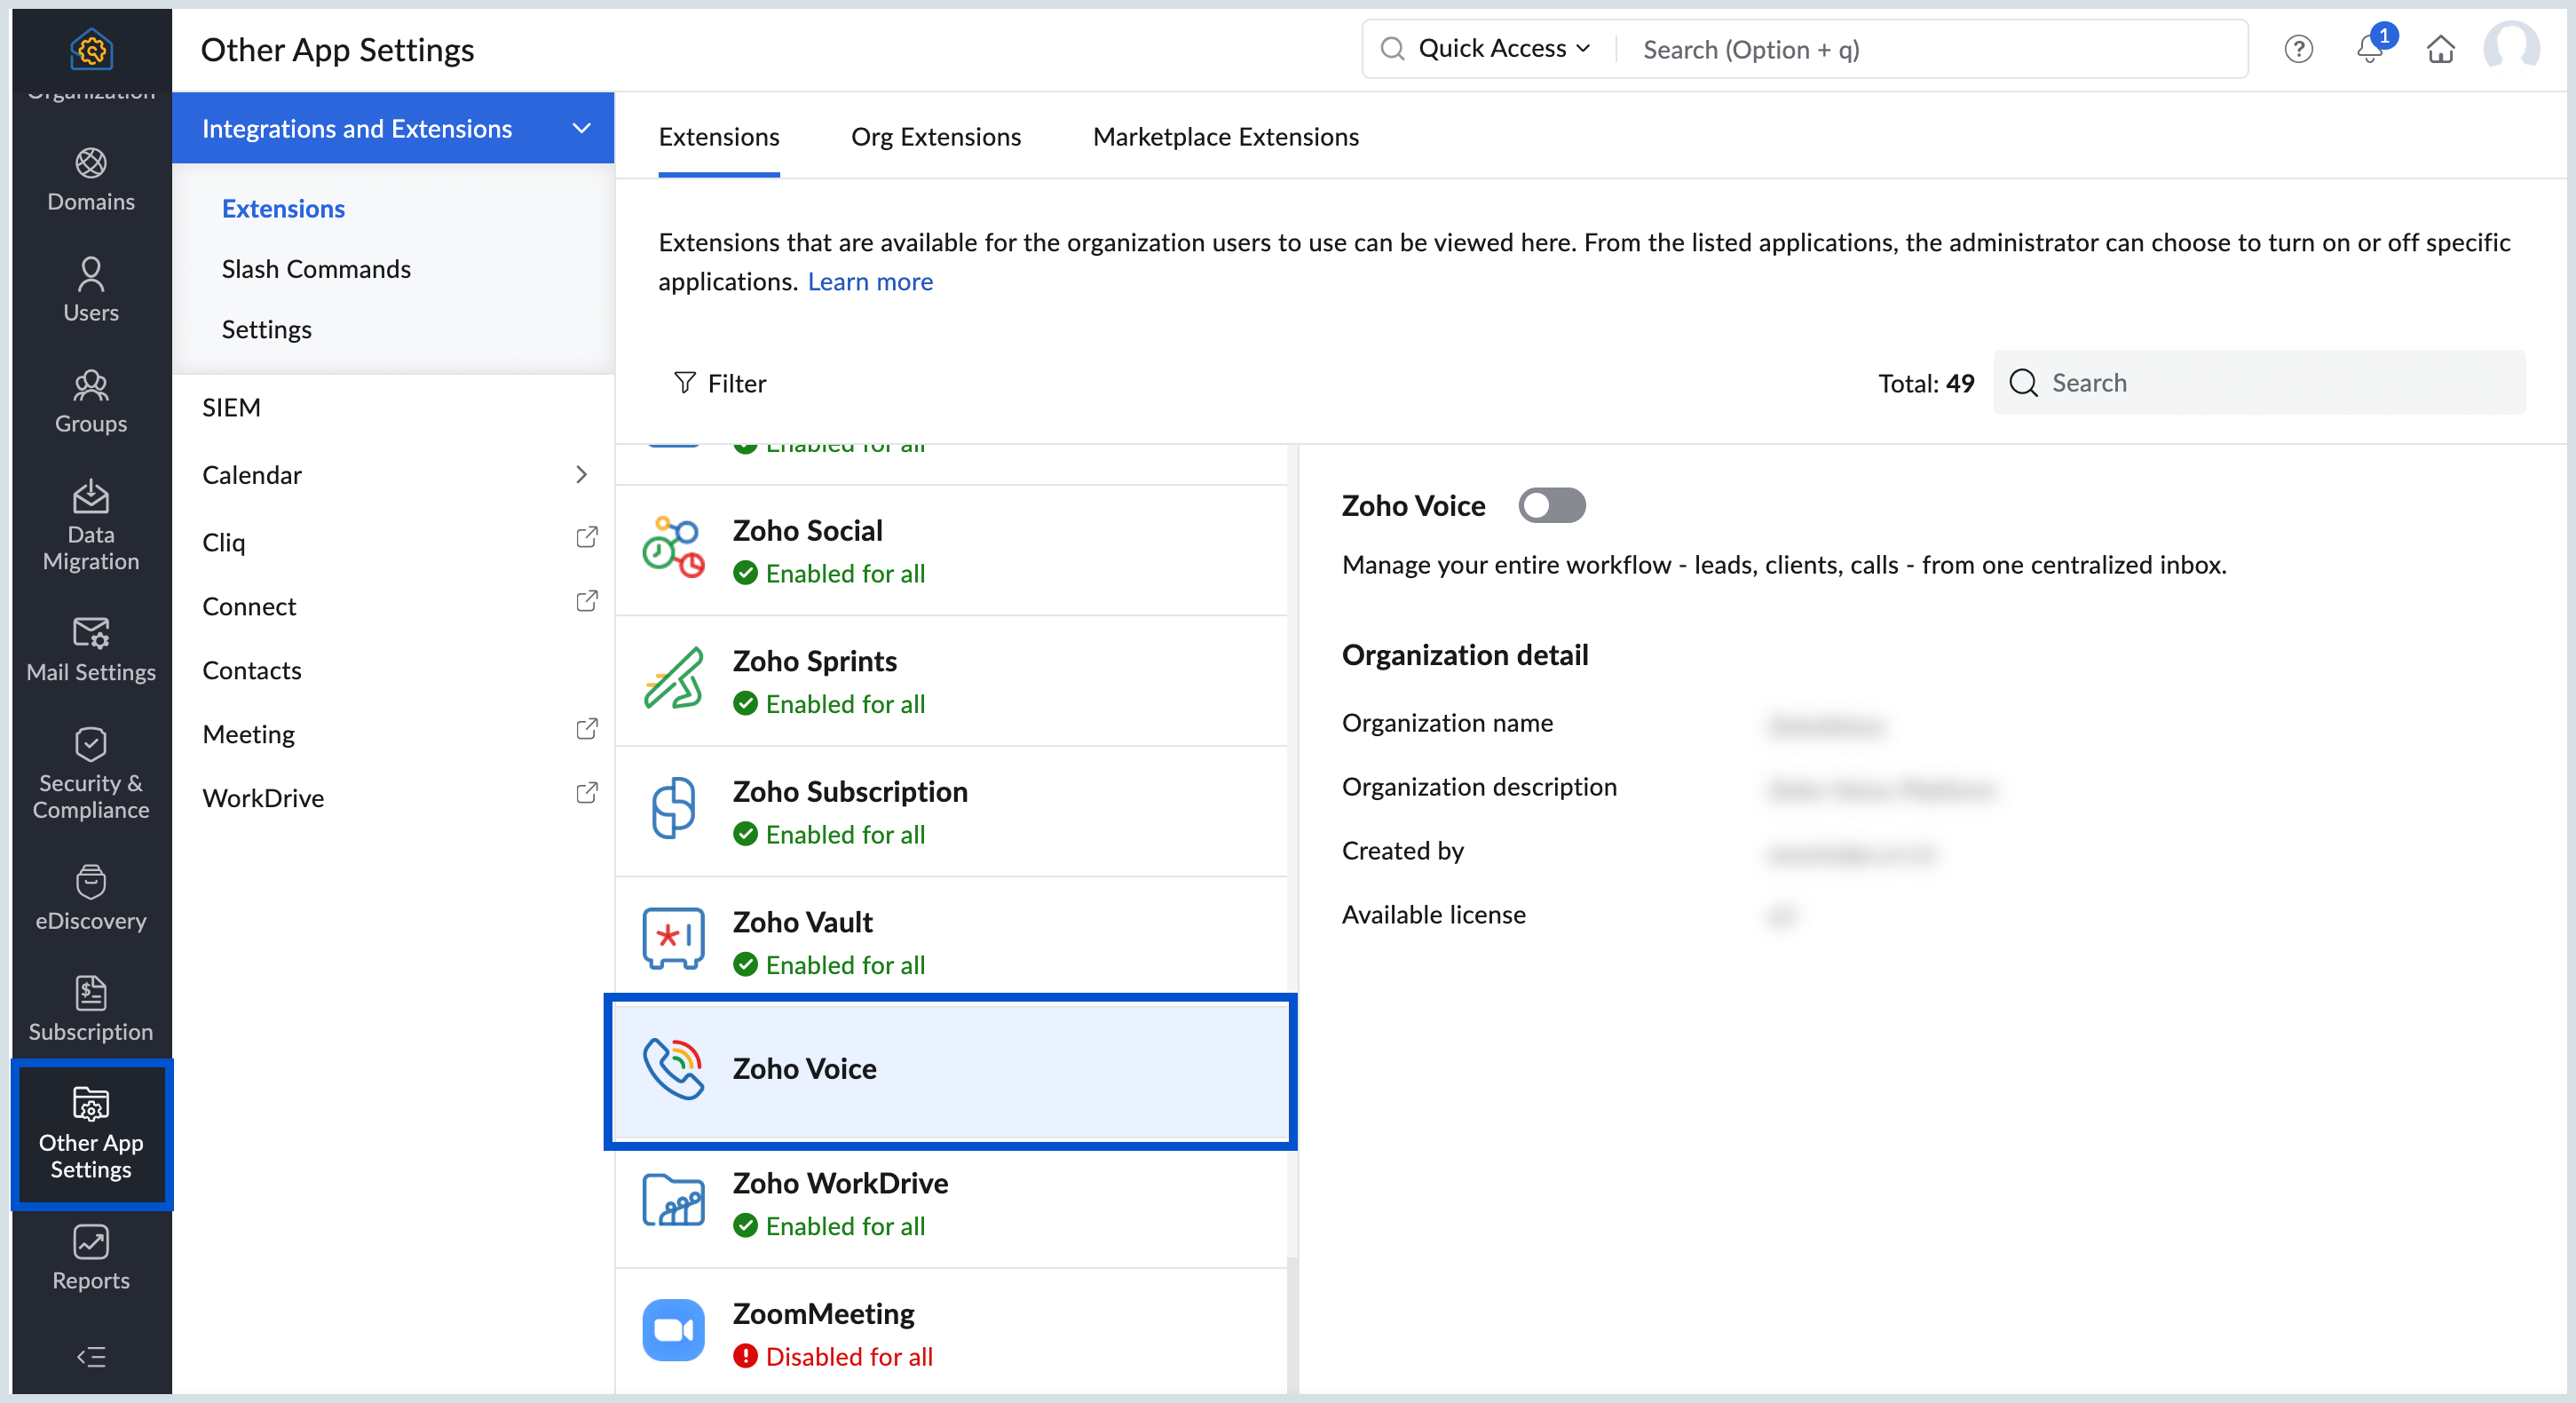
- Navigate to Other App Settings> Extensions.
- Search for Zoho Voice Extension.
If you already have a Zoho Voice account, your account details such as Organization name, description, number of license will be displayed.
Note:
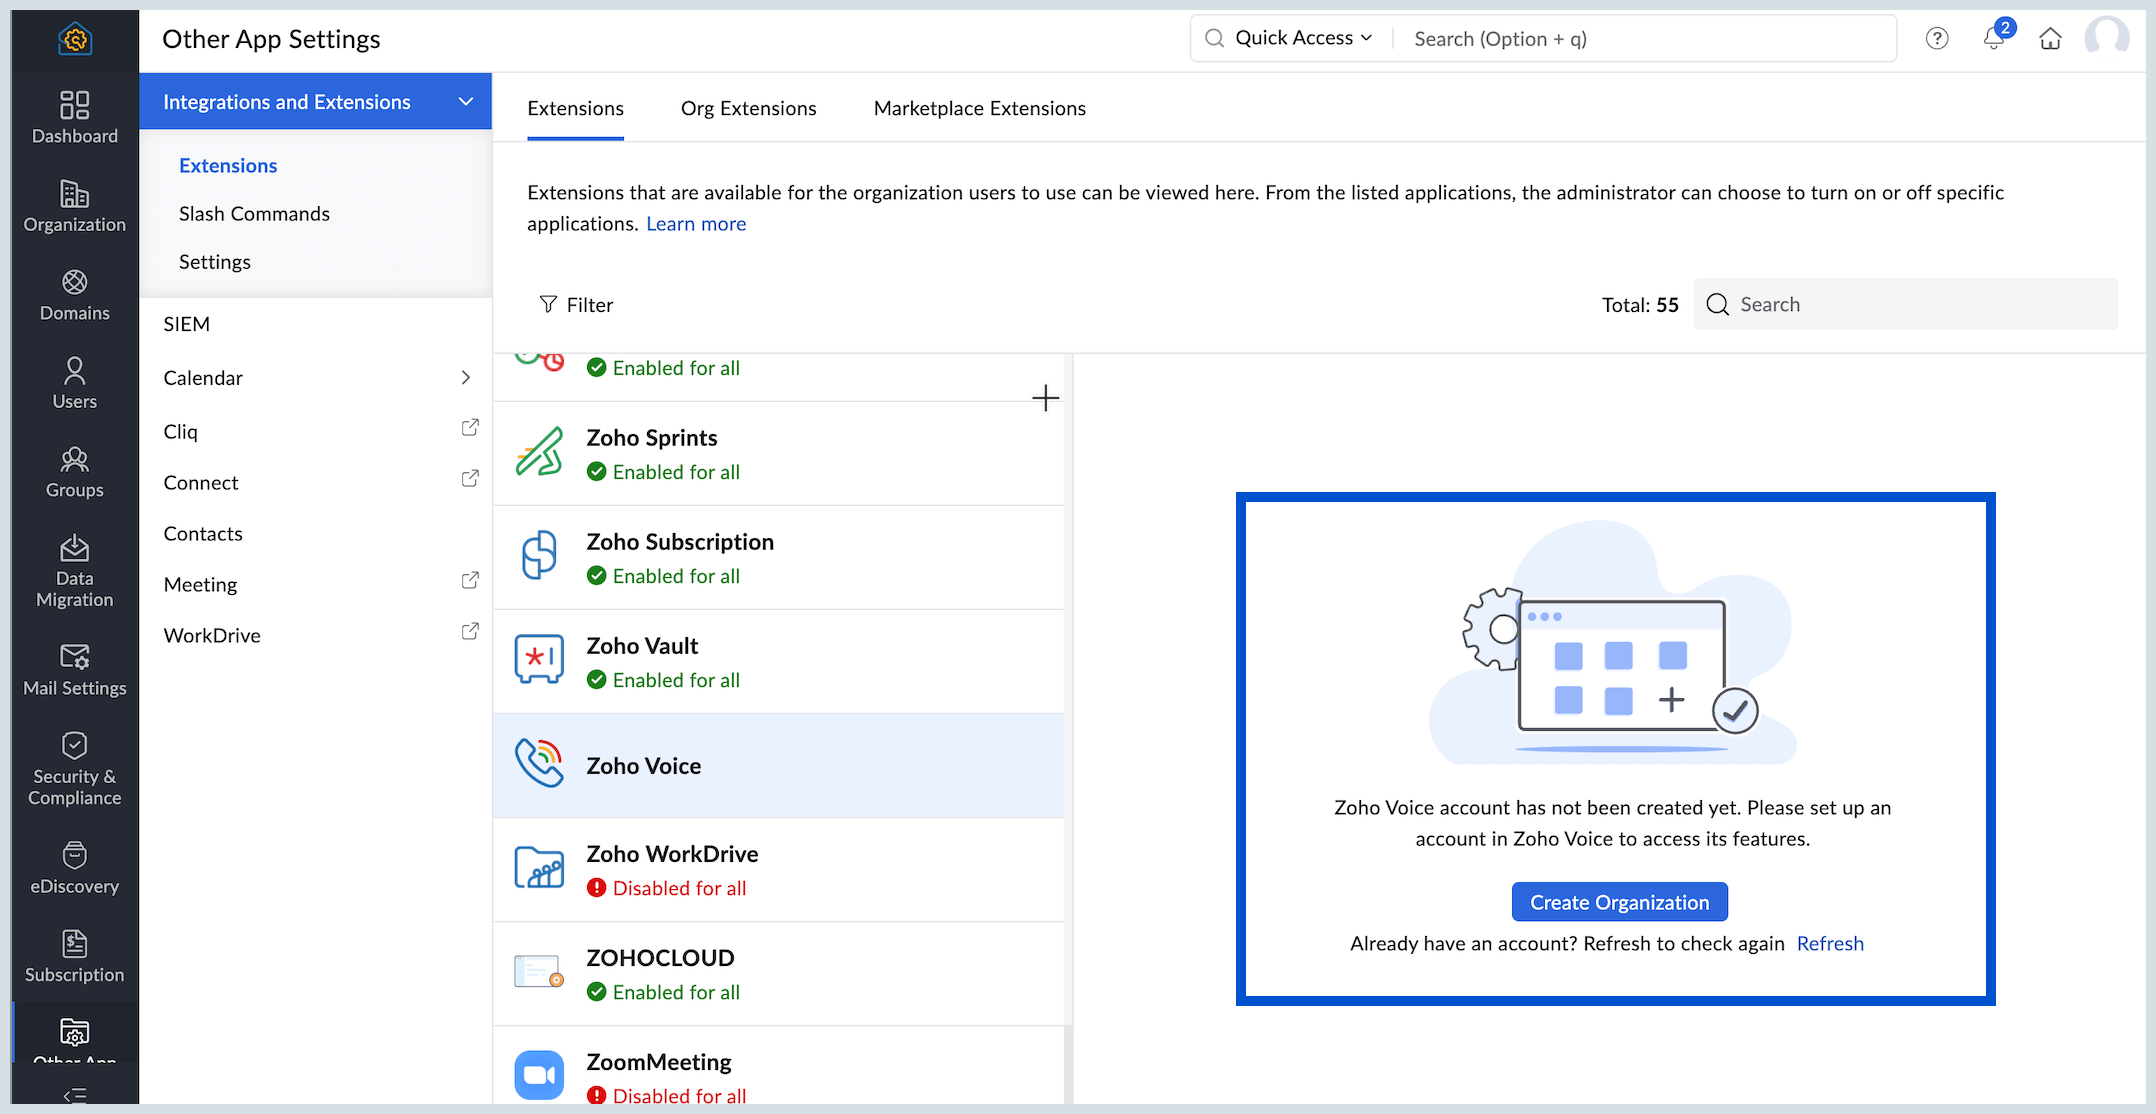
If you don't have a Zoho Voice account yet, click the Create Organization button to set up your Zoho Voice organization account.
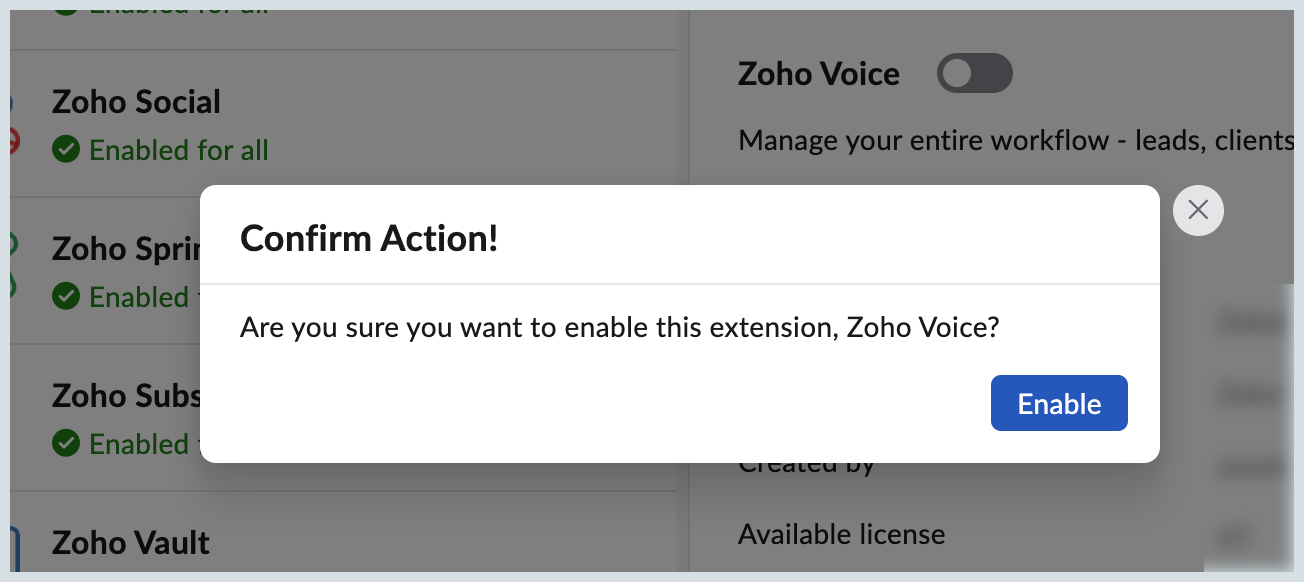
- Turn on the toggle button to enable the extension and click Enable in the confirmation pop-up.
- Add the user account in the Associated Users tab to enable the Zoho Voice extension for the users.
Note:
- Users can only be associated with the Zoho Voice extension based on the number of licenses you have purchased for your Zoho Voice account.
- A Zoho Voice license will be deducted only for users who do not already have a Zoho Voice account. If a user’s account is associated with Zoho Mail for the Zoho Voice extension, a Zoho Voice account will be created for them.
- A user does not need to have a Zoho Voice account to enable the extension in Zoho Mail. However, the user must have a Zoho Mail account for the extension to be configured for them.
Enable/Disable Zoho Voice in Zoho Mail
Once the Organization Admin has configured the Zoho Voice extension for your account, it will be enabled by default for all users. You can easily access it through your mail settings. You can also choose to enable or disable the Zoho Voice extension as an eWidget, from your Mail settings. Follow the steps below to configure the Zoho Voice extension for your account:
- Log into your Zoho Mail account.
- Navigate to settings and click on Integrations.
- Scroll or search for Zoho Voice.
- Click on the Configure button in the Zoho Voice extension card.
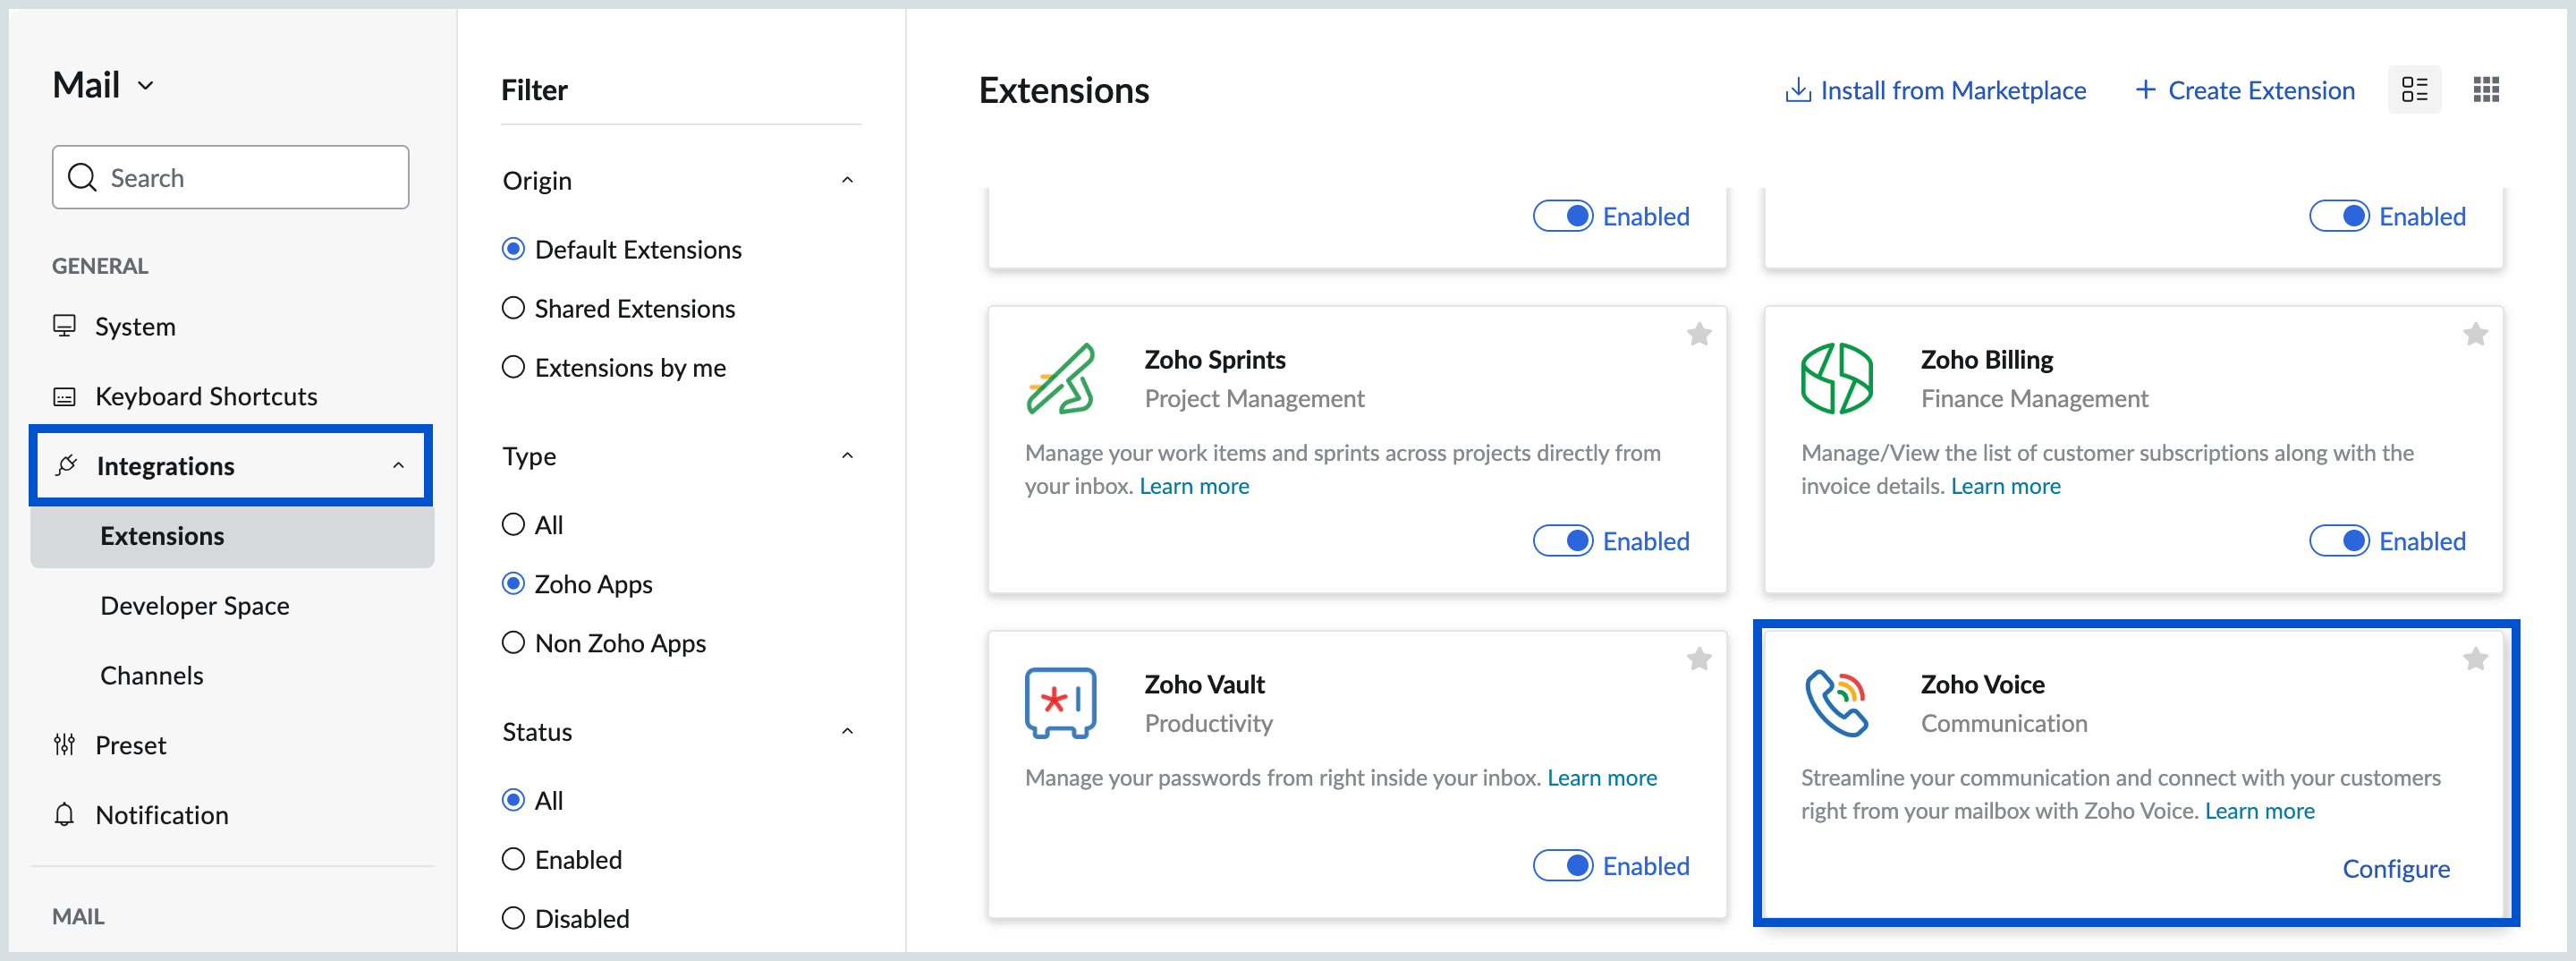
- Turn On/Off the toggle button to enable/disable the extension.

After enabling Zoho Voice, simply click the Access Zoho Voice button to be redirected to the Zoho Voice extension
Access Zoho Voice eWidget
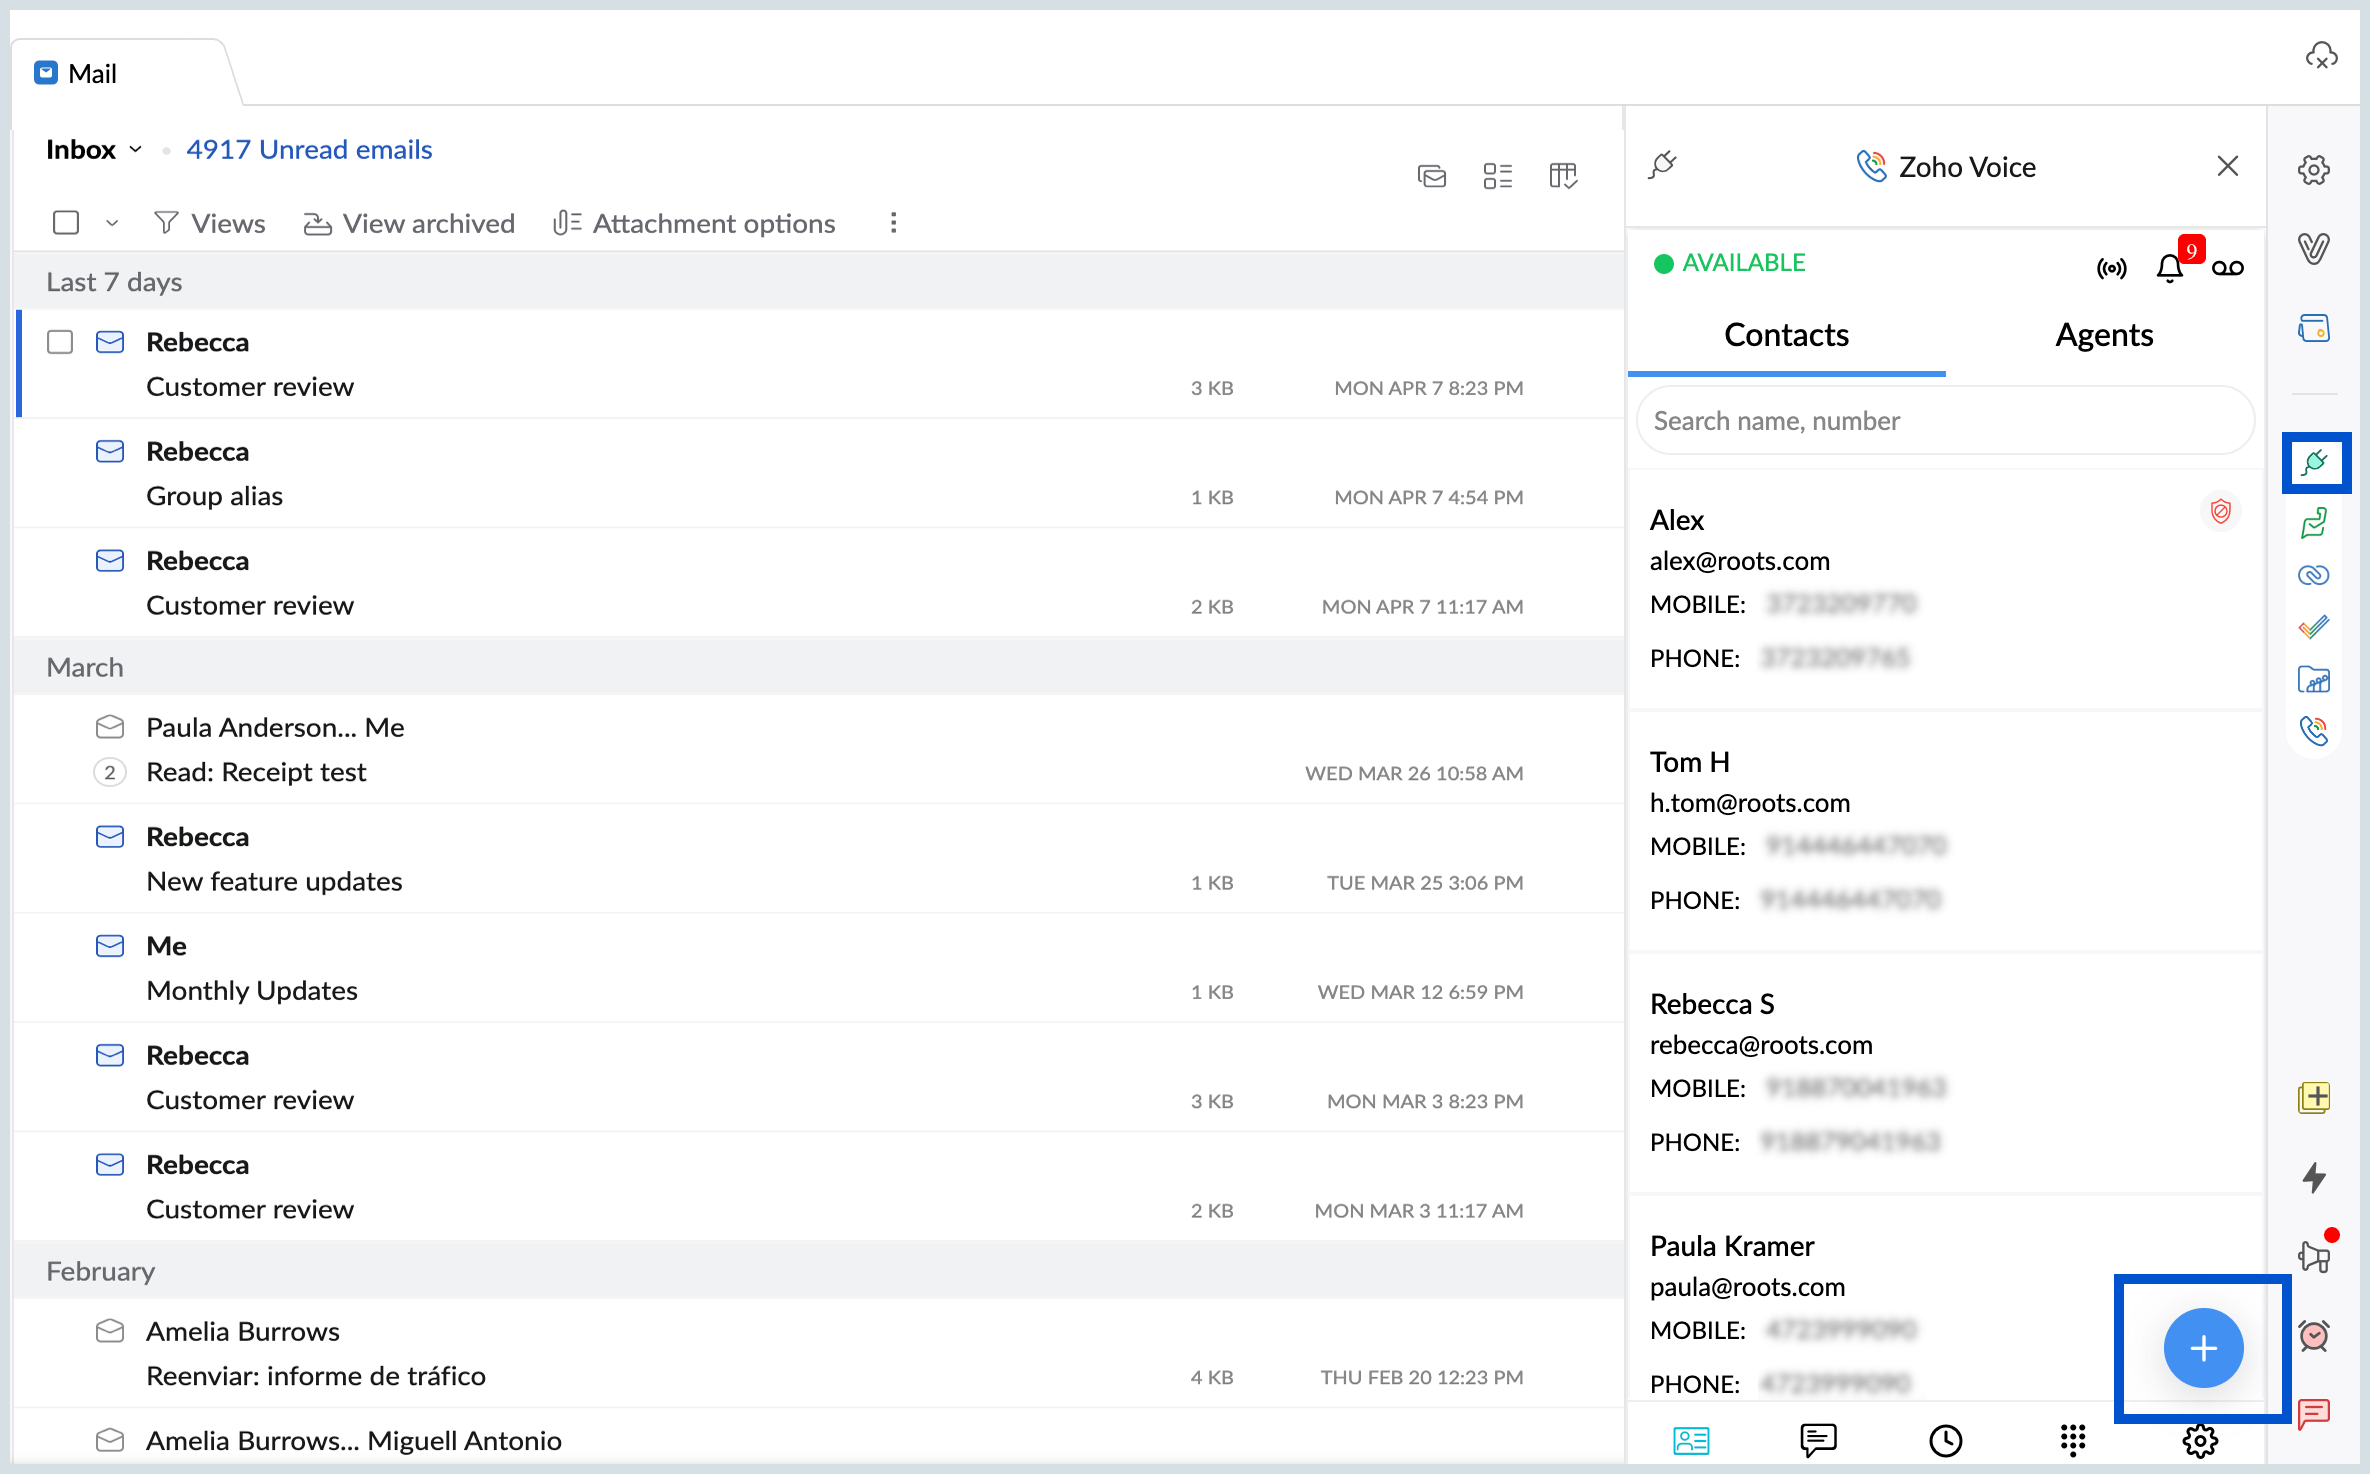
The Zoho Voice extension will be displayed as an eWidget in the right pane for easy access. To open it, simply click on the Zoho Voice eWidget icon. For quicker access, you can pin or mark the Zoho Voice icon as a favourite within the eWidget pane. Once you click on the Zoho Voice eWidget, you'll be directed to the Contacts tab.
Contacts
You can save contact information for clients, leads, or even team members directly in the Zoho Voice extension, allowing you to make calls right from your inbox and easily access the information when needed. To create contacts, follow the steps outlined below:
- Log into your Zoho Mail account.
- Click on the Zoho Voice extension in eWidget.
- In the Contacts tab, click on the + icon available in the bottom right corner.
- Enter the required details such as Name, Email, Mobile Number and you can even mark the contact as favourite.
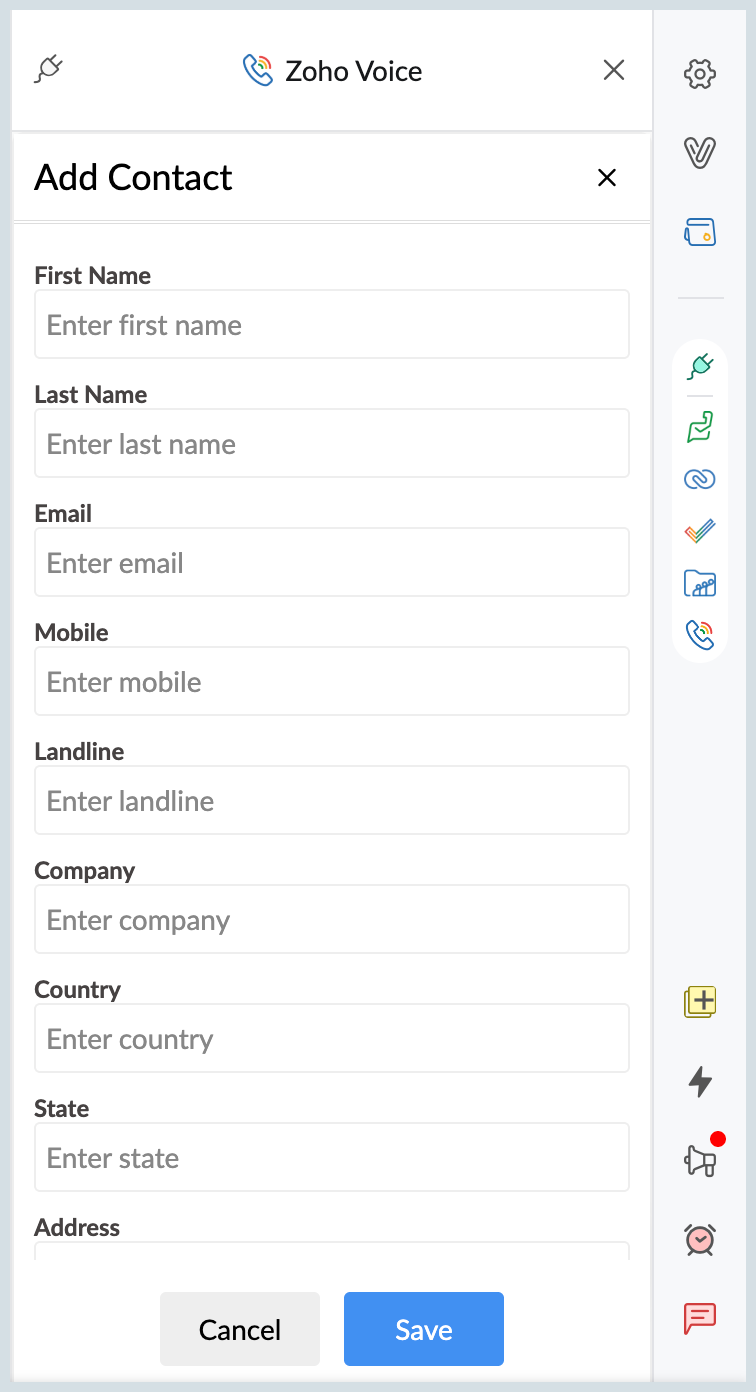
- Click Save to create contact.
Once a contact is saved, you can make calls or send SMS directly from the Zoho Voice extension without leaving your inbox. Additionally, you can click on any contact to view its details, edit the information, or mark it as spam.
After a call ends, you can add notes to summarize the conversation. Simply write your thoughts, choose the outcome, and check the history of any notes you have added before.
Make Calls from Email Preview
When you receive emails containing mobile numbers, you can make calls directly from the email preview without switching to another application. Simply click the Zoho Voice call icon next to the mobile number in the email preview, and the Zoho Voice extension will open in the right pane to initiate the call.
More Options
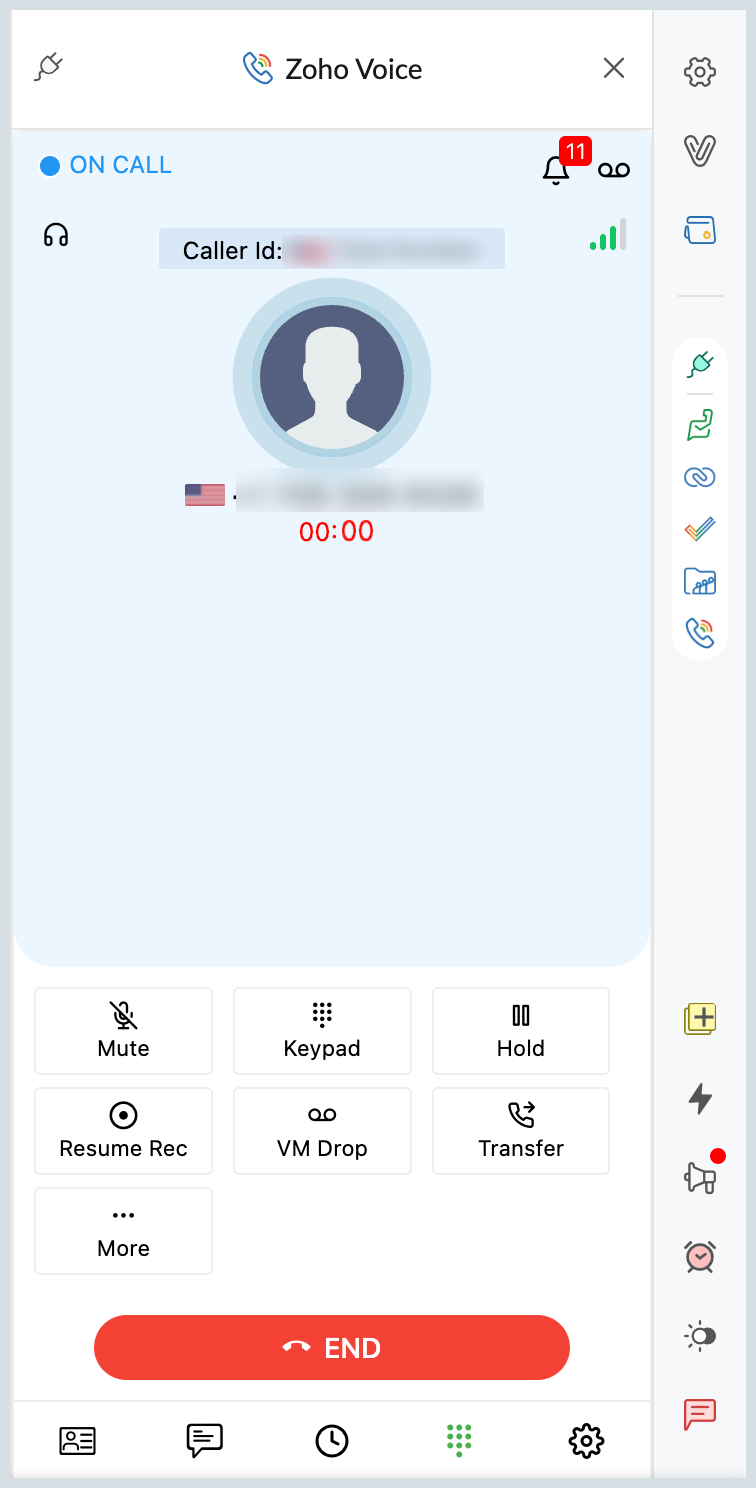
When you're on a call, in addition to muting your microphone, accessing the dial pad, and putting the call on hold, you can also take advantage of several actions directly from the caller display screen. Here’s what you can do:
- Record -You can easily record the call conversation by simply clicking the record icon. To enable call recording, you must configure the call recording option in the Zoho Voice application.
- VM Drop - The Voicemail Drop feature allows you to effortlessly leave pre-recorded messages when an outbound call reaches a voicemail box. This can only be accessed and created through the Zoho Voice application.
- Transfer - While on a call, you have the option to transfer the call to other users, including your Agents, Queues, and Contacts.
- More - If you want to add notes during the ongoing call, click on the More option. This allows you to add new notes and view the history of all the notes you have previously recorded.
Agents
Users and team members associated with the same Zoho Voice account as you will be listed under the Agents tab. Agents cannot be added through the Zoho Voice extension in the eWidget; they must be added via the Zoho Voice application. Through the Zoho Voice extension, you can make calls and view the agent status.
Status
Your status can be updated manually or automatically to inform other users or agents of your availability. Follow the steps below to update your status:
- Log into your Zoho Mail account.
- Navigate to Zoho Voice extension in eWidget.
- In the header, click on the status icon available at the top left corner of the eWidget.

- You can choose from the drop-down to change your status to:
- Available
- On Break
- Busy
- Offline
Notifications
All your Zoho Voice notifications, including messages, missed calls, and more, will be conveniently displayed in the Notifications tab, keeping you informed. To access them, simply click the Notifications icon in the top-right corner of the Zoho Voice eWidget. All notifications will be listed, and you can easily filter them by category—such as messages, calls, announcements, call notes, and more—making it simple to find the information you need.
Additionally, you can mark all notifications as read at once using the Mark All Read option in the notifications tab. You can also click the Clear All icon to instantly remove all notifications from the Notifications tab.
Voicemails
When you are unavailable, appear busy, or miss a call, other users can leave you a voicemail, which is a recorded message you can listen to and respond to later. These voicemails will be available in the Voicemails tab. Only the most recent 20 voicemails will be accessible. To listen to your voicemails, follow the steps outlined below:
- Log into your Zoho Mail account.
- Navigate to Zoho Voice extension in eWidget.
- Simply click on the Voicemails icon in the top right corner of the Zoho Voice eWidget, next to the notifications icon.
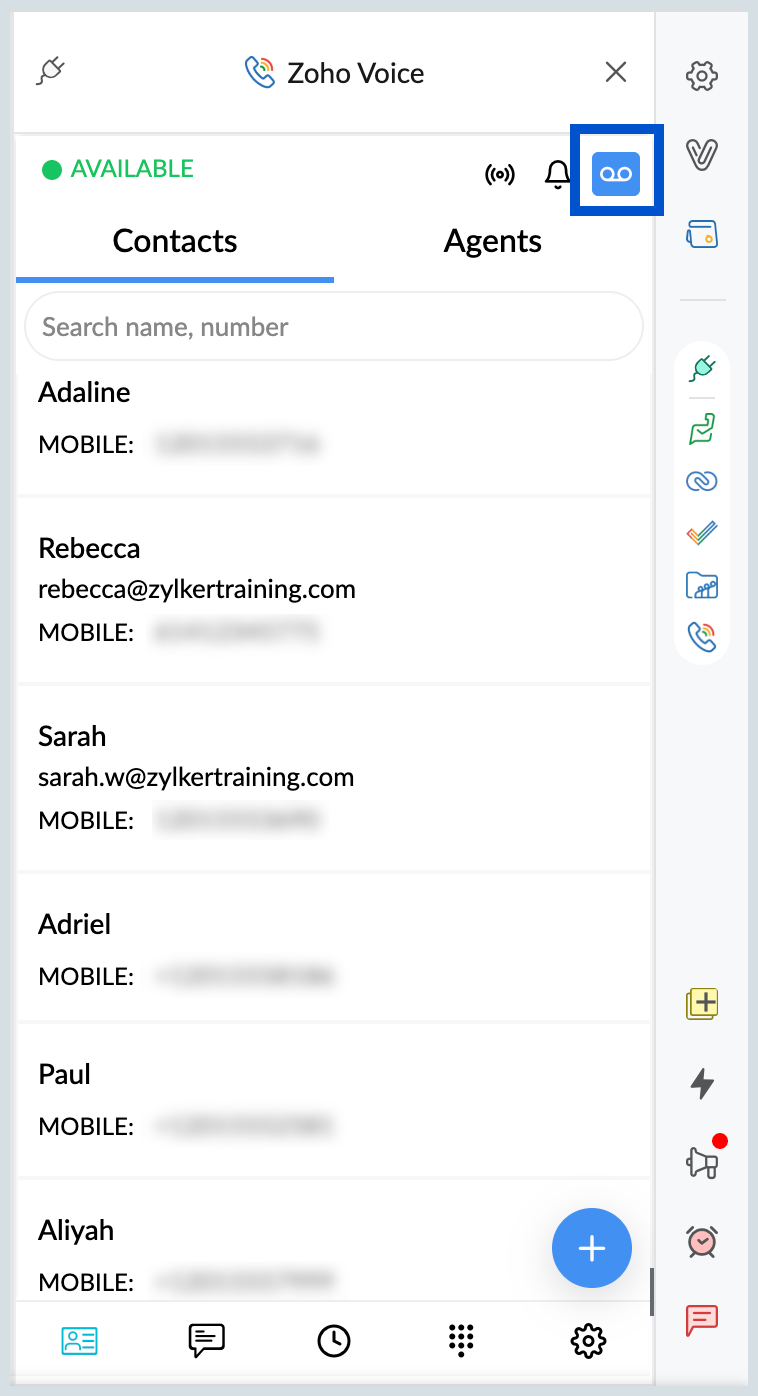
- Once connected, the call display screen will appear, and your Voicemails will be played automatically.
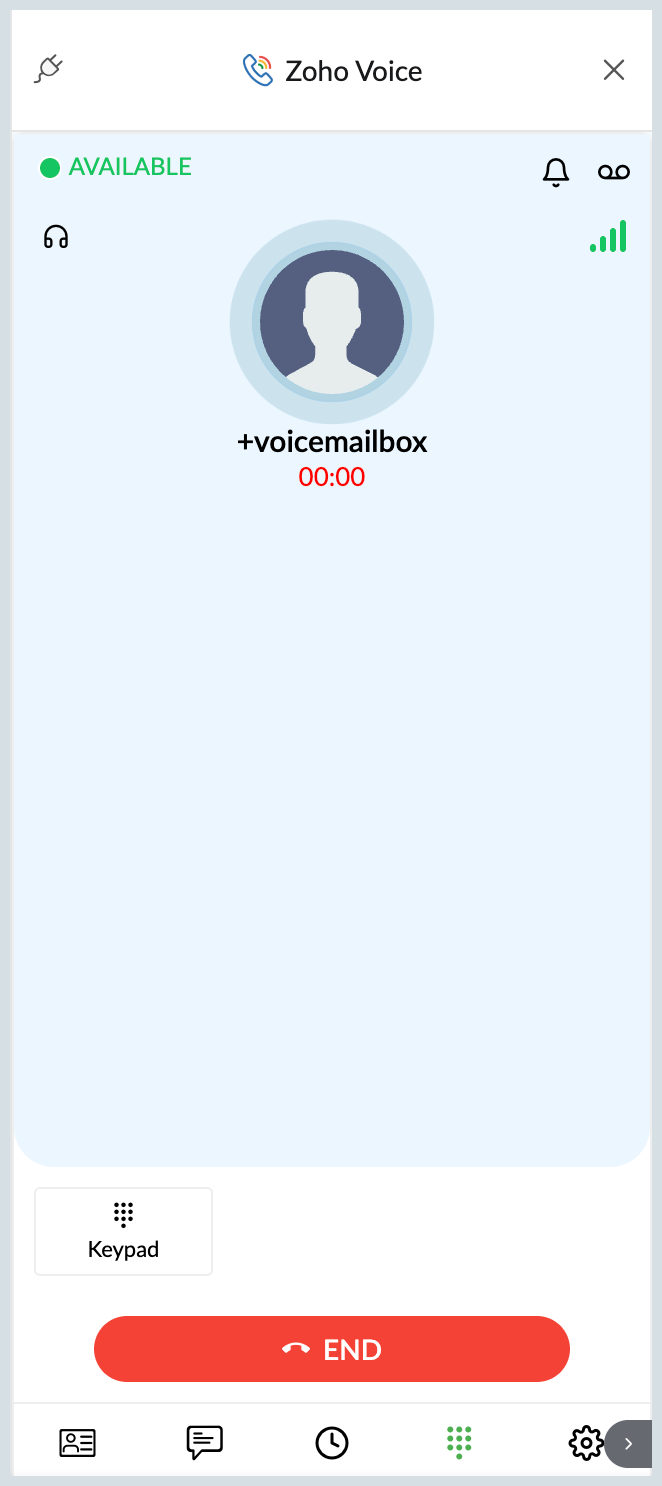
- You can cut the call if you no longer want to listen to voicemails.
You won't be able to listen to Voicemails from the Voicemail icon in the header if you have already listened to them.
Search
With multiple contacts and agents information, finding a specific user's information can be time-consuming. To save time, you can use the Zoho Voice Search bar to quickly find what you are looking for, instead of manually scrolling. The search allows you to easily access information related to Contacts, Agents, SMS, and Logs within their respective tabs in your Zoho Voice extension.
SMS
Note:
- To be able to Send SMS, you would be required to enable SMS in Zoho Voice application
- For the US and Canada region, 10DLC (10-Digit Long Code) registration is required to send SMS/MMS.
You can also send SMS messages to the contacts or agents whose numbers you have saved in Zoho Voice. To send a SMS, simply follow the steps outlined below:
- Log into your Zoho Mail account.
- Navigate to Zoho Voice extension in eWidget.
- Click on the SMS icon in the footer of the eWidget next to Contacts icon.
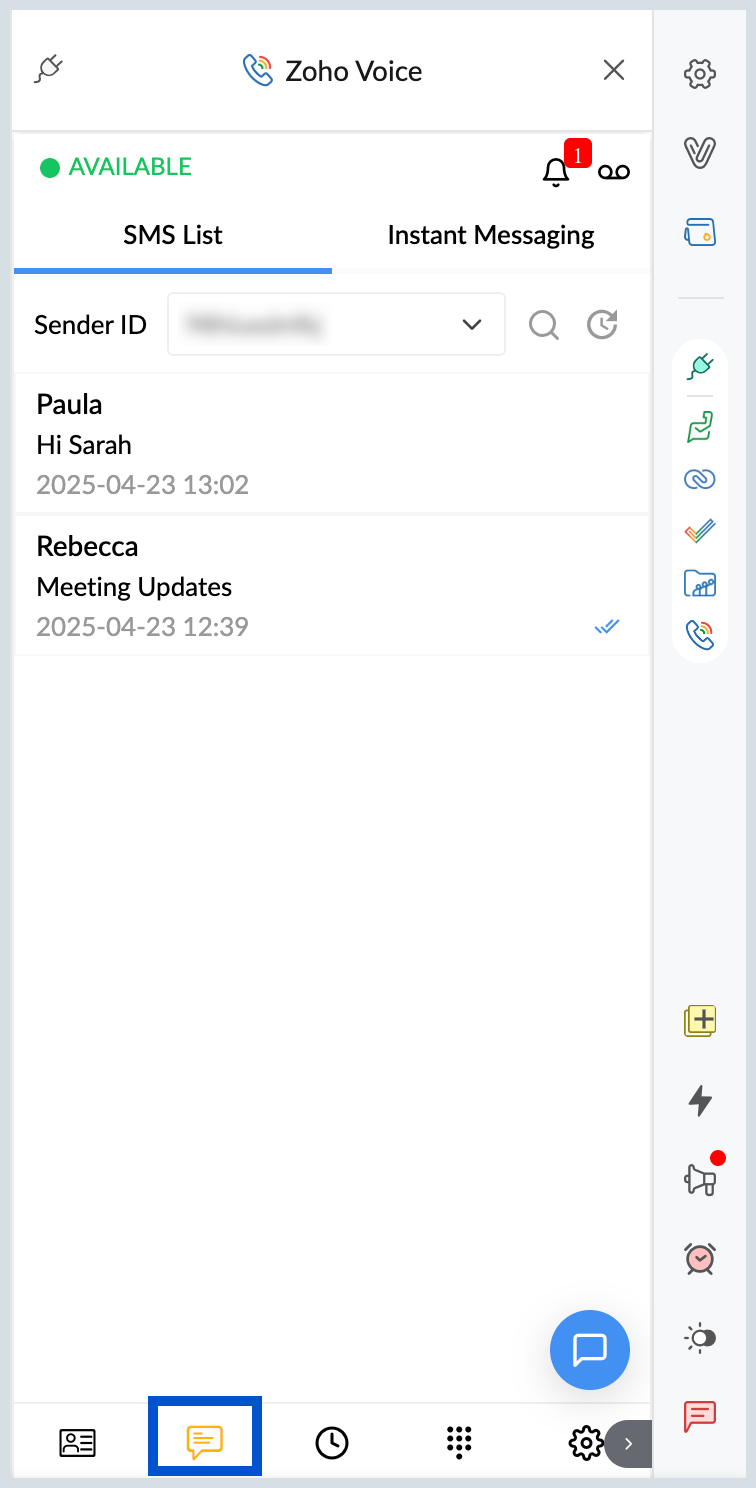
- All the SMS you have sent or received, will be displayed in the SMS list and your Sender ID will be displayed on top. You can also choose a different Sender ID from the drop-down menu.
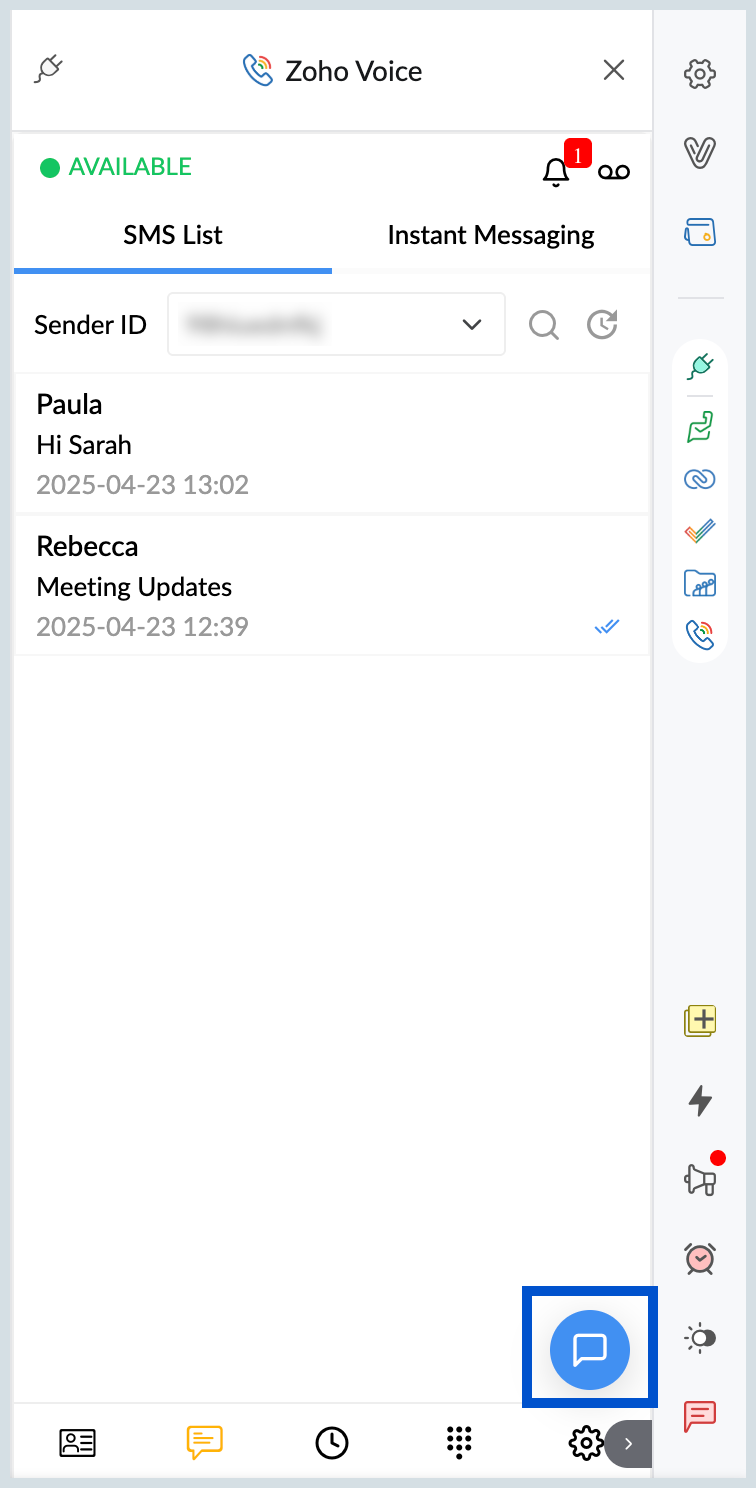
- Click on the Send SMS icon at the bottom right corner to send a SMS to a user you have not sent a SMS already.
- The send SMS tab will be displayed, allowing you to choose or enter the contact number and enter the message you want to send.
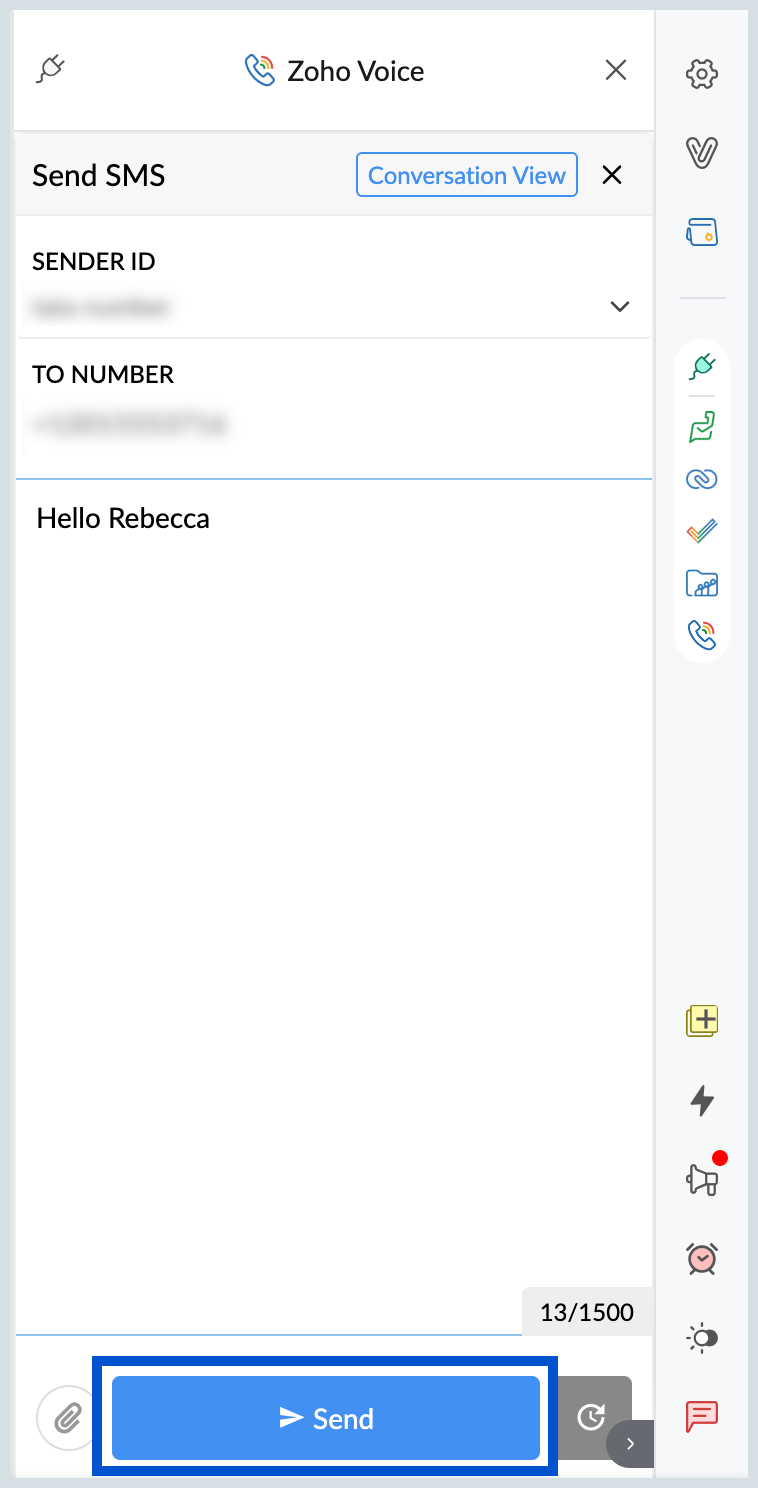
- Click on the Send button in the bottom of the tab to send the message or you can also choose to schedule the message for later.
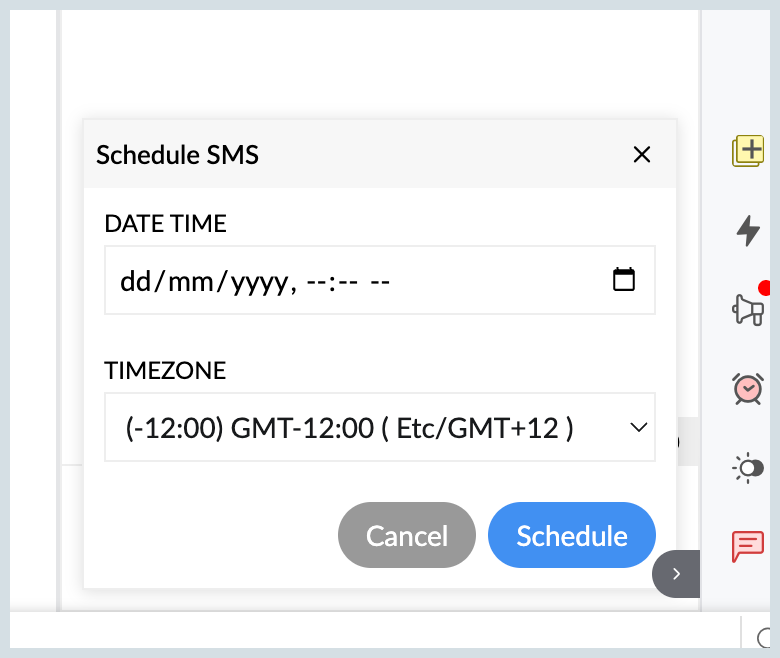
- You can schedule messgaes by clicking on the Schedule later icon (Clock icon) next to the send button. Select the date&time and the timezone and click Schedule. The message will delivered at the mentioned time.
You can also click the Conversation View button to display your SMS messages in a chat conversation format. Additionally, you can search for specific messages within the conversation using the search icon and make a call to the number by clicking the call icon in the header.
Scheduled SMS
You can schedule messages to be sent at a specific time, ensuring they are delivered to the recipient exactly when you need. To schedule a message, simply type your message and set the desired time in the Send SMS tab. You can also schedule messages directly from the Scheduled SMS tab by clicking the Schedule SMS icon available at the top right corner of the eWidget.
After scheduling a message, you can easily reschedule or delete it by hovering over the scheduled message, allowing for quick adjustments.
MMS(Multimedia Messaging Service)
In addition to sending text messages, you can easily share attachments with other users through the SMS module. Follow the steps mentioned below to share attachments:
- Log into your Zoho Mail account.
- Navigate to Zoho Voice extension in eWidget.
- Click on the SMS icon in the footer of the eWidget next to Contacts icon.
- Enter the required details and click on the Attachment icon available at the bottom left corner to insert attachments, files etc..
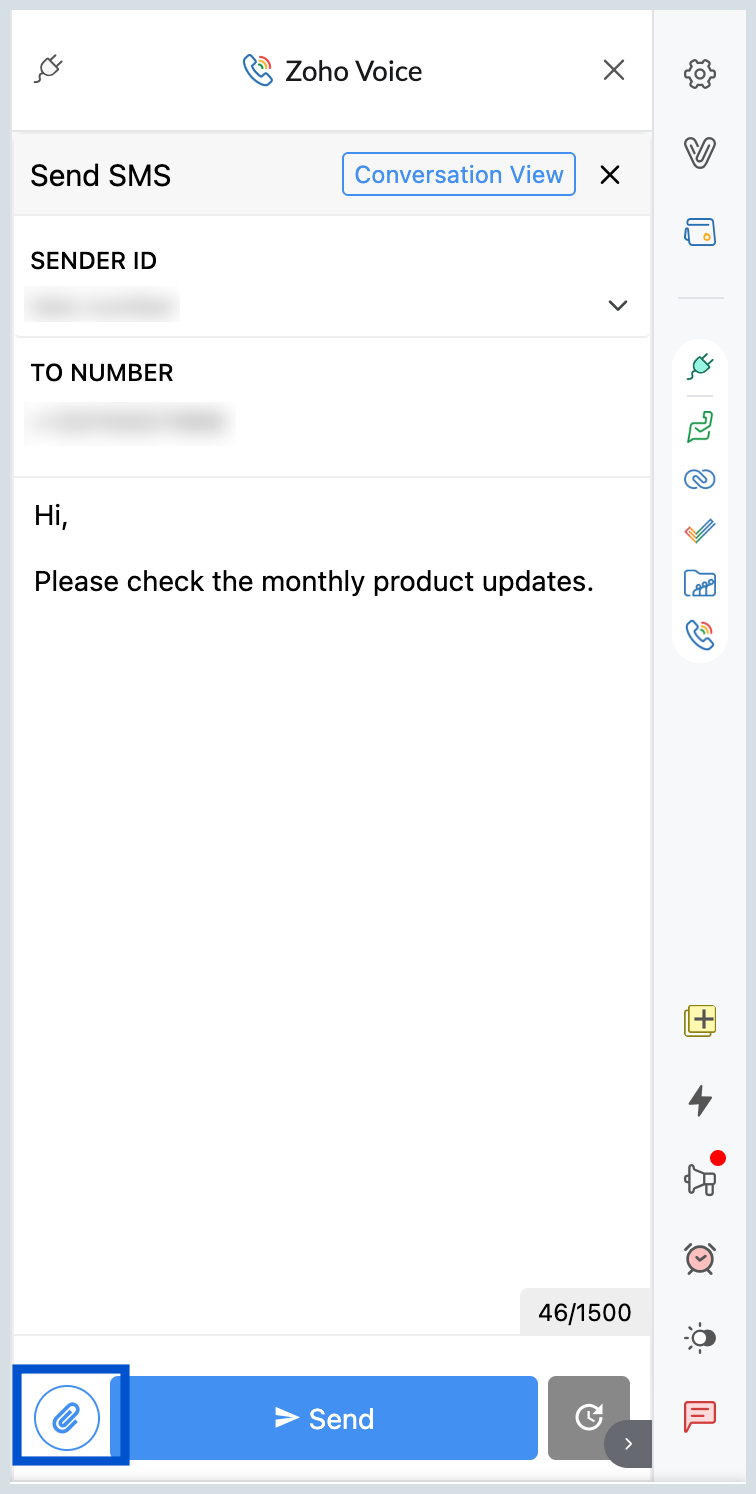
- Choose the attachment you want to add and click on the Send button to deliver the message.
Instant Messaging
In addition to sending SMS messages through the Zoho Voice extension, you can also utilize instant messaging services such as WhatsApp and Telegram to communicate with other users. Follow the steps mentioned below to send instant messages:
- Log into your Zoho Mail account.
- Navigate to Zoho Voice extension in eWidget.
- Click on the SMS icon in the footer of the eWidget next to Contacts icon.
- Navigate to the Instant Messaging tab. Chats will be displayed based on the selected application.
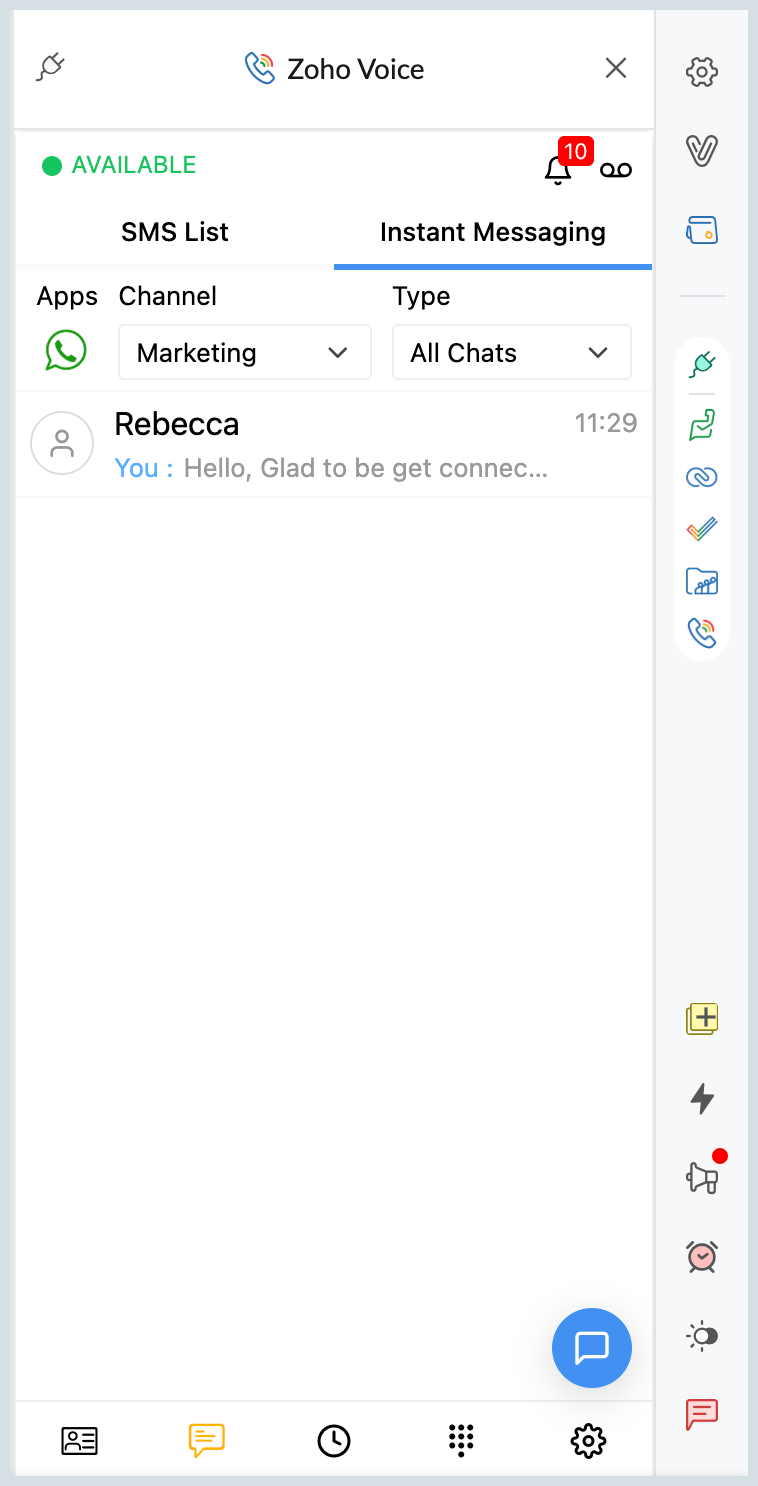
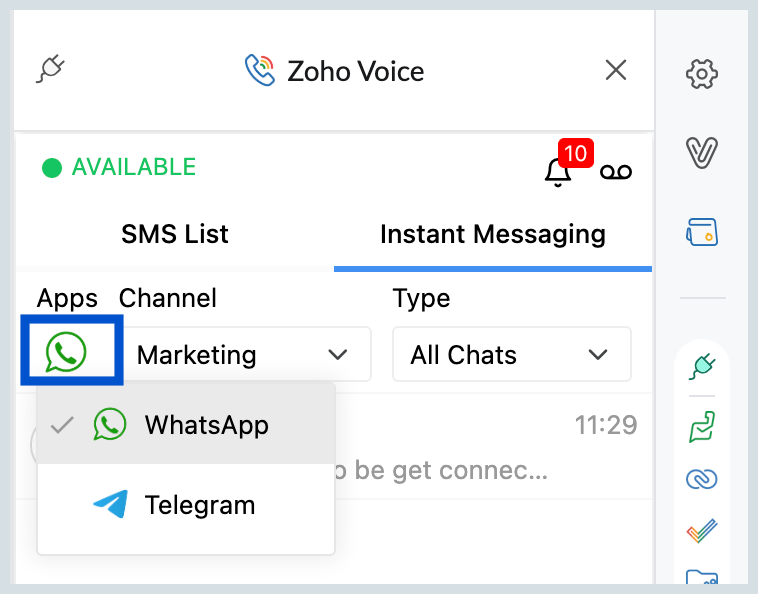
- To change the messaging app, click the app icon in the top-left corner. You can also select the channel and chat type using the drop-down menus.
- Click the Send SMS icon at the bottom-right corner to start composing a message.
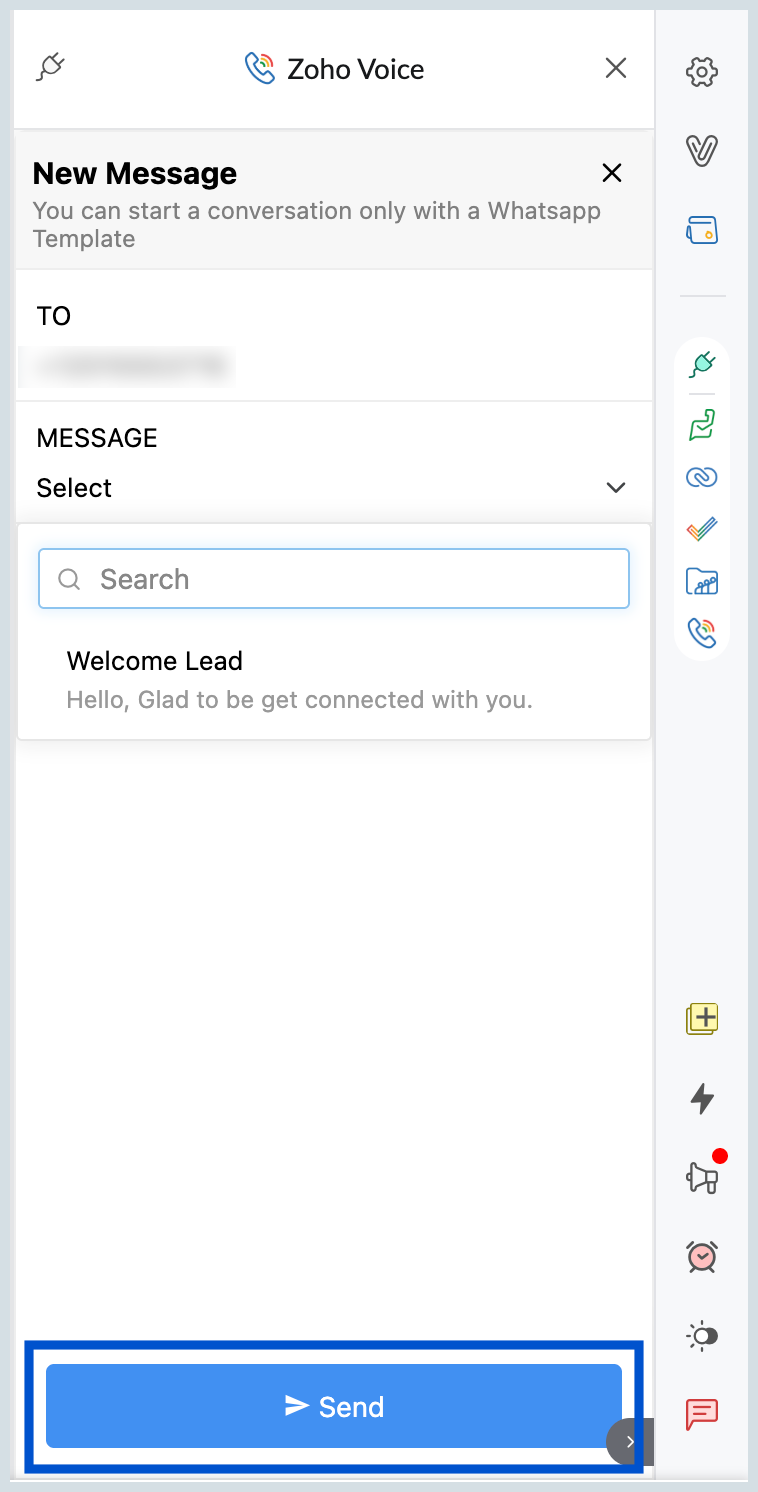
- A New Message window will appear where you can:
- Choose the recipient's phone number
- Select a message template
- After entering all the required information, click Send to deliver your message.
Note:
The Send SMS option in Instant Messaging for any of the above mentioned messaging services will only be available once you have created a Channel to communicate.
Logs
All your call activity—including placed, received, missed, or disconnected calls—will be displayed in the Logs tab of the Zoho Voice extension. The logs show the call dates along with their duration for easy reference. From the Logs tab, you can also:
- Make calls
- Send SMS
- Block numbers
- Copy and paste phone numbers
All your call activities—whether placed, received, missed, or disconnected—will be displayed in the Logs tab of the Zoho Voice extension. The logs include the call dates along with the duration of each call. From the Logs tab, you can make calls, send SMS, block numbers, or copy-paste the number, all through the More Options menu. Simply hover over the contact to access Call details or more options. However, when hovering over the call icon for agents, you can only make calls; options like viewing details or blocking agents won't be available.
If you have a call recording of the conversation, you can use the play Recording icon to listen to the recordings available in the call logs. To view your logs, simply click on the clock icon at the footer of the Zoho Voice extension. You can also use the search bar to find logs from specific numbers. If you receive a call or make a call to a number that's not in your contacts list, you can add it directly from the Logs tab. Just hover over the number log and click the Add Contact icon to save the contact to your list.
Voicemail Logs
You can also listen to your voicemails in the Voicemail logs by clicking on the play voicemail icon when you hover over the Voicemail. All the voicemails you receive will be listed here, and you can listen to them as many times as you like. The date, time, and duration of each voicemail will also be displayed. Additionally, you can search for a specific number using the search option to easily find and listen to voicemails from that number. 
Hover over a Voicemail and click on the Voicemail details icon to view details such Log ID, From, To, Agent and much more. You can also Listen to the Voicemail by clicking on the play icon available at the top or choose to listen to the transcription of the Voicemail.
Voicemails Transcription
When you receive voicemails, you have the option to read their transcriptions instead of listening to the audio recordings. Voicemail Transcriptions convert spoken messages into written text, allowing you to quickly grasp the content without needing to listen to the voicemail. To view Voicemails Transcription, follow the steps mentioned below:
- Log into your Zoho Mail account.
- Navigate to Zoho Voice extension in eWidget.
- Click on the Logs icon in the footer of the eWidget next to SMS icon.
- Click on Voicemail logs. All the voicemails you have received will be displayed.
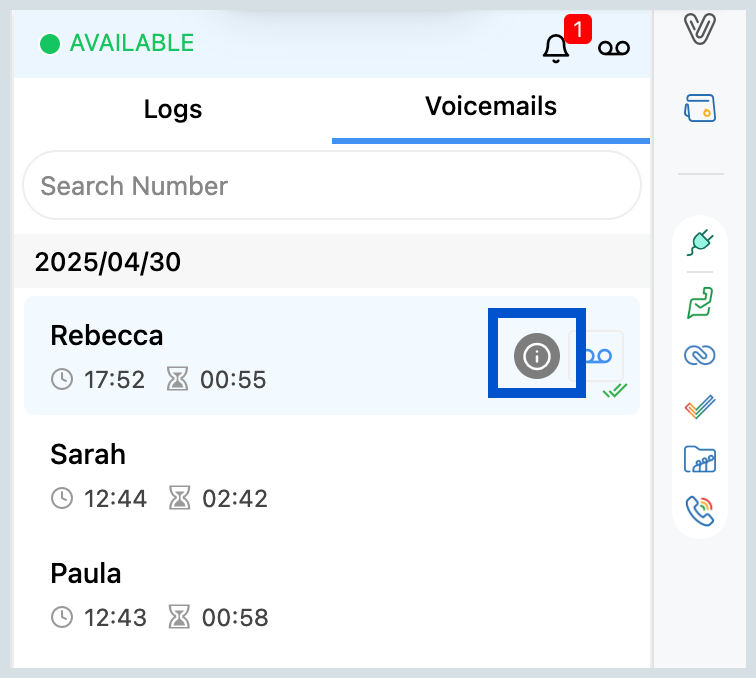
- Click on the Voicemail whose transcription you would like to view. Hover over the Voicemail and click on the Voicemail details icon.
- The Voicemail transcription would be displayed, along with Transcribed by and Transcribed time.
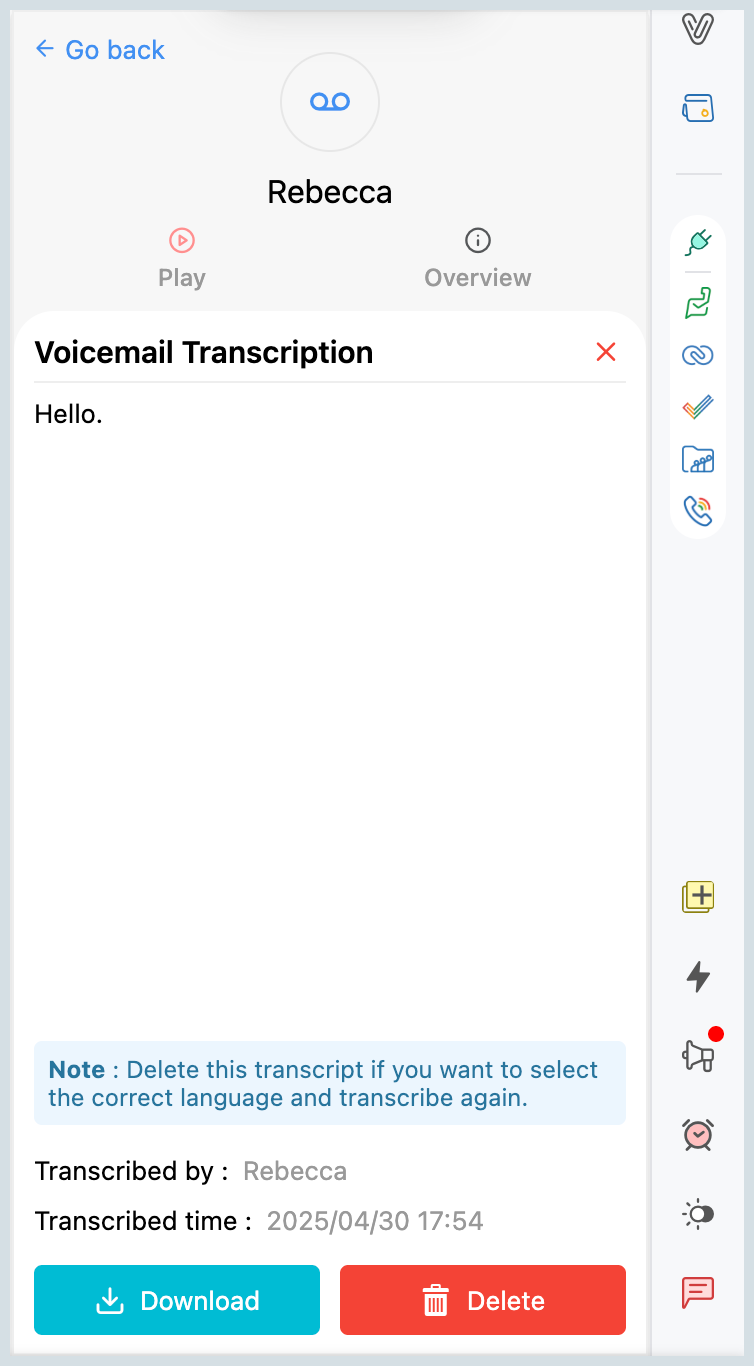
- You can also choose to download or delete the Voicemail Transcription.
Dial pad
With Zoho Voice extension in eWidget, you can make calls directly from your inbox without needing to save contact information first. The Dial Pad lets you quickly enter the number and place a call right away. To access the Dial Pad, simply click the Dial Pad icon at the footer of the Zoho Voice extension in eWidget. While making calls, you can change the country code by clicking on the flag icon, and you can also choose a different caller ID for the call.
You can utilize the Auto-select phone number feature in the caller ID option as this chooses the most suitable number for outgoing calls based on the destination country. If you have multiple numbers, you can easily mark your favorites by hovering over the desired number and clicking the star icon, allowing for quicker access and convenience in your communications.
Settings
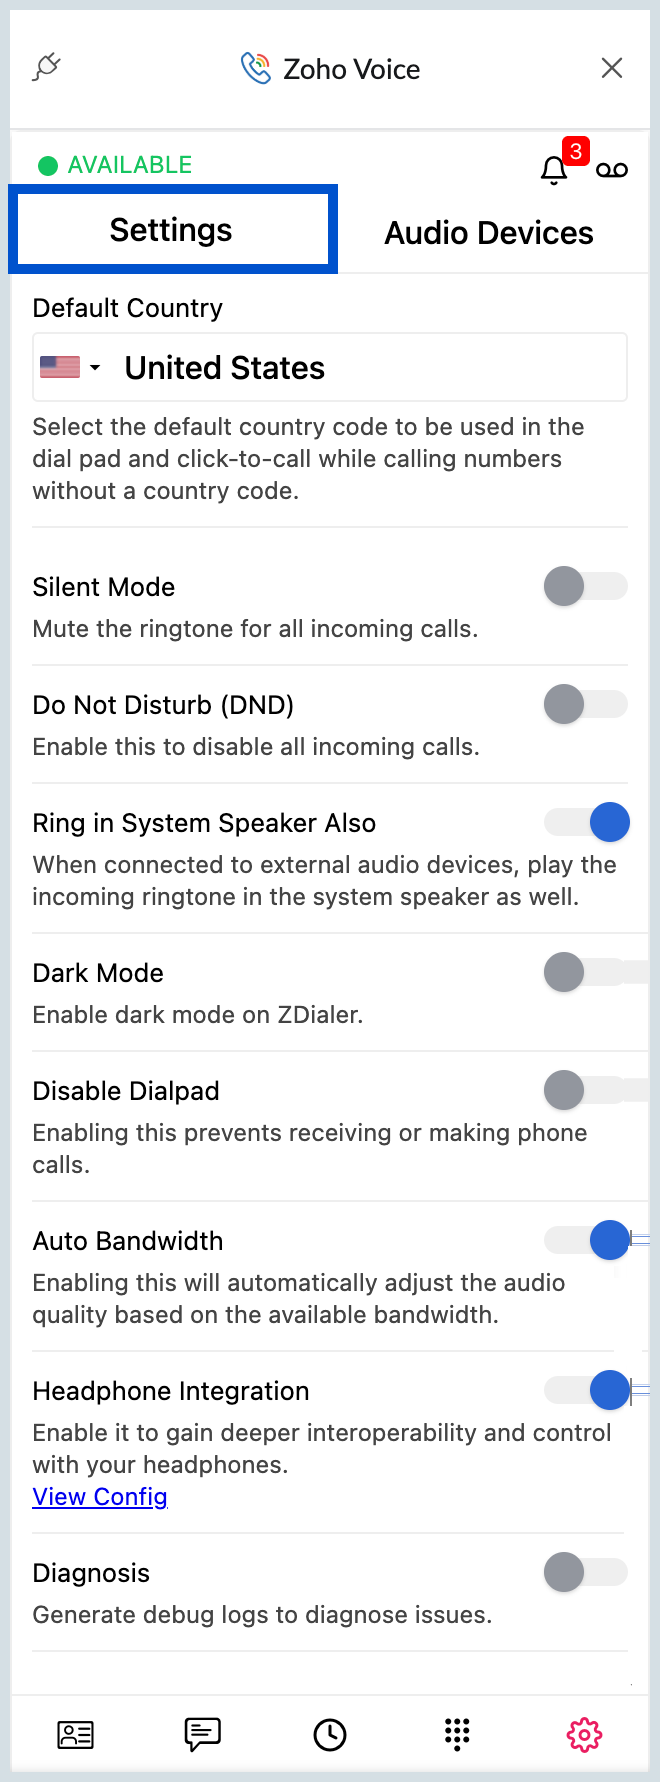
You can manage Zoho Voice eWidget settings through the Settings tab located at the footer of the extension. Here, you can view the username and email ID associated with your Zoho Voice account. The available settings you can customize include:
- Default Country – You can change the default country associated with your Zoho Voice account.
- Silent Mode – If you prefer to mute notifications for incoming calls, you can turn Silent Mode on or off.
- Do Not Disturb – You can disable or enable all notifications for incoming calls by turning the Do Not Disturb mode on or off.
- Ring in System Speaker Also – When your system is connected to external audio devices, you can choose to play the ringtone through your system speakers as well when you receive calls.
- Dark Mode – You can switch the display to dark mode based on your preference, instead of the default light mode.
- Disable Dial Pad – You can choose to enable or disable the Dial Pad here. If you disable it, you won't be able to place or receive calls until you re-enable the Dial Pad.
- Auto Bandwidth – The quality of your audio calls will be automatically adjusted based on the available bandwidth.
- Diagnosis – Enable this option to generate debug logs, which can help diagnose and resolve any issues later.
Audio Devices
You can customize the audio settings for your Zoho Voice extension in eWidget according to your preference. The Audio Device settings are available within the extension's settings.
System Audio Settings
You can enable or disable the toggle to choose between using the default system audio or connecting your own external audio devices with the extension. If you disable the default system audio, you can manage the settings for the connected external audio devices, including:
- Speaker (Audio Output)
- Microphone (Audio Input)
Additionally, you can test the audio settings once you have made the necessary changes.


