Other Actions in Invoices
Edit Invoice
To change details of an existing invoice:
- Go to Sales > Invoices and select the invoice whose details you want to edit.
- Click the Edit icon.
- Make the necessary changes and click Save.

Send Invoice to Customer
Usually, when you create an invoice, you would have saved it as a draft or sent it to your customer right away.
If you have saved it as a draft, you can send it to your customer manually. Here’s how:
- Go to Sales > Invoices and select the invoice you want to send.
- Click the Mail / SMS dropdown and select the way in which you want to send the invoice to the customer.
- Go through the template and click Send.

Note: You need to purchase Snail Mail credits to send snail mails to your customers.
Mark Invoice as Sent
You can manually mark an invoice as sent. This allows you to record payments for the invoice. To mark an invoice as sent:
- Go to Sales > Invoices.
- Select the invoice which is in the Draft status that you want to mark as sent.
- Select Mark as Sent.

If you have enabled Customer Portal for the customer, they can view the invoice in their portal and perform actions.
Share Invoice Link With Customers
Secure Link Sharing: Since the invoice link can be accessed by anyone, Secure Link Sharing adds a layer of security to ensure only the intended recipients view the full invoice. To facilitate this, add your customer’s Email Address or Phone Number to their details in the Customers module. Next, when you generate and share the link, your customer can verify their identity by entering the same email address or phone number to view the full invoice. If they cannot provide these details, they can only Accept, Reject, or Pay the invoice.
Prerequisite: Ensure the invoice has the Sent status before you share it. You can either send it by email or through other methods like SMS or WhatsApp, and then choose Mark it as Sent.
You can generate a link for an invoice and share it with your customers. Using this link, the customer can view the invoice. To generate and share the invoice link:
- Log in to your Zoho Books organization.
- Go to Sales on the left sidebar, and select Invoices.
- Select the invoice you want to share.
- In the Details page, click Share at the top.

- In the Share Invoice Link popup, fill in the following fields:
- Visibility: Choose Public to allow anyone with the link to access the invoice before it expires, or Private and Secure to restrict access to the customer portal.
- Link Expiration Date: Set a date for the link to expire.
Note: By default, the link expires 90 days from the date it’s generated.
- Click Generate Link.
Once the link is generated, click Copy Link to copy and share it with your customers.
Accept or Decline an Invoice as a Customer via Public Link
When you send an invoice link via Email, SMS/Text Message, WhatsApp, or messaging apps, customers can follow the steps below to review and respond to it:
- Click the invoice link.
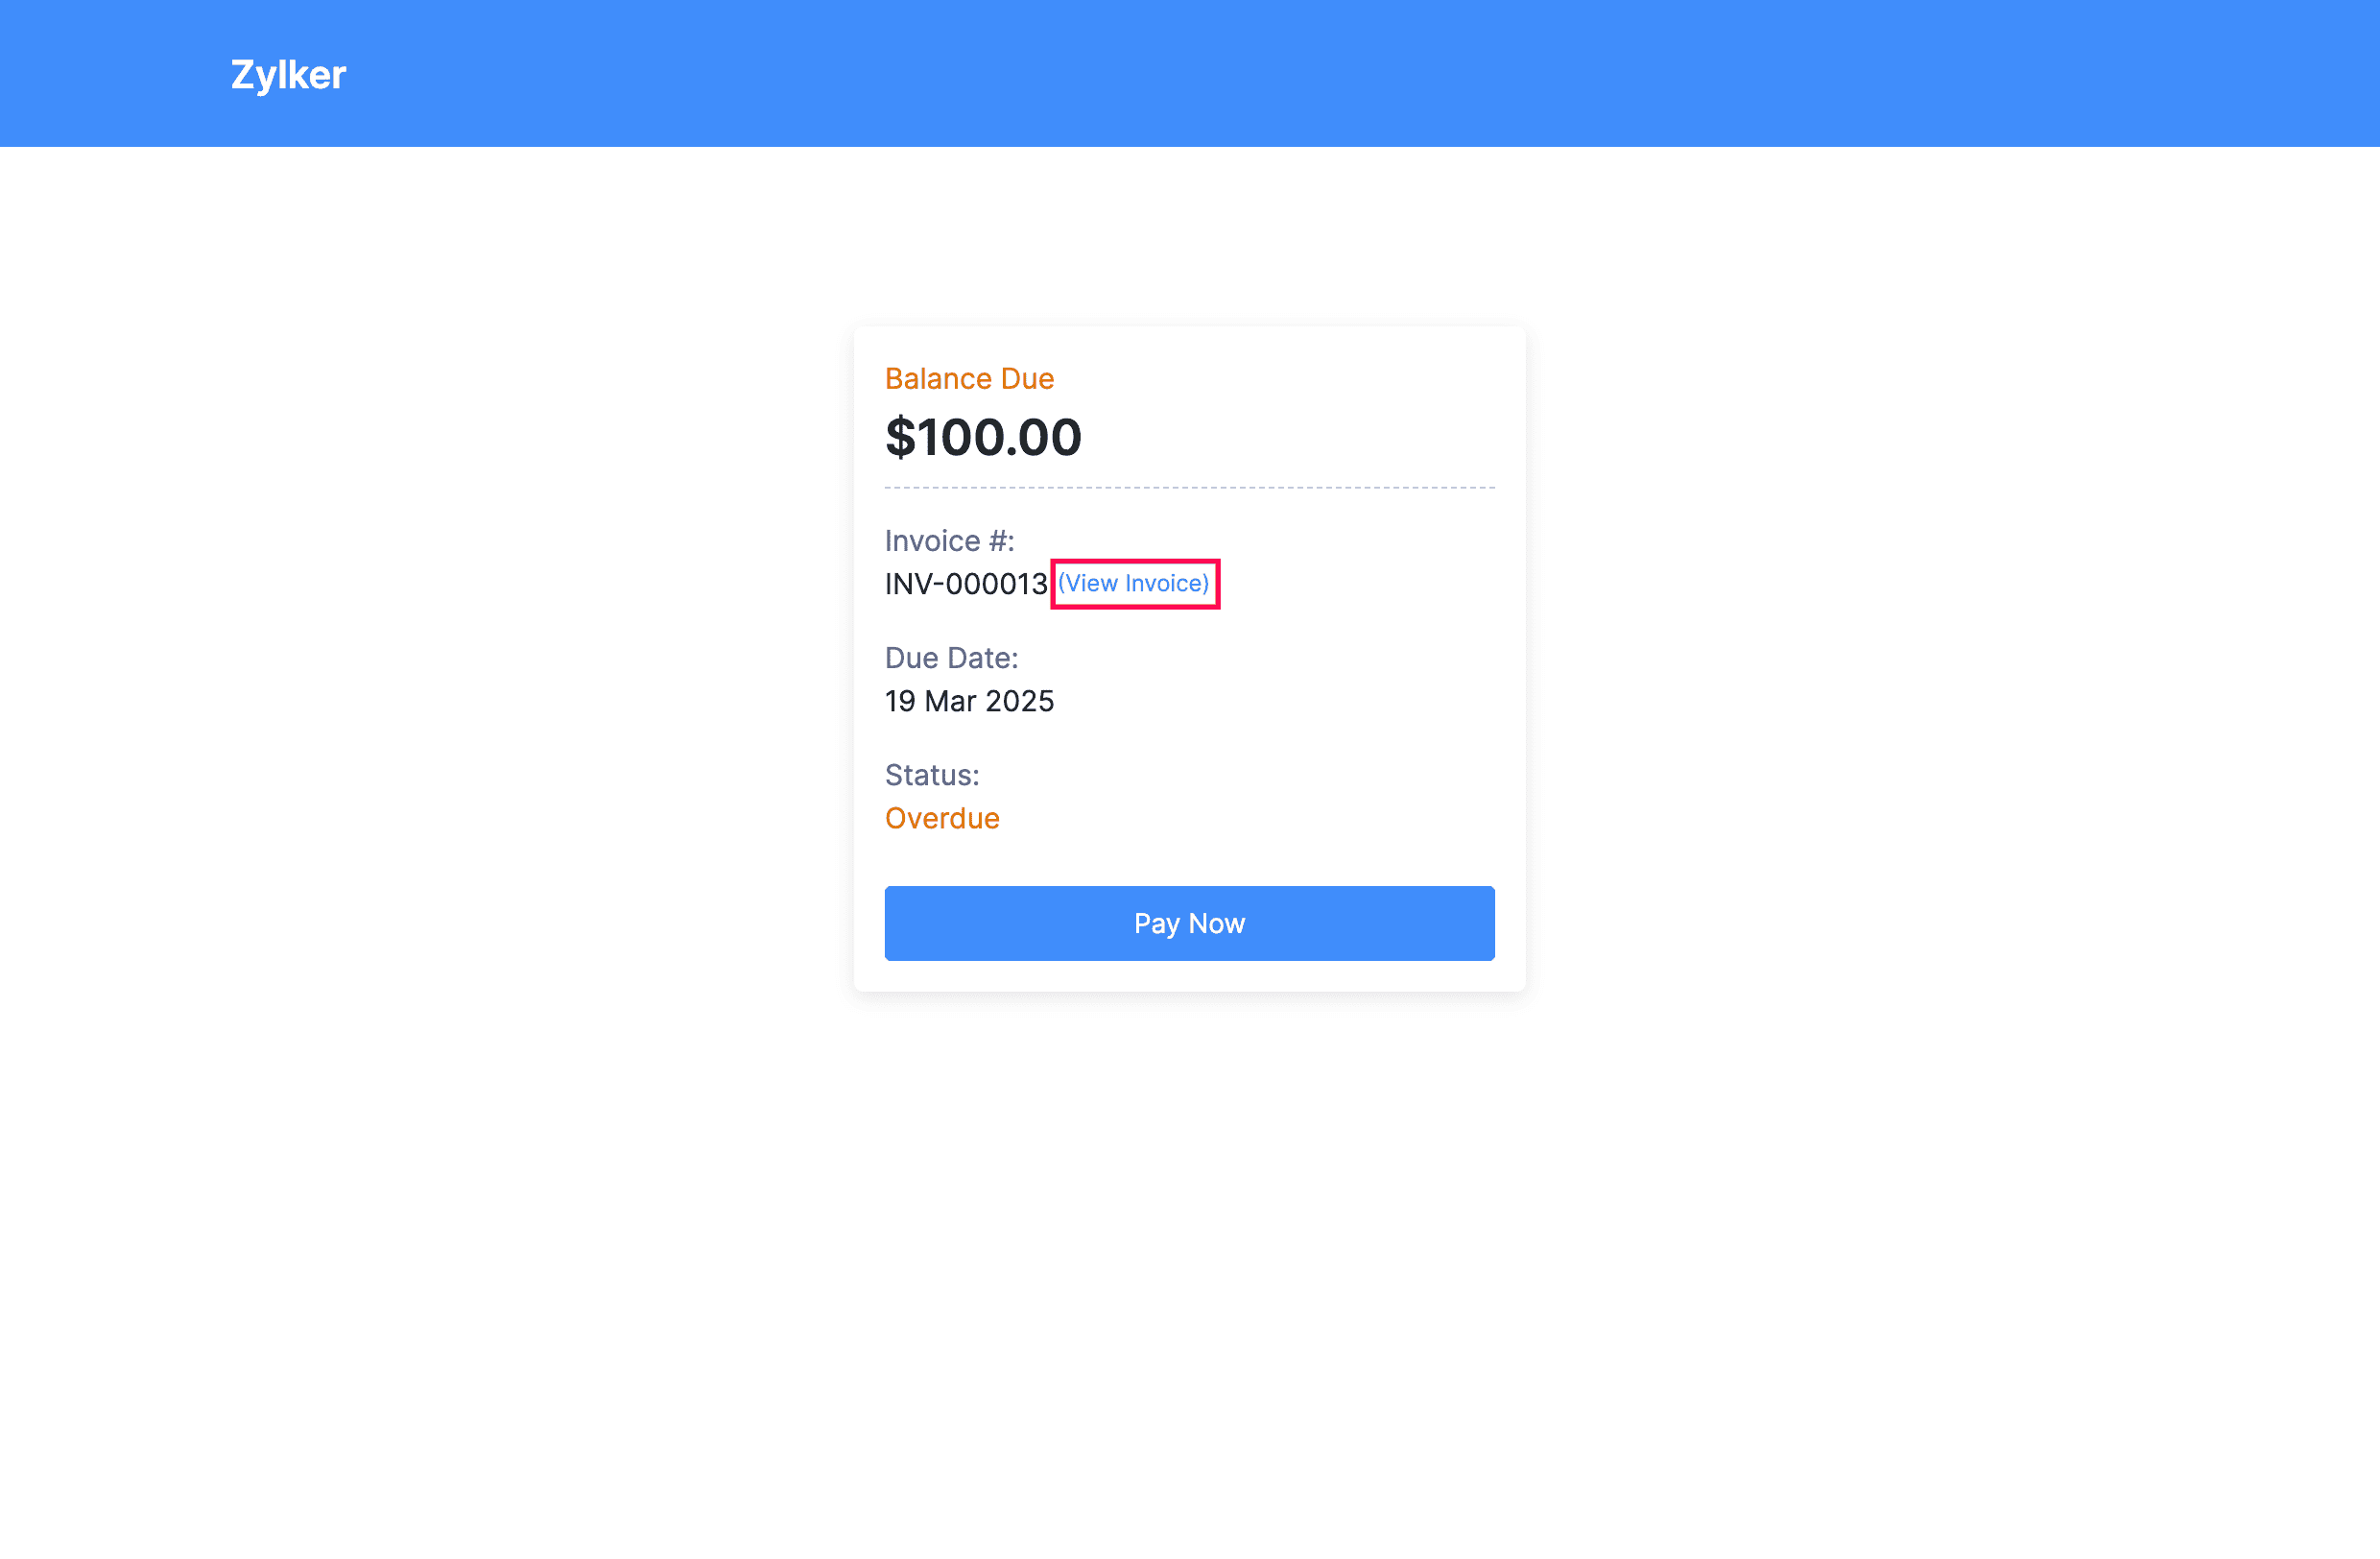
- Choose to Accept, Decline, or click Pay Now.
- To view the full invoice, click View Invoice next to the Invoice Number.
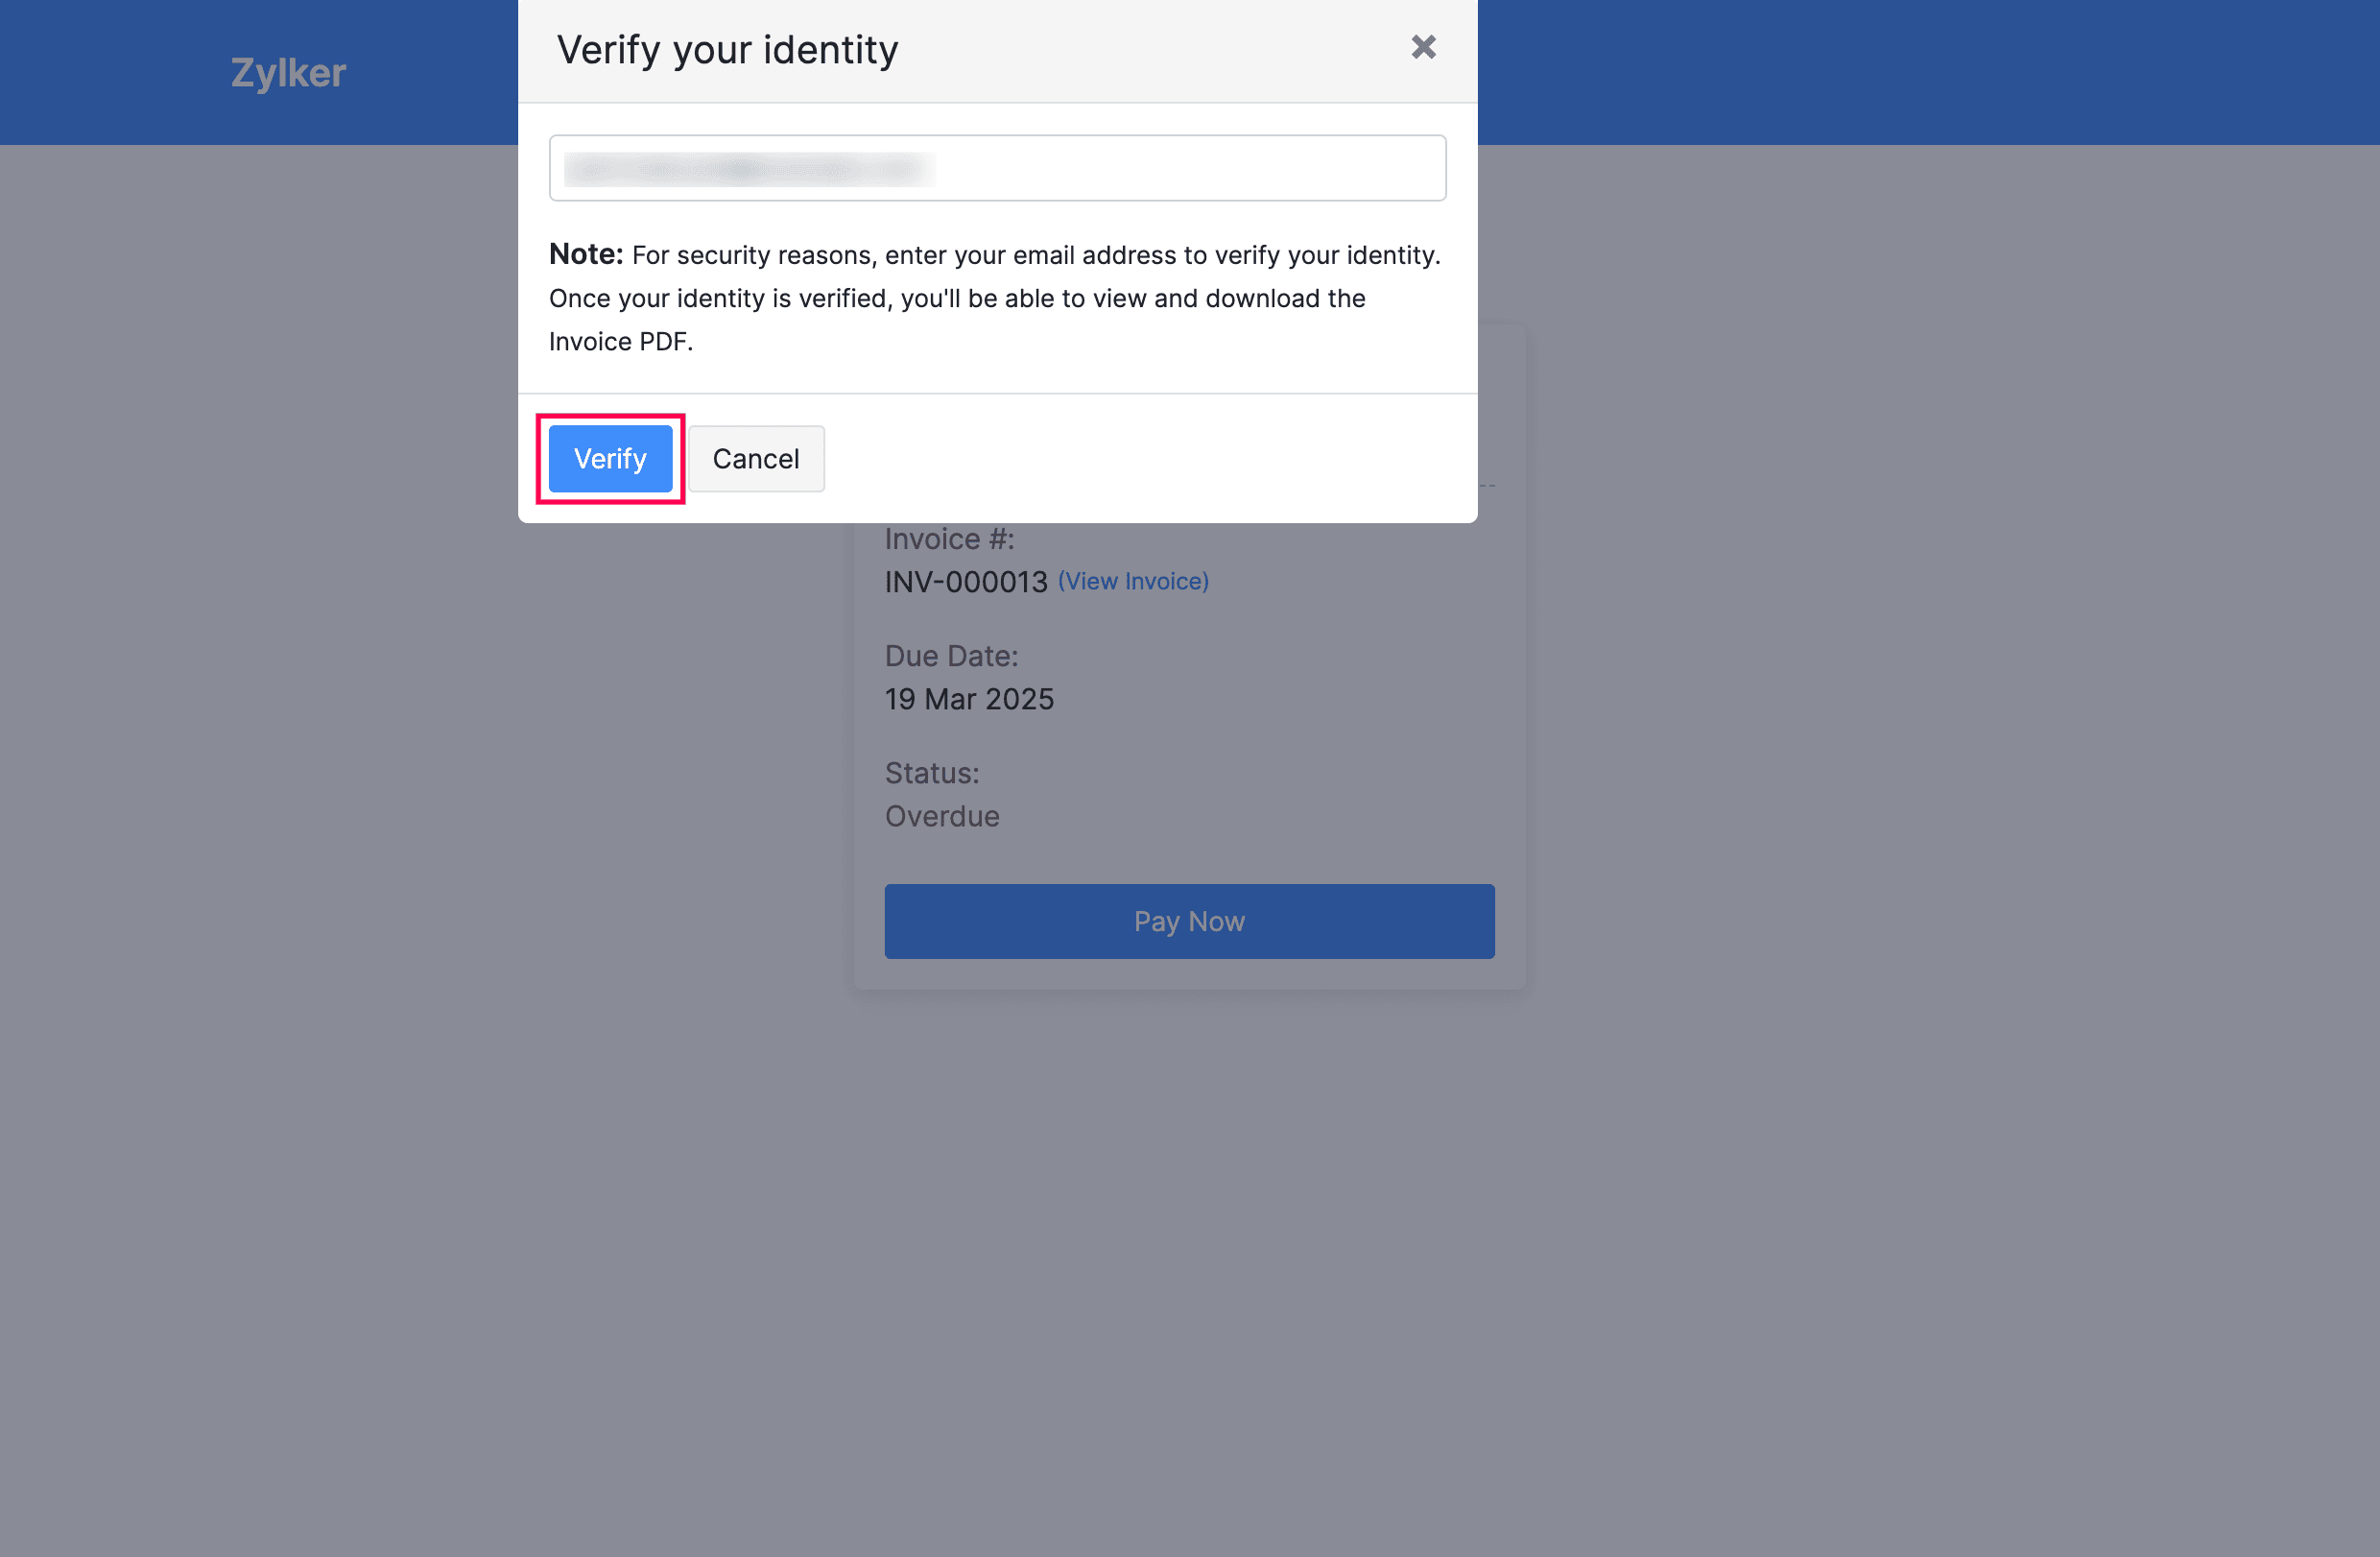
- In the Verify your identity popup, the customer must enter the email address associated with the business or their contact person’s email, and click Verify.
Once verified, view the full invoice, review the details, and click Pay Now.
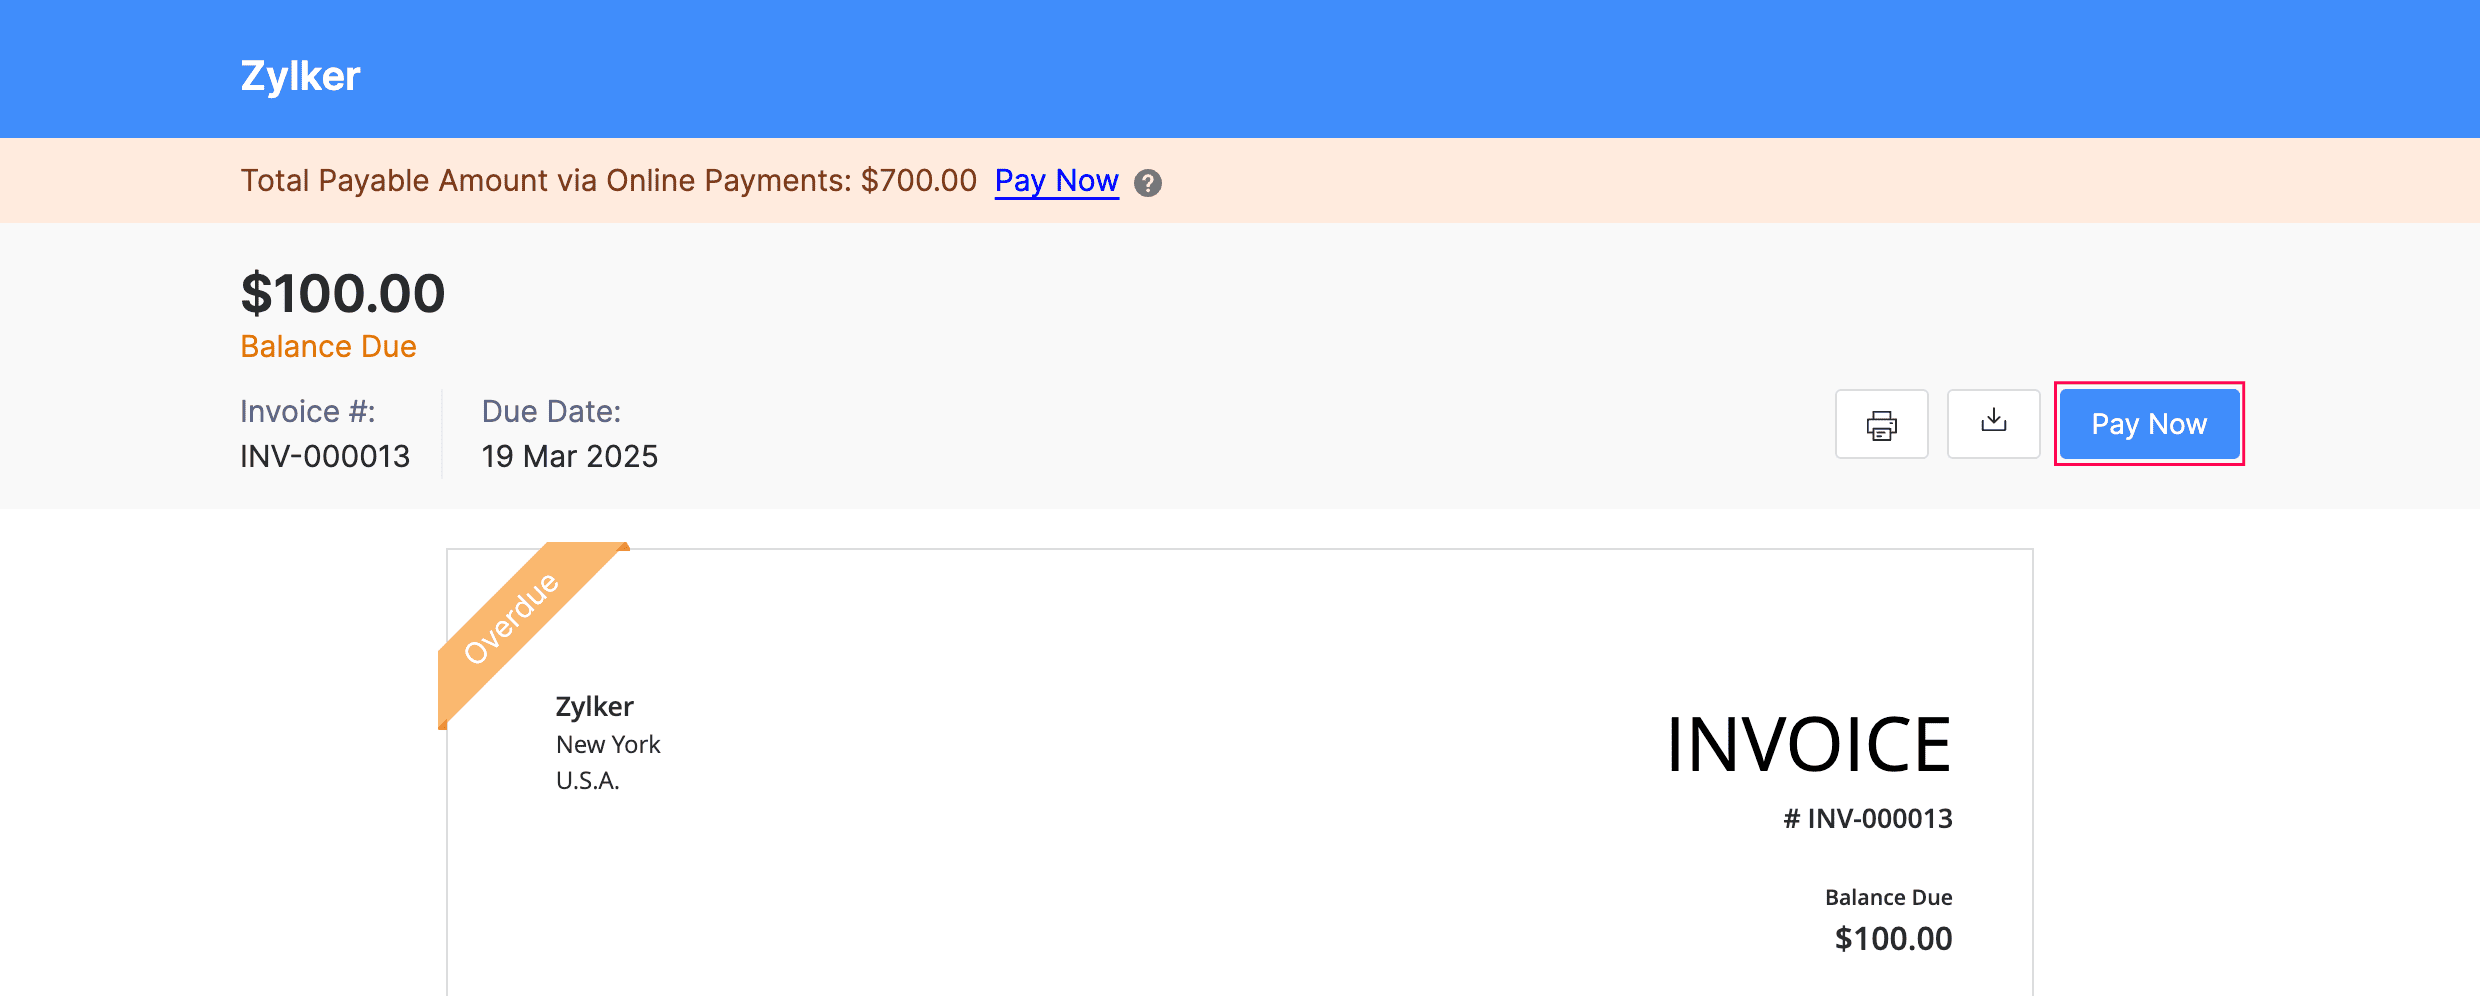
Now, the customers can securely respond to the invoice based on their preference.
Print Invoice
To print an invoice in Zoho Books:
- Go to Sales > Invoices and select that which you want to print.
- Click the PDF/Print dropdown and select Print.
- Check the invoice preview and click Print.

Additional Charges
In Zoho books, you have the option to add two additional charges:
- Shipping Charges
- Adjustment
To configure these charges:
- Go to Settings on the top right corner of the page.
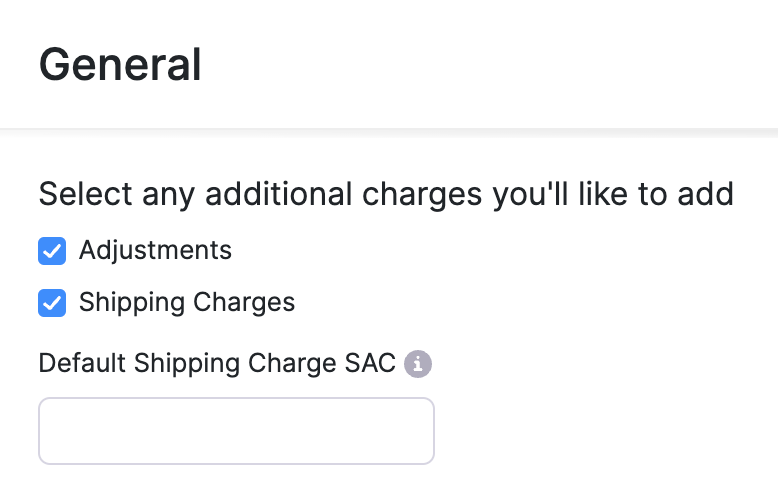
- Select General under Preferences.
- Scroll down to Select additional charges you’ll like to add.
- Mark the box Shipping Charges and Adjustments as per your requirement.
- Click Save at the bottom of the page.
Now, you will find these fields in the transactions below the item table.
Note: Shipping Charges and Adjustments won’t be displayed in Retainer Invoices and Payments Received.
Discounts
Discounts can be applied on two levels in Zoho Books:
- Item level - Discount is applied individually on each item in a transaction.
- Invoice level - Discount is applied on the total amount of the invoice.
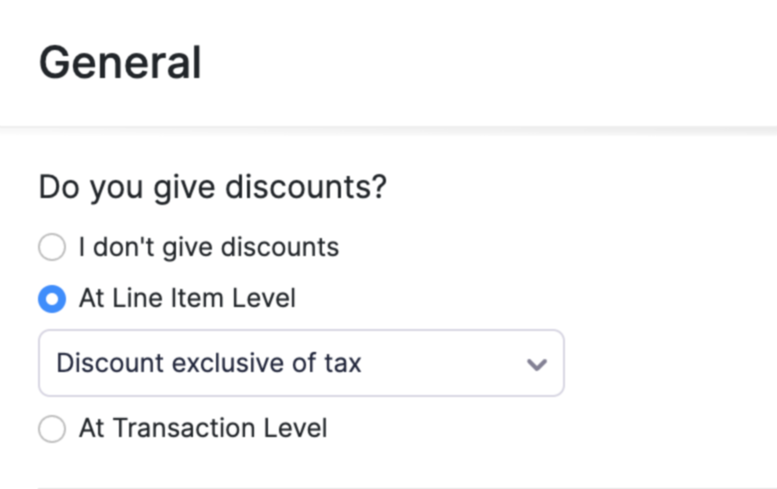
To configure the discount preferences in Zoho Books:
- Go to Settings on the top right corner of the page.
- Select General under Preferences.
- Scroll down to the Do you give discounts? section.
- Select At line item level for item level discounts or At invoice level for invoice level discount.
- Select I don’t give discounts if you don’t wish to give discounts in any of your transactions.
- Click Save at the bottom of the page.
Clone Invoice
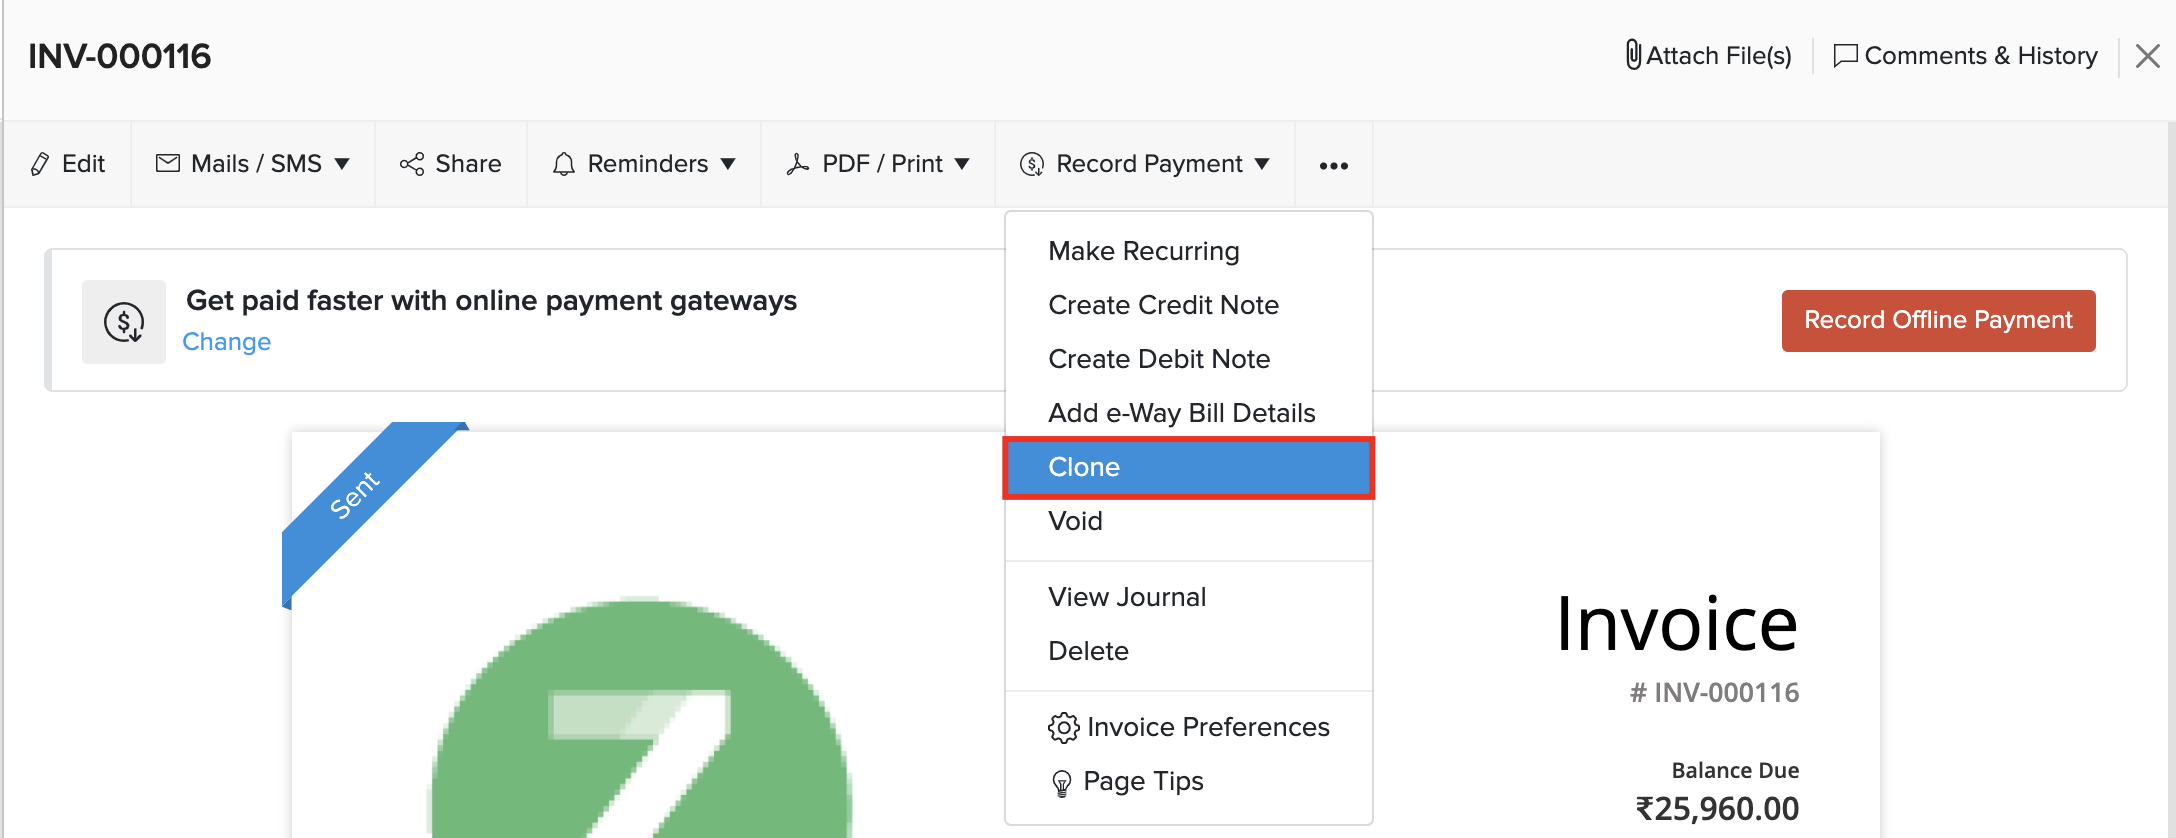
If you want to create an invoice with the same details as an existing one, you can choose to clone it rather than create a new invoice. Here’s how:
- Go to Sales > Invoices and select the invoice to clone.
- Click ••• and select Clone.
- Make necessary changes in the New Invoice page.
- Click Save to create a new cloned invoice.
Attach Files To Invoice
You can attach up to 5 files of 5MB each to an invoice. To attach files to an invoice:
- Go to Sales > Invoices and select the invoice for which you want to attach the file(s).
- Click Attach File(s) on the top right corner of the page.
- Select your upload option.

| Upload options | Description |
|---|---|
| Drag & Drop | Upload files from your device. |
| Cloud | Upload files from your cloud account. |
| Documents | Upload files from documents saved in your Zoho Books account. |
You can Download, Delete or Remove the files by clicking the options below the uploaded files.
Note: If you Delete a file, it will be permanently deleted from your account. If you Remove a file, it will be removed from the transaction but will still be present in your documents tab.

Void Invoice
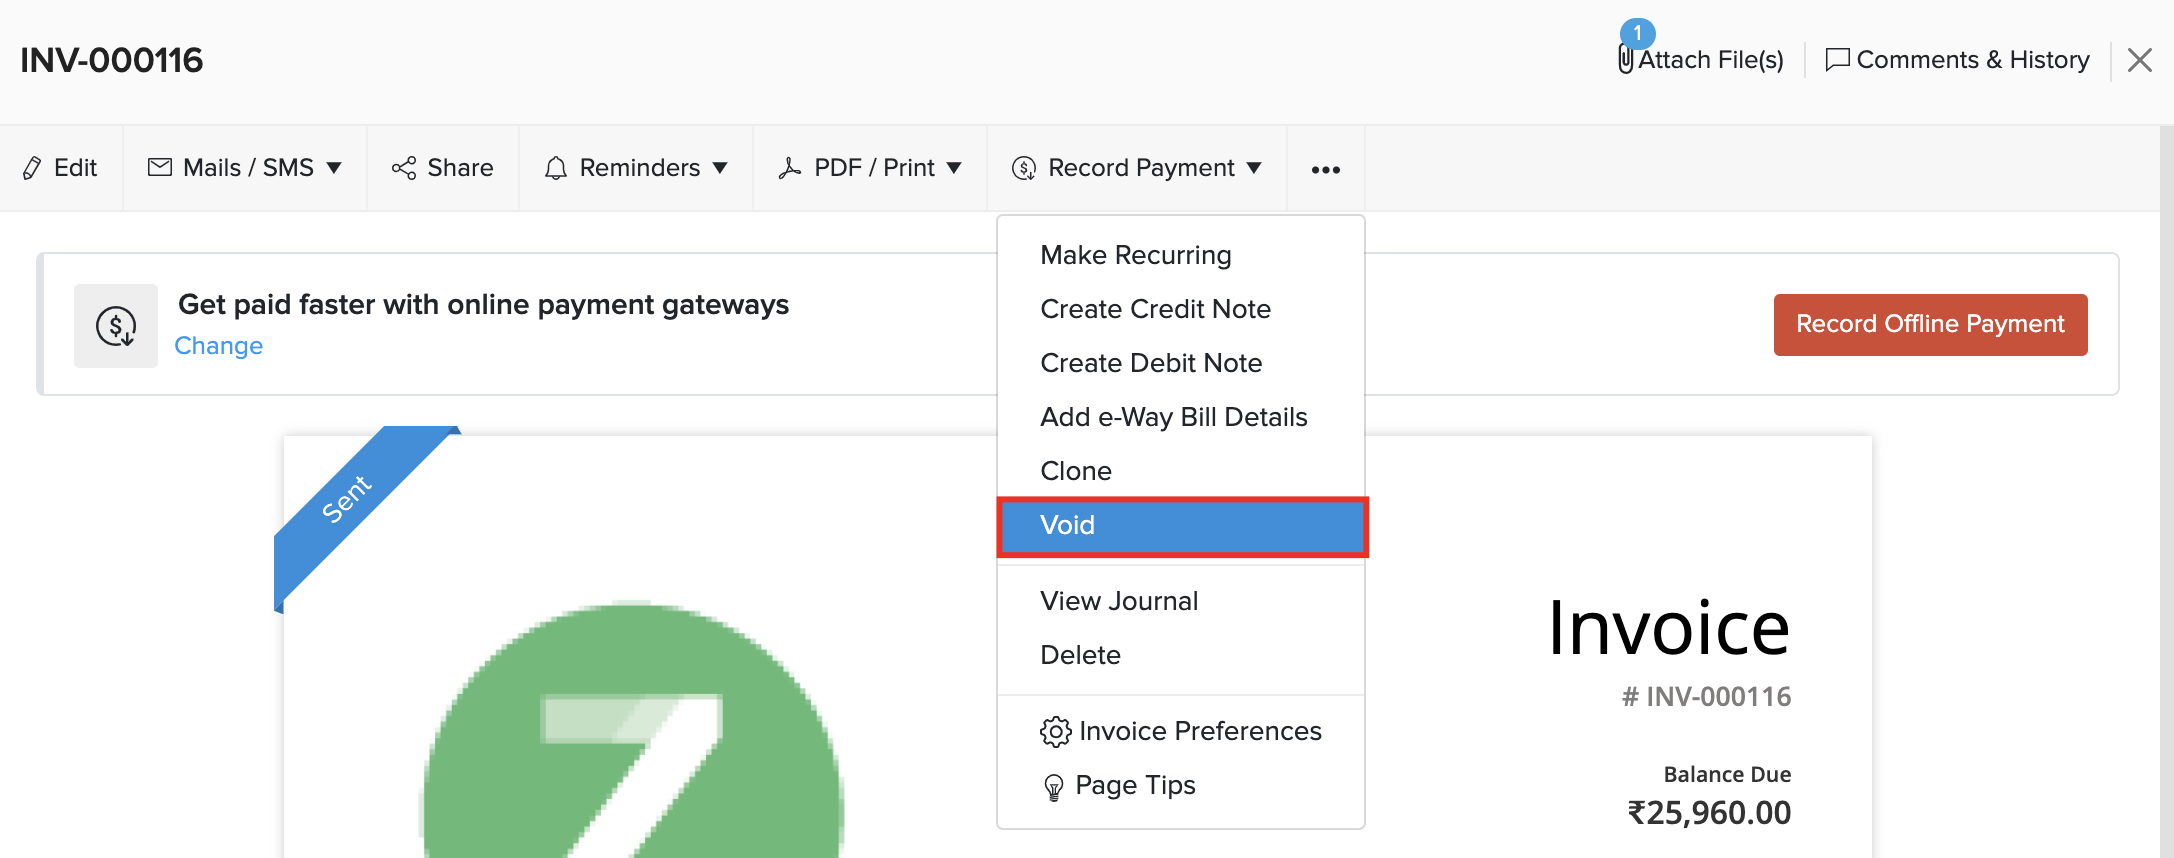
Once you void an invoice, it will not reflect on any of your sales transactions or reports. To void an invoice:
- Go to Sales > Invoices and select the invoice to void.
- Click on ••• and select Void.
- Enter a reason and click Void it.
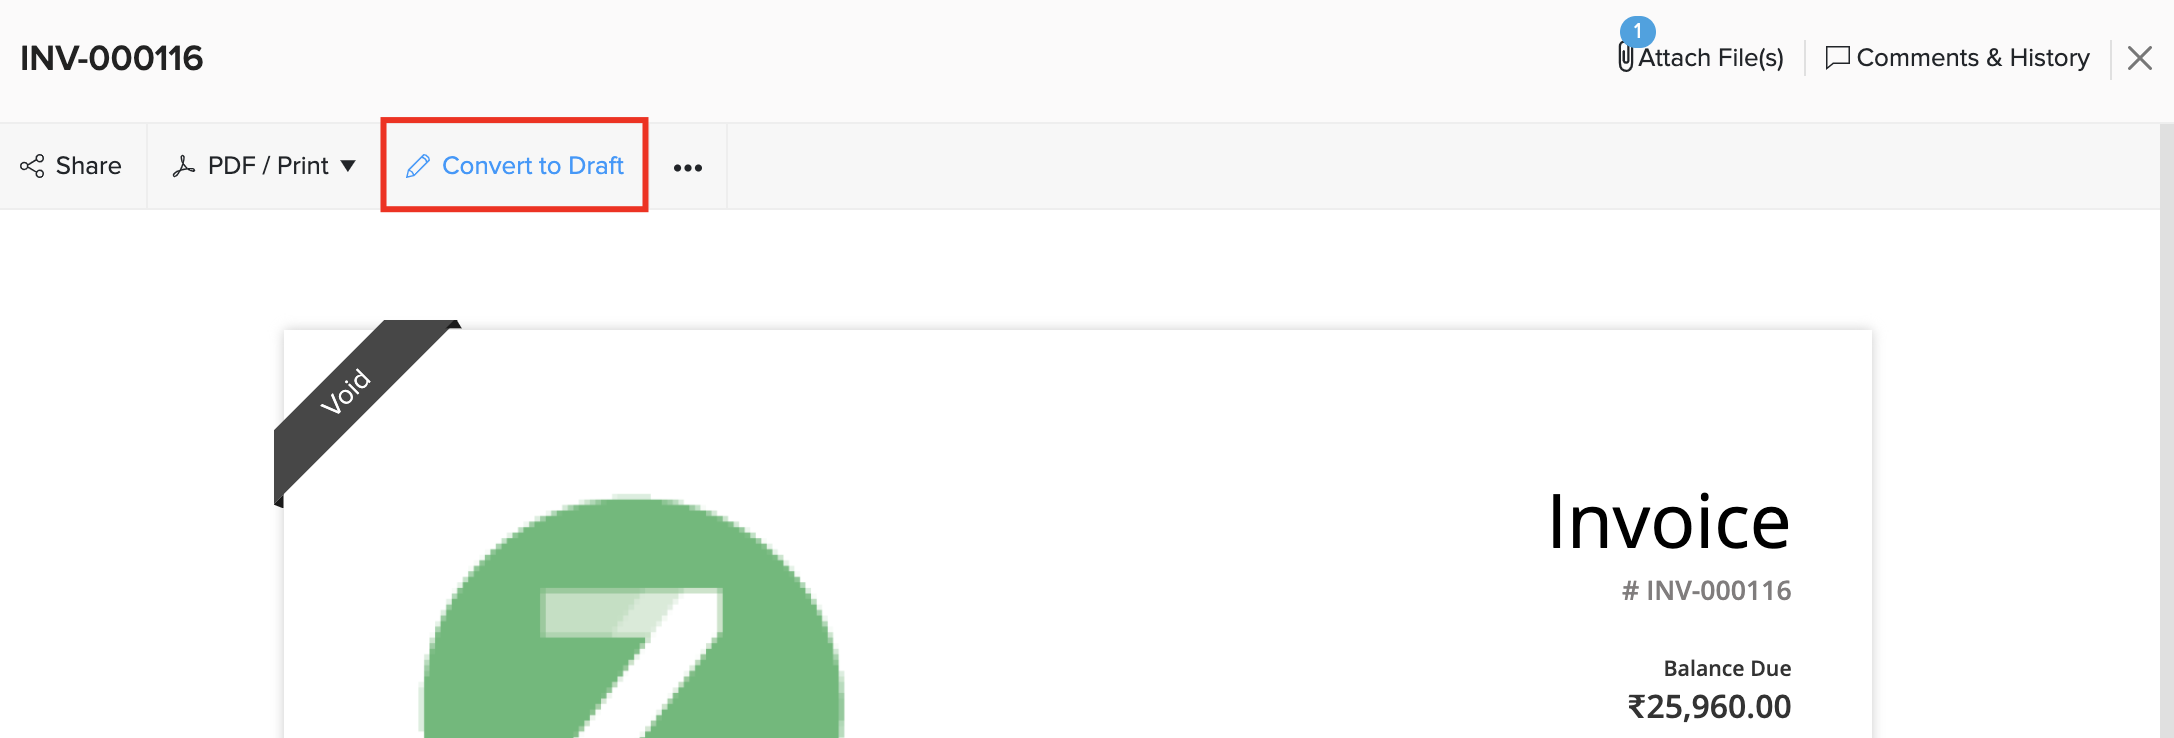
In case you want to make the invoice valid again, you can mark it as active. This is a better alternative to deleting an invoice permanently, letting you retain any information in the invoice.
To make an invoice active:
- Go to Sales > Invoices and select the invoice which is in the Void status.
- Click Convert to Draft.
- Enter a reason and click Convert to Draft.
Write Off Invoice
When your customer doesn’t pay you for an invoice and all attempts at making them pay has failed, you can write it off. The amount of the invoice that you write-off will reflect on the Bad Debt account in the reports.
To write-off an invoice:
- Go to Sales > Invoices.
- Select the invoice you want to write off.
- Click Record Payment > Write Off.

- Enter the Reason for the write off.
- Click Write it off.
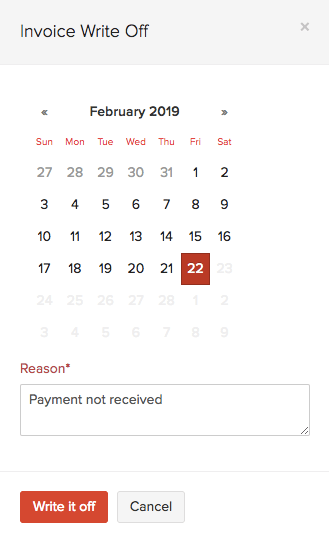
If you want to revert the write off, click the Cancel Write Off button in the top right corner of the page.

Export Invoices
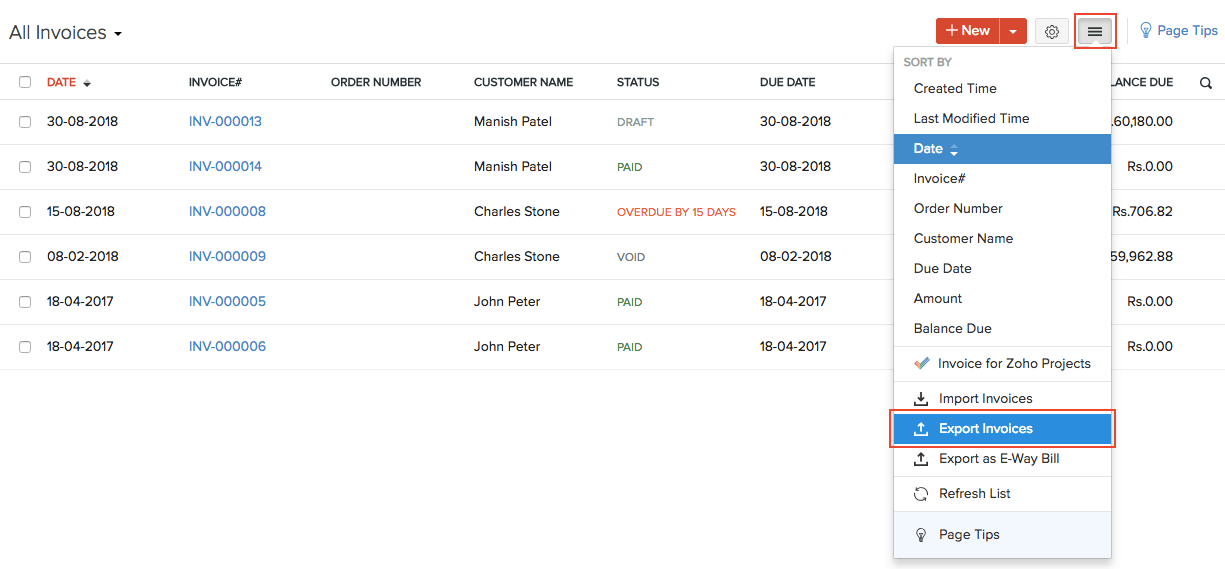
You can export all your invoices to your system in CSV, XLS, or XLSX formats. Here’s how:
- Go to Sales > Invoices.
- Click the More icon in the top right corner of the page.
- Select Export Invoices.
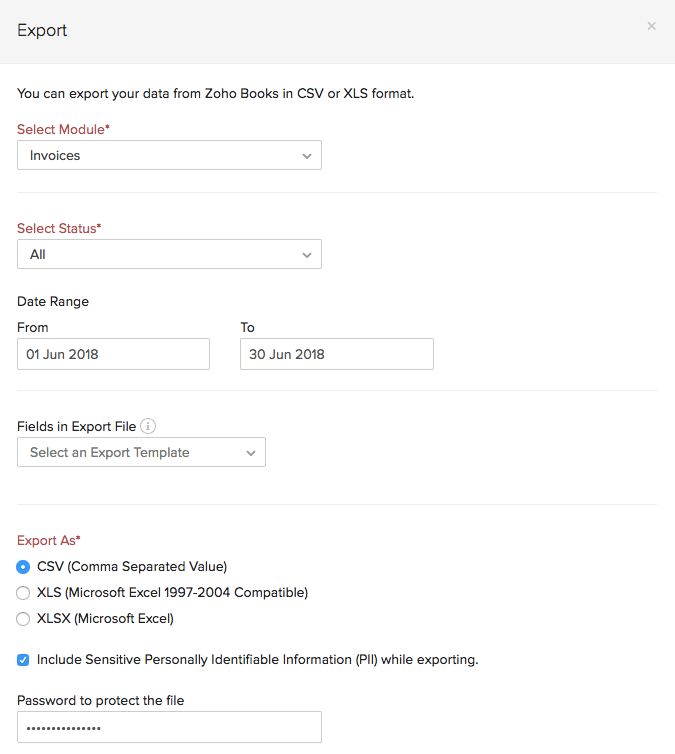
Fill in the following fields:
| Fields | Description |
|---|---|
| Select Status | By default, all invoices will be exported. If you want to export invoices based on their status, you can select the status here. |
| Date Range | Select a From and To date between which you want to export the invoices. This will filter all Invoice with the invoice date in between the from and to dates. |
| Fields in Export File | If you want to export only certain fields, you can select a template under Fields in Export File. If you don’t have an export template, you can create a new template by clicking + Add New. |
| Export As | Select the format of your export |
| Personally Identifyable Information (PII) | If you want to export the PII along with the export file, mark the Include Sensitive Personally Identifiable Information (PII) while exporting option. The PII fields such as your customer’s address, email address, phone number, bank account number, and any sensitive custom field will be included in the export file. |
| Password | Enter a password to secure your export file. |
- Click Export.
Bulk Update Invoices
If you need to update a specific field in multiple invoices at once, you can use the bulk update option. To update in bulk:
- Go to Sales on the left sidebar, and select Invoices.
- Select the invoices you want to update.
- Click Bulk Update at the top of the page.
- In the Bulk Update Invoices popup, choose the field you want to update from the dropdown and enter the new information.
- Click Update.
Now, the selected invoices will be updated with the new information.
Download Invoices in Bulk as a PDF File
You can download the selected invoices as a PDF file, with each invoice on a separate page. To download:
- Log in to your Zoho Books organization.
- Go to Sales on the left sidebar, and select Invoices.
- Select the invoices you want to download in bulk.
- Click the PDF icon at the top of the page.
Now, the selected invoices will be downloaded onto your device as a PDF file, with each invoice as a separate page.
Download Invoices in Bulk as a ZIP File
You can download the selected invoices as a ZIP file, which will contain individual PDFs of each invoice. To download:
- Go to Sales on the left sidebar, and select Invoices.
- Select the invoices you want to download in bulk.
- Click the ZIP icon at the top of the page.
Now, the selected invoices will be downloaded onto your device as a ZIP file containing individual PDFs of each invoice.
Next >
Troubleshooting


 Yes
Yes